Description #
This unit is intended for training of undergraduate, clerkship, and first year of the core residency program in order to learn the practical aspects of Wound Management as well as the methods of Hemostasis and Local Anesthesia.
• Learning Objectives
At the end of this unit, students should be able to:
1) Perform Local Anesthesia by Infiltration, Field block, and Nerve block
2) Maintain the temporary and permanent Hemostasis
3) Perform the Basic technique for Wound Repair, Including Debridement, the Closure by primary and secondary intent
Overview #
Management of surgical wounds requires an intimate knowledge of wound healing and the factors which affect the healing process, local anesthetics, and surgical techniques. This chapter will discuss only surgical principles and techniques used for wound management, including local anesthesia, hemostasis, tissue dissection, debridement, sewing, and repair, as well as cutting and removing sutures.
Contents #
Local Anesthesia
Infiltration
Field Block
Nerve Block
Hemostasis
Temporary Methods of Homeostasis
Permanent Methods of Homeostasis
Tissue Dissection Techniques
Sharp Dissection
Blunt Dissection
Combined Sharp and Blunt Dissection
Basic Technique for Wound Repair
Closure by Primary Intent
Closure by Secondary Intent
Closure by Tertiary Intent
Debridement
Principles of Sewing and Repair
Wound Suturing Techniques
Interrupted Sutures
Continuous Sutures
Cutting Stones
Removing Sutures
Local Anesthesia #
Local Anesthesia
Local anesthesia is performed with anesthetic solutions such as xylocaine, lidocaine, marcaine, and others. There are three basic techniques for local anesthesia: infiltration, field block, and nerve block.
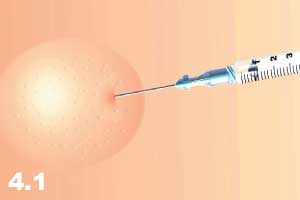
Infiltration
In this technique, 0.5 – 1% xylocaine is injected throughout the area where the operation is planned. A 25 gauge needle (1/2 inch) is used first to raise a skin wheal (Figure 4.1). The underlying layers of tissue are then infiltrated with the use of a larger, longer needle (22 gauge, 1-1/2 inch).
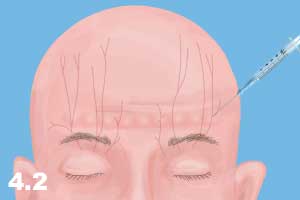
Field Block
With this type of anesthesia, the field of surgery is blocked by infiltration of xylocaine (0.5-1%) around the area of operation (Figure 4.2). This technique is not used frequently.
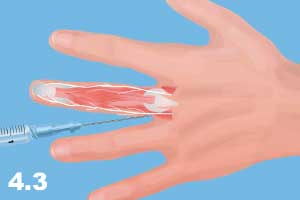
Nerve Block
A nerve block includes the infiltration of local anesthesia around the nerve, in order to provide anesthesia in the distribution of that nerve, e.g. digital nerve block to repair finger lacerations (Figure 4.3). The intercostal nerve block is used for the management of pain due to chest trauma, intercostal neuralgia or for postoperative pain management after thoracic surgery (Figure 4.4).
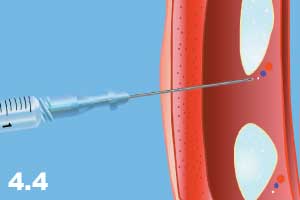
Nerve blocks can be performed with higher concentrations of xylocaine (1-2%) or marcaine (2%).
Technique for the performance of a nerve block:
a) Formation of skin wheal with 25 gauge needle.
b) Insertion of a longer needle through the wheal to the targeted nerve. When the needle reaches the nerve, the patient feels paresthesia along with the nerve distribution. At this point, the needle is withdrawn 2-3 mm.
c) Aspirate the needle to make sure that the needle is not in a blood vessel.
d) Inject 2-5 ml of 1-2% solution in the area surrounding the nerve.
Hemostasis #
Hemostasis
This is the process of stopping or preventing the flow of blood from incised, transected or otherwise traumatized blood vessels.
Hemostasis techniques can be subdivided into the following major categories:
1) Temporary Hemostasis
2) Permanent Hemostasis
Temporary Methods of Hemostasis
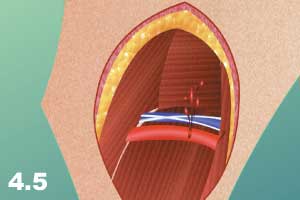
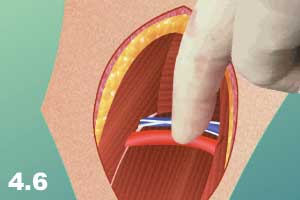
Temporary methods of hemostasis include interruption of blood flow from the bleeding point by temporary measures. The following are basic techniques commonly used for this purpose:
a) Digital pressure on the bleeding point (Figures 4.5 -4.6)
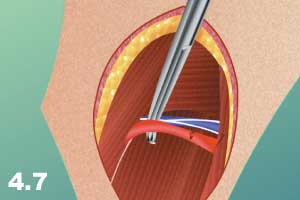
b) Pressing the supplying vessel proximally (for arteries) or distally (for veins) to the bleeding point (Figure 4.7).
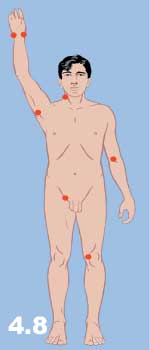
c) Pressing the major arteries to the bone proximal to the bleeding area using pressure points: axilla, antecubital space, wrist, groin, and popliteal space. The carotid artery can be pressed to the processus transversus of C4 vertebrae (Figure 4.8).
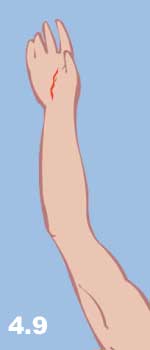
d) Elevating the extremity upwards (Figure 4.9).
e) Applying a tourniquet (Figure 4.10).
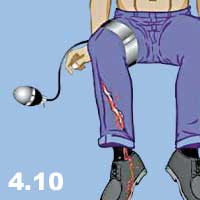
NB: A tourniquet should be applied tightly and should not be kept for more than two hours. The tourniquet should be released every 20 minutes, for 1-2 minutes, and then re-applied.
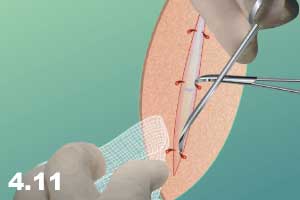
f) Applying a clamp or forceps onto the artery (Figure 4.11).
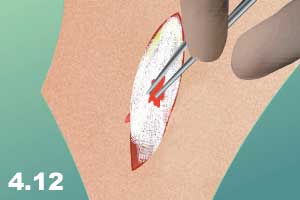
g) Applying a biological, chemical or physical tamponade (Figure 4.12).
Permanent Methods of Hemostasis #
Permanent Methods of Hemostasis
Permanent methods of hemostasis include interruption of blood flow from the bleeding point by permanent measures.
The following are basic techniques commonly used for permanent hemostasis:
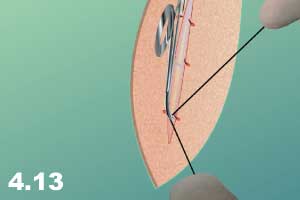
a) Ligation of the artery (Figure 4.13).
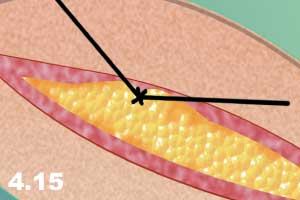
b) Tying the artery with the surrounding tissue into a figure 8 (Figure 4.14 – 4.15).

c) Sewing the lacerated or cut artery (Figure 4.16).

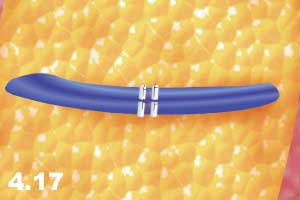
d) Application of biological or synthetic hemostatic material such as Surgicel, Gelfoam, pledgets or a piece of fat in order to seal a small laceration that may occur at the needlepoint in areas with soft tissue and high pressure (Figure 4.17).
e) Electro-coagulation of the bleeding points with a cautery (Figure 4.18).

f) Clipping. Permanent hemostasis can also be achieved with the application of clips. The proximal side of the artery is clipped twice and the distal part requires one clip. Clips should be applied on a dissected and well-exposed artery. When the proximal and distal ends of the artery are clipped, only then can it be transacted between the clips (Figure 4.19).

Hemostasis can also be classified by factors that are utilized to stop bleeding:
a) Physical, Use of physical factors such as digital pressure applied to the bleeding points or proximal to the bleeding points is frequently used for hemostasis. The Pringle maneuver is a classic example of applying pressure proximal to the bleeding point (hepatic artery and portal vein in the hepatoduodenal ligament are clamped with non-crushing hemostatic forceps to control bleeding from the liver). Also used are a tourniquet application and a bandage with pressure.
b) Temperature. Vasoconstriction by cooling temperatures and coagulation of bleeding vessels by high temperatures are classic examples of the use of temperature as a factor in hemostasis.
c) Chemical Agents. The use of vasoconstrictive agents and local hemostatic pads such as Surgicel are examples of chemical hemostasis.
d) Biological Agents. Materials such as platelets, fresh frozen plasma, and autogenous tissue are often used for hemostasis in surgery.
The most important technique of hemostasis, frequently used during surgical procedures, is the application of hemostatic clamps with subsequent ligation, suturing, or coagulation of the blood vessel. The most commonly used hemostatic clamping techniques are as follows:
a) Hemostatic clamp applied at a bleeding point (Figure 4.20).
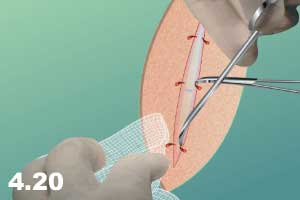
Steps for tying the bleeding point:
• The assistant holds the clamp upward at a 90º angle to the surgical plane, while the surgeon passes the suture from under the clamp and around the clamp (Figure 4.21).
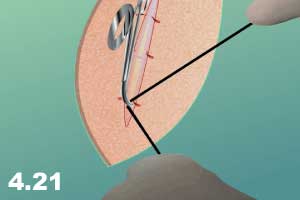
• The assistant should show the end of the clamp to the surgeon by moving the clamp downward (parallel to the surgical plane) and to the side.
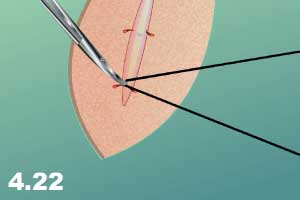
• Tie-down with a simple knot (Figure 4.22).
• When the first knot is tightly in place, the clamp can be removed slowly while further tightening the knot (Figure 4.23).
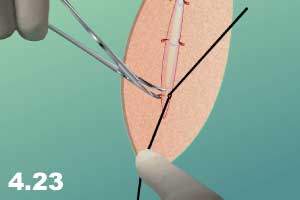
• Apply subsequent knots and make sure that the knots are squared and are not less than three.
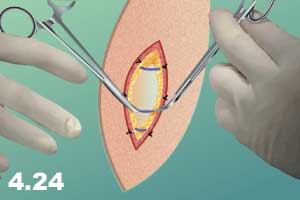
b) Hemostatic clamp applied before cutting the blood vessel.
Sometimes the knowledge of anatomy or visual observation of blood vessels gives the surgeon a chance to prevent bleeding by applying clamps before cutting the vessel.
This technique includes the following steps:
• Isolate and dissect the tissue around the blood vessel and clamp the vessel proximally and distally (Figure 4.24).
• Cut the blood vessel (Figure 4.25).
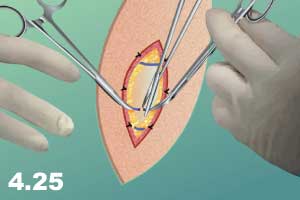
• Tie the vessel with a ligature as described above.
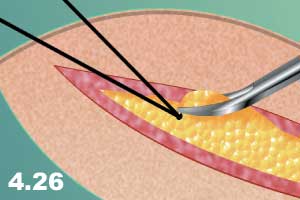
c) Sometimes the tissue is too thick or the endpoint of the clamp is not visible. In this case, the blood vessel can be sewn as follows:
• Place a suture under and close to the end of the clamp.
• Tie the end with a simple knot without taking the clamp out (Figure 4.26).
• Pass the tie from under the clamp (Figure 4.27).
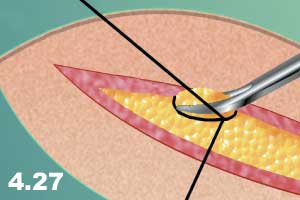
• Tie down the entire tissue with the slow removal of the clamp.
d) Sometimes it is difficult to control the bleeding point with a clamp because the elastic properties of cut arteries shorten, causing them to disappear in the tissue. Once the clamp is applied it is impossible for the operator to bring the tie around the blood vessel. In this case, a technique called “figure 8” suture ligation is used.
e) Applying two hemostatic clamps to a blood vessel before dividing may be traumatic and cause bleeding, especially from small fragile blood vessels. “Tying in continuity” consists of passing two ties under the dissected vessel and tying prior to cutting. This is the least traumatic method of hemostasis.
NB: Important rules for hemostasis:
• Do not panic.
• Use a temporary method to stop bleeding, i.e. applying pressure with fingers or gauze.
• A hard hemostat must not be applied blindly as it can cause more damage. Remember that every artery is accompanied by veins and nerves. Crushing the artery, vein or nerve is not a solution.
• Request appropriate soft clamps and other instruments.
• Expose the blood vessel proximally and distally.
• Apply the soft clamps and repair the blood vessel.
• If the situation becomes difficult, apply an appropriate temporary method and ask for help.
Tissue Dissection Techniques #
Cutting, slicing, separating and isolating the tissue is called dissection. Tissue dissection techniques are used by surgeons to separate tissue planes or layers, and to isolate target structures for surgical manipulation. These techniques help reach organs, tissue structures such as tumors, anatomical landmarks and foreign bodies located in the depths of the tissue. These techniques are used consistently by surgeons in many operations.
Tissue dissection techniques can be subdivided into the following main categories:
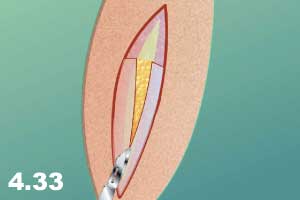
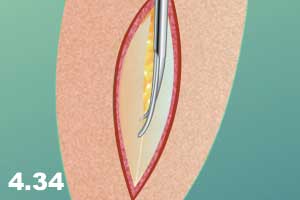
Sharp Dissection
Tissue or certain planes can be cut simply with a sharp instrument. Sharp dissection is performed mainly with a scalpel (Figure 4.33) or scissors (Figure 4.34).
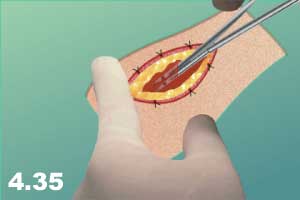
Blunt Dissection
Separation of tissue or layers and planes of tissue by pressure without cutting is called blunt dissection. Blunt dissection can be performed with instruments such as scissors or by the fingers (Figure 4.35).
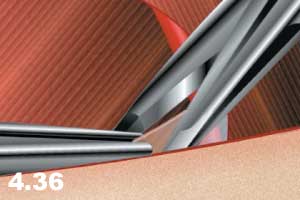
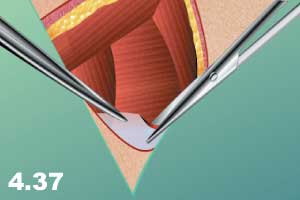
Combined Sharp and Blunt Dissection
Combined sharp and blunt dissection can also be performed with sharp instruments by cutting while pushing the instrument toward the desired direction (Figure 4.36-4.37).
All these techniques can be performed with an electrocautery. In extensive surgical procedures, dissection with electrocautery is preferred due to the capacity of the instrument to cut and coagulate at the same time. This facilitates dissection with simultaneous hemostasis.
Undermining is a dissection technique used mostly for approximation of skin defects. The tissue is dissected under the skin flap in order to make the skin more flexible for approximation (Figure 4.38).

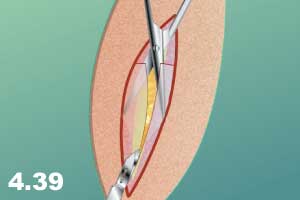
Another useful technique is the use of instruments, such as scissors or a clamp, under the target tissue aimed for cutting so that the target tissue can be elevated in order to protect the underlying vital tissue from unnecessary trauma (Figure 4.39).
Basic Technique for Wound Repair #
Basic Technique for Wound Repair
Wound closure is subdivided into three categories:
Closure by Primary Intent
The wound is closed in 8-12 hours for extremities and 24 hours for facial lacerations
Closure by Secondary Intent
The wound is not closed and allowed to granulate on its own without surgical closure
Closure by Tertiary Intent (also called Delayed Primary Closure)
The wound is initially left open to granulate, and then is sutured, usually 3-4 days later.
Debridement
Debridement is a technique used for repair of laceration and non-sterile wounds.
Steps:
a) infiltration of local anesthesia (for small wounds) (Figure 4.40).

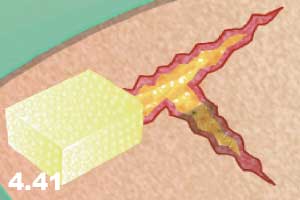
b) washing the wound with saline for me chanical cleaning of dirt, debris or other foreign bodies (Figure 4.41).
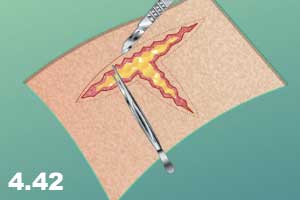
c) if this is not sufficient, about 1 mm of the wound edge should be trimmed (Figure 4.42).
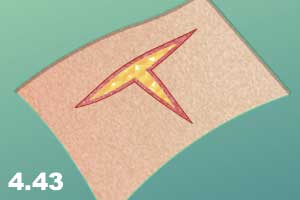
d) ensure the excision evens the edges of the wound (Figure 4.43).
e) ensure all the necrotic or severely damaged tissue is removed.
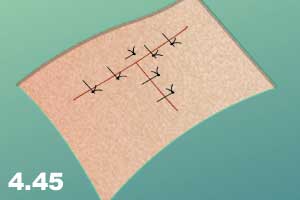
f) the clean (free of foreign bodies and necrotic tissue), even edges of the wound are sewn together (Figure 4.44 – 4.45).

Principles of Sewing and Repair #
Principles of Sewing and Repair
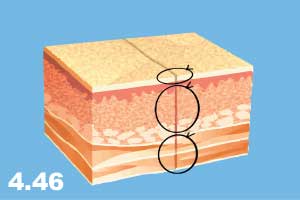
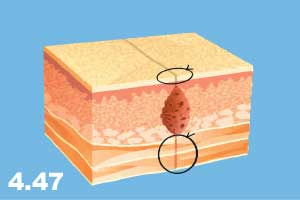
a) the wound should be approximated to eliminate any dead space or empty pockets (Figure 4.46 – 4.47).
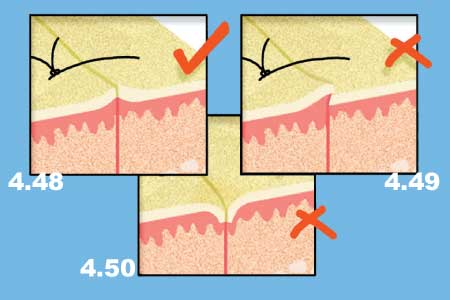
b) the edges of the wound should be everted, not inverted or overlapped (Figures 4.48 – 4.50).
c) it may be necessary to extend the end of the wound to make the wound more flexible.
d) in a case where the edges of the wound are difficult to bring together and the maneuver creates a great deal of tension, use the undermining technique.
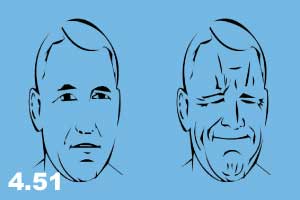
NB: Skin tension lines must be taken into consideration. This is found by pressing the skin in the area between the index finger and the thumb, or movement of the skin in the area of concern (Figure 4.51).
Wound Suturing Techniques #
Wound Suturing Techniques
In this section, only the basic skin closure techniques are described. Special suturing techniques are discussed elsewhere. Basically, suturing techniques are divided into interrupted and continuous sutures.
Interrupted Sutures
With this technique, each suture is independent; that is, tied separately after the completion of each individual suture. The most commonly used interrupted sutures are:
- Simple Interrupted Suture
- Vertical Mattress Suture
- Horizontal Mattress Suture
- Inverted Interrupted Suture
- Semi-Mattress Suture
Continous Sutures
In this technique, approximation of the edges of the wound is achieved by continuous placement of the sutures without tying and cutting the suture material. Continuous sutures have certain advantages over interrupted sutures.
a) can be completed faster and therefore have a time-saving effect.
b) are able to adjust and accommodate postoperative edema of the wound edges.
The major advantage is that the integrity of the wound is in jeopardy if one of the sutures is cut off.
Continuous sutures can be divided into:
- Simple Continuous Suture
- Interlocking Continuous Suture
- Horizontal Mattress Continous Suture
Simple Interrupted Sutures #
Interrupted Sutures
With this technique, each suture is independent; that is, tied separately after the completion of each individual suture. The most commonly used interrupted sutures are:
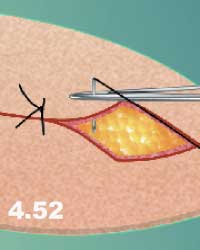
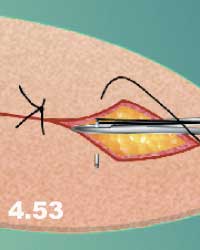
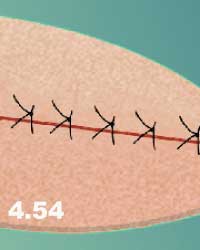
a) Simple Interrupted Suture (Figures 4.52 – 4.54).
This is the most commonly used interrupted suture. With this technique, equal bites of tissue should be taken on each side of the wound. The distance between the edge of the wound and the needle puncture can vary depending on the thickness of skin, however, a distance of 0.5 cm from the edge of the wound and between the sutures is usually sufficient to properly close the wound. Several layers of interrupted sutures may be required for proper repair, depending on the depth of the wound. For example, for repair of a wound that has reached the muscles, the first suture layer is placed in the muscle sheath, the second in the superficial fascia and the third in the skin. The advantage of interrupted sutures is that in the case of loosening or removal of one suture, the integrity of the wound is held by other sutures; for example, in the case of wound infection, by removing one suture, it is possible to drain the pus and keep the rest of the wound together.
NB: It is very important for the edges of the wound to be everted after interrupted sutures are completed. If this is not achieved during suturing and tying, the edges can be everted using two pick-up forceps after the wound is closed.
Vertical Mattress Suture. #
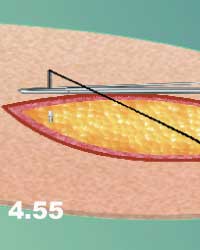
b) Vertical Mattress Suture.
Vertical mattress suture takes both deep and superficial bites in one suture.
• The first bite of this suture enters the skin further away from the edge of the wound than the simple interrupted suture (about 1.0 cm), and reaches under the superficial fascia inside the wound (Figure 4.55).
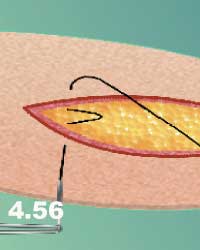
• The suture then comes out with the same distance and depth through the near side of the wound (Figure 4.56).
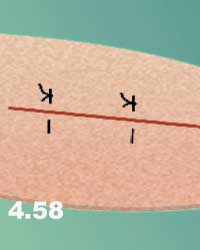
• The second bites are back-handed and pass only through the most superficial cuticular or subcuticular layers of dermis on both sides of the wound (Figure 4.57).
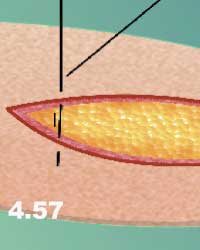
• Figure 4.58 demonstrates the completion of the vertical mattress suture. The advantage of this suture is that it covers deep wounds without leaving a “dead” space that facilitates the accumulation of fluid and predisposes the wound to infection. This suture also everts the edges of the wound providing the most optimal healing conditions for the skin.
Horizontal Mattress Suture #
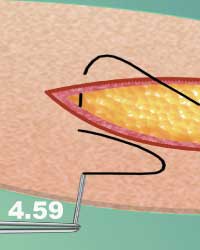
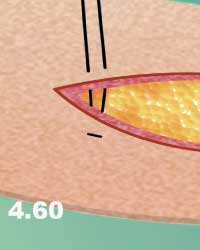
c) Horizontal Mattress Suture.
Both bites of this suture are placed horizontally, i.e. parallel to the wound edges (Figures 4.59 – 4.61).

Inverted Interrupted Suture #
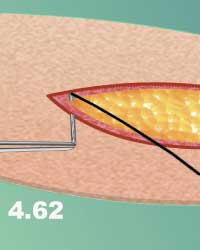
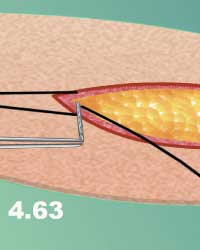
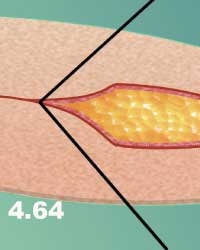
d) Inverted Interrupted Suture.
In this technique, the needle enters beneath the target layer and comes out from the top on the near side of the wound (deep to superficial). On the far side, the needle enters from the top of the target layer and comes out beneath the target layer (superficial to deep). When the suture is tied, the knots skip under the suture and they cannot be seen on the surface of the wound (i.e. the knots are buried) (Figures 4.62- 4.64). This technique is used mostly in subcutaneous closure or initiation of a continuous suture. It is also used in the closure of superficial layers such as the platysma muscle in the neck. Since large knots would be visible under the skin, this method is cosmetically unacceptable.
Semi-Mattress Suture #
e) Semi-Mattress Suture.
Semi-mattress sutures are an excellent technique used for laceration repair and/or uneven wounds with a variety of geometric forms and configurations.
• The first bite of this suture enters the skin further away from the edge of the wound as in the vertical mattress or horizontal mattress suture (Figure 4.65).

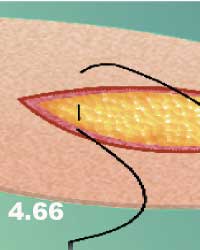
• On the near side of the wound, the suture does not go through the skin. It grabs only the subcuticular layer of the skin (Figure 4.66).
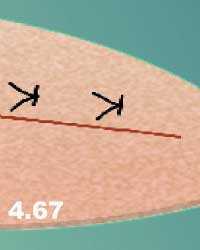
• The next bite is back-handed and passes through the dermis most superficially only on the far side of the wound (Figure 4.67). It can also come out beside the first suture as in the horizontal mattress suture.
Simple Continuous Sutures #
Continuous Sutures
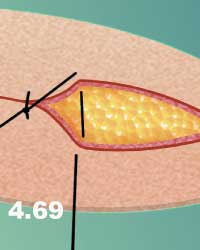
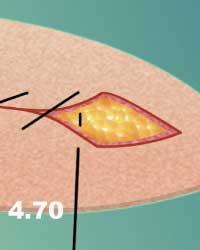
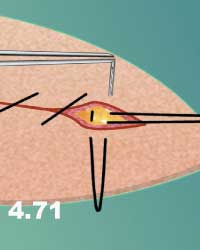
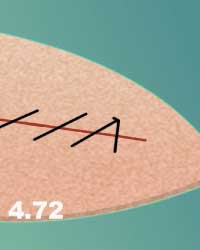
a) Simple Continuous Suture (Figure 4.68 – 4.72). The suture starts from the far edge of the wound about 0.5 cm away from the edge, entering the wound from outside in, and exiting from inside out, on the near edge of the wound. After the suture is tied, it can be continued on with the needle pathway of a 45º or a 90º angle to the wound. To end this suture, the last passage should be made about 3 mm from the corner of the wound. The needle is then passed from the same side about 2 mm apart from the last exit to the far side of the wound. The suture is then tied down with a loop left on the near side.

Interlocking Continuous Sutures #
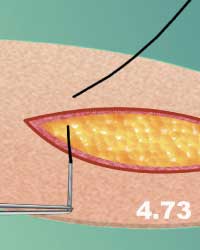
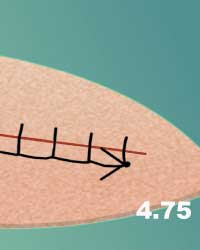
b) Interlocking Continuous Sutures. In this type of suture, the needle is passed through the loop made by the previous suture. The rest of the procedure is similar to the simple continuous suture using a needle placement of a 90º angle to the wound edges (Figure 4.73 – 4.75).

Horizontal Mattress Continoous Suture #
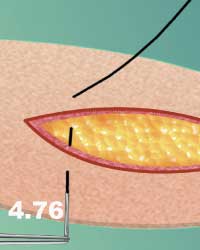
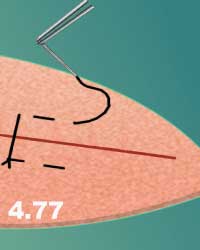
c) Horizontal Mattress Continuous Suture. This is also called continuous inverting mattress suture. This suture is similar to the interrupted horizontal mattress suture with a parallel arm to the edge of the wound. In order to accomplish this task, when the needle is passed from outside in, it should then be passed from inside out on the same side of the wound parallel to the port of entry (Figure 4.76 – 4.78).
Subcuticular Suture #
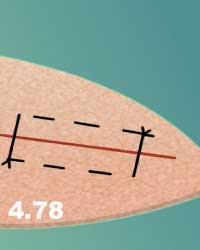
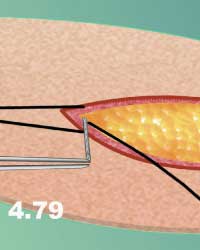
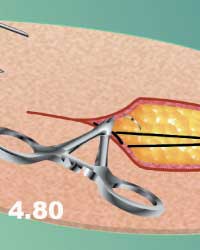
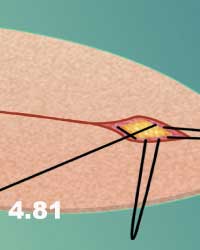
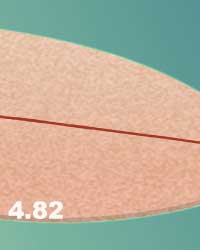
d) Subcuticular Suture. This suture gives good skin closure by approximating the subcuticular layers. It has the advantages of better cosmetic scar and better blood supplies for the healing process. The suture should be anchored at one end of the wound and then inserted into the subcuticular layers of the tissue parallel to the skin. The suture is not pulled tight until the full suture has been placed. After it has been pulled taut, the distal end is also anchored. Anchors can be outside or inside the wound. An absorbable suture with an inverted inside anchor is preferred (Figure 4.79 – 4.82).
Continuous sutures must not be used on wounds that are predisposed to infection. The disadvantage of this suture is that if it is broken in one place the entire wound will open.
NB: Do not use continuous sutures on the skin unless the wound is cut in sterile conditions and the possibility of infection from the opening of the internal organ does not exist.
Stapling #
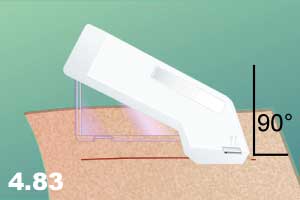
e) Stapling. The skin wound can also be closed with the use of staples. Staples are as efficient as sutures and they can be applied much faster. There are several stapling devices on the market, however, staplers with a rotating head provide better visualization of the wound. In addition to the speed of wound closure, it has been proven that the use of staples reduces wound complications such as infection in comparison to reactive surgical sutures.
Technique:
• Place the stapler perpendicular to the length of the wound at a 90º angle to the skin (Figure 4.83).
• The arrow on the cartridge should point to the incision line where the tack is placed (inset, Figure 4.84).
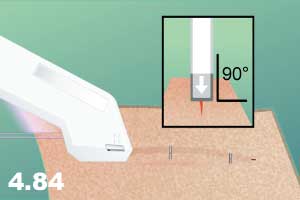
• Press the stapler to the skin firmly.
• Squeeze the handle of the loading unit completely (Figure 4.84).

• Release the handle completely.
• Reposition the stapler and repeat the procedure.
Cutting Sutures #
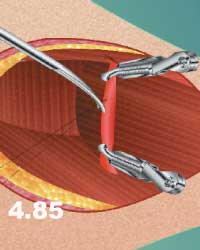
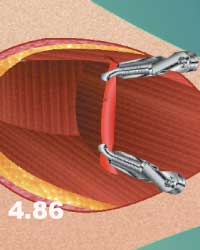
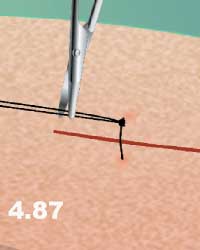
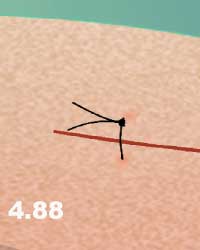
Sutures should neither be cut very close to the knots nor far away from the knots. If they are cut too close to the knot, there is the possibility of them becoming untied; if they are cut too long, an additional, undesirable foreign body will be left in the wound. Silk sutures hold knots well (do not unravel) and should be cut about 1-2 mm above the knot. In order to achieve this objective, the tip of the scissors should be pushed down to the knot and then turned to the side (Figure 4.85 – 4.86). Some synthetic materials tend to unravel and it is better to cut 4-6 mm above the knot. On the other hand, skin sutures must be left with longer ends to facilitate suture removal (Figure 4.87 – 4.88).
Removing Sutures #
Sutures can be removed in seven days for most parts of the body. However, in the face and neck they can be removed earlier (3-5 days). Retention sutures should be left longer (10-14 days).
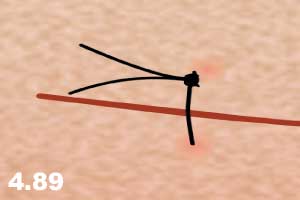
Steps:
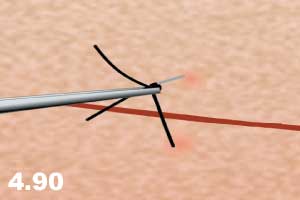
• Pick up the end of the suture above the knots with forceps (Figure 4.89).
• Pull the suture slightly up to be able to place the tip of the scissors under the suture (Figure 4.90).
• Divide the suture where it dips beneath the skin (Figure 4.91).
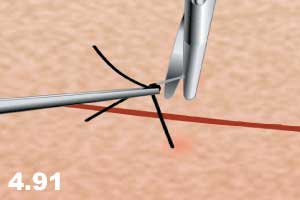
• Gently pull the suture out through the other skin orifice.