Description #
The use of bedside ultrasound by clinicians to guide invasive emergency procedures has been proven to improve success and reduce complications, and is rapidly becoming established as the standard of care.
UGEMP-Advanced provides an opportunity for physicians to acquire and maintain the skills required to perform the following procedures using Ultrasound-guidance:
- Abcess drainage
- Subcutaneous Foreign Body localization and removal
- Arthrocentesis
- Lumbar Puncture
- Paracentesis
Learning Objectives #
At the end of the course, the student should be able to know the cognitive aspects and perform the psychomotor aspects of these procedures with the use of ultrasound guidance:
- Abcess drainage
- Subcutaneous Foreign Body localization and removal
- Arthrocentesis
- Lumbar Puncture
- Paracentesis
Paracentesis #
Ultrasound Guided Paracentesis
While it may appear that a patient has a large amount of ascites on physical examination, patient factors such as obesity and organomegaly may create challenges. Ultrasound can accurately confirm the presence of ascites and guide safe drainage. It has been demonstrated that ultrasound can identify as little as 250 mL of free fluid in the peritoneal cavity, and can be of critical importance in diagnosing the cause of ascites and secondary complications such as spontaneous bacterial peritonitis. Paracentesis may also be therapeautic when massive ascites causes respiratory difficulty. Ultrasound-guided paracentesis has a 95% success rate, as compared to 65% when performed with the landmark technique. Ultrasound evaluation also reduces futile attempts in patients with little or no ascites.
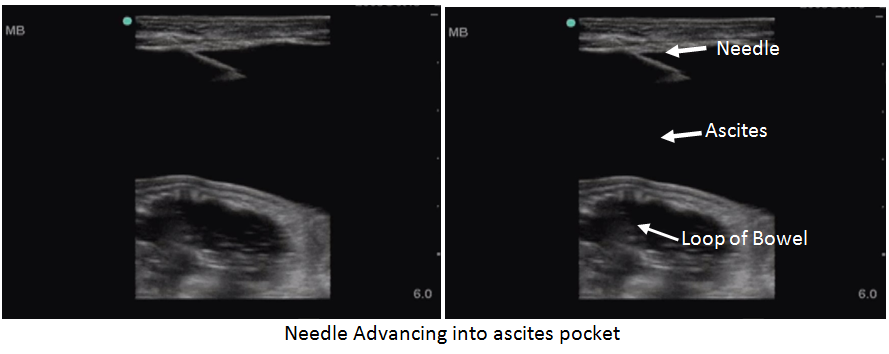
Ascites, as with all fluid, will be black when seen on ultrasound. Pre-scan to identify the largest pocket of fluid. Ensure that no bowel is in the area of the needle-path. Remember the location of the superficial epigatric vessels, which are just lateral to the umbilicus, and must be avoided.

 #
#
In order to ensure that the Epigastric Vessels are avoided, activate the Colour Doppler function and search for the superficial pulsating vessels
Colour Doppler demonstrates the Inferior Epigastric Vessels
The three windows to assess for fluid are the Right and Left lateral gutters approximaely 4-5cm superior to the iliac crest and midline between the bladder and umbilicus, as both these areas are relatively avascular.
Prior to performing any invasive procedure, appropriate lab tests such as INR, platelet count and coagulation factors should be reviewed and deficiencies corrected.
If you are looking in the pelvis for free fluid, ensure that you are NOT looking at the bladder. The bladder presents as a rectangle of fluid, while ascites will outline loops of bowel. If there is any concern or question as to bladder location, insert a foley catheter or have the patient void and re-scan the fluid collection
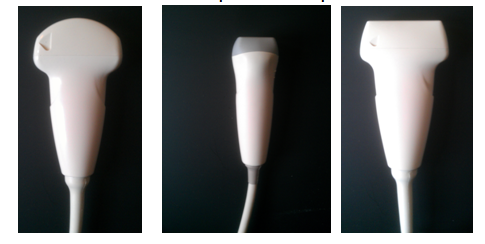
Probe Selection
Using the low frequency or curvilinear probe will provide for the best overview of the area prior to the procedure. However, once a pocket has been identified, it is possible ( depending on patient body habitus) to switch over to a high-frequency linear probe. This will ensure the highest level of safety as it allows the physician to measure the distance from the surface of the skin to the pocket of fluid and the depth of the pocket.

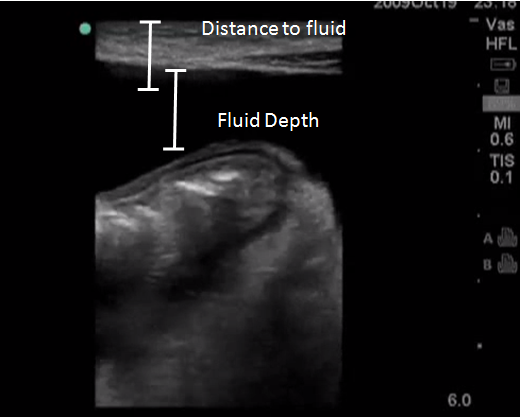
When selecting the pocket of fluid to target, it is recommended to select a pocket which is at least 2cm in depth in order to maintain a window of safety.
Preparation & Procedure
Step 1 ) Confirm the presence of fluid and the deepest pocket using a low frequency (3-5MHz Probe). You can also use a high-frequency linear probe to examine the abdominal wall and fluid.
Sept 2) Plan the best approach that will avoid loops of bowel
Step 3) Mark location for needle placement and proceed with Paracentesis
Step 4) Apply full sterile technique to reduce risk of infection.
Static Technique – position your patient; mark the puncture spot with ultrasound prior to procedure
Dynamic Technique – position your patient, mark the puncture spot with ultrasound, place the probe in a sterile sheath, and watch the needle enter the ascites. The needle will be best-visualized if it is at a 45-degree angle to the ultrasound beam.
If searching for ascites from the midline near the pelvis, ensure that you do not mistake the bladder for a pocket of fluid. If the probe is in transverse, the bladder will typically have a rectangular shape. If necessary, have your patient void, or insert a foley catheter, to decompress the bladder prior to the paracentesis.
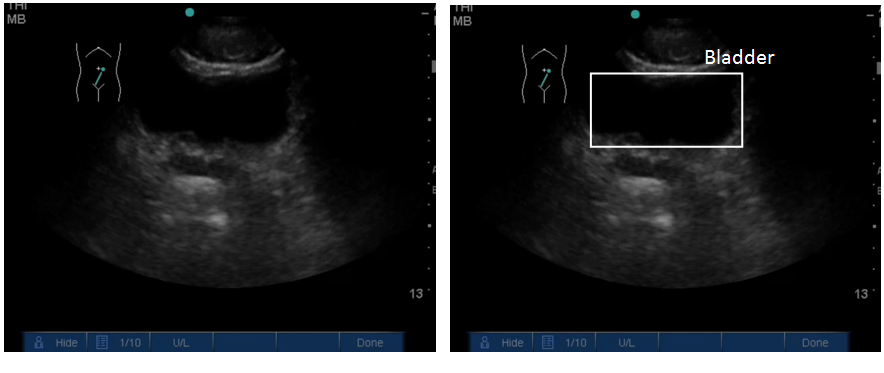
Notice how the fluid in this video is contained and rectangular-shapped — This is the bladder
References
Ultrasound-Assisted Paracentesis Performed by Emergency Physicians vs. the Traditional Technique: A Prospective Randomized Study. Nazeer, S; Dewbre, H, Miller, A. Amr J of Emerg Med. May 2005. Vol 23(3) P363-367
Reviews- Physics & Probes #
Introduction to Ultrasound Probes
The ‘art’ of ultrasound is a continuous trade-off between penetration and resolution. The probe can be good at either penetration or resolution, but not both at the same time. Some probes are good at only penetration ( can penetrate very deep into the patient, but resolution is compromised) or only resolution ( the quality of the image is vastly superior, but you are only able to look at very superficial structures ), and some probe walk the line between penetration and resolution by making some compromises to both.
The trick to remember with ultrasound is that you are using sound waves to generate an image. These ultrasound waves are measured in Mega-Hertz ( MHz), with a lower frequency ( 2-5MHz) having good penetration but less-than-ideal resolution. The higher-frequency probes (10-15MHz) have much better resolution, but due to the heightened frequency, are unable to penetrate as far into the body. A good analogy to the ultrasound probes is to think about those ‘pimped-out’ cars where you can hear the stereos from 3 blocks away.
If you think about it, you’re not hearing the full range of the stereo, you are only hearing the base ( low frequency). The lower the frequency, the farther the sound wave can travel. In order to hear the high-end of the stereo, you would actually have to be sitting in the vehicle. This is because high-frequency sound wave cannot travel as far as can lower frequency.
Low Frequency -> travel farther -> “sounds terrible” = decreased resolution
High Frequency -> shorter travel distance -> “clearer sound” = increased resolution
Curvilinear ( 2-5MHz)
This probe is the work-horse of ultrasound. It is a low frequency probe that results in a relatively good amount of penetration. Since the probe is curved, the beam ‘fans’ out through the body, to produce a wide field-of-view. As indicated, this will result in a relative loss of resolution. As the probe is quite large, it is not ideal for fitting into small areas ( such as intercostally for cardiac views )
Phased Array ( 2 – 5 MHz) ( AKA – Cardiac Probe )
This probe also uses a low frequency, but due to the smaller size of the probe-head ( read: smaller ‘foot-print”), it is more useful for fitting into tighter locations, such as intercoastal windows when assessing the heart. The name is derived from the way the computer activates the crystals in the probe – it occurs through “sequential phasing”. Due to the way the crystals are arranged in the probe head, the ‘near field’ is quite small.
Orientation Markers
Every probe in the world will have and indicator marker on them. This marker will ALWAYS be directed towards the patients HEAD (when the probe is in a longidutinal orientation) OR towards the patients RIGHT (when rotated into a transverse orientation ). This marker corresponds to the indicator marker on the screen. If the probe is every orientated the other way, the image will be ‘backwards’ to convention. The probe marker will also become of critical importance in procedures as the needle will be advanced on the same side of the marker, and will therefore always enter from the left side