Description #
The use of bedside ultrasound by clinicians to guide invasive emergency procedures has been proven to improve success and reduce complications, and is rapidly becoming established as the standard of care.
UGEMP-Advanced provides an opportunity for physicians to acquire and maintain the skills required to perform the following procedures using Ultrasound-guidance:
1. Abcess drainage
2. Subcutaneous Foreign Body localization and removal
3. Arthrocentesis
4. Lumbar Puncture
5. Paracentesis
Learning Objectives #
At the end of the course, the student should be able to know the cognitive aspects and perform the psychomotor aspects of these procedures with the use of ultrasound guidance:
1. Abcess drainage
2. Subcutaneous Foreign Body localization and removal
3. Arthrocentesis
4. Lumbar Puncture
5. Paracentesis
Foreign Body removal #
Ultrasound Guided Foreign Body Identification and Removal
It has been shown that ultrasound is more sensitive than CT and conventional plain radiography’ at detecting radioopaque and non-radioopaque soft-tissue foreign bodies. Ultrasound is also highly effective at guiding the removal of these foreign bodies.
Ultrasound is ideal for 3 aspects of foreign body intervention
1) Diagnosis of a retained FB
2) Identification of FB location
3) Assistance with FB removal
Foreign Body Removal
You will want to use a linear probe with the highest frequency (at least 12MHz but ideally 15-18MHz if available ). This will provide the best resolution of an object that is very superficial. Ultrasound-guided foreign body removal will be performed using sterile conditions, including the use of the sterile transducer cover.
Begin by scanning slowly over the area of interest, as it can be easy to miss or pass-by a foreign body if there is no shadowing from the object. The foreign body may reveal itself by 3 means:
a) it will be visible with the ultrasound
b) it may create a fluid collection around it, highlighting the foreign body
c) there may be a mass-effect on surrounding structures either due to the object or due to swelling at the injury site
Scan the area of entry but also where patient senses the FB, as the location of the FB can be distant to the entry point. Use your clinical judgement for possible localization. For example – was the tree branch kicked while the foot was moving forward? The FB will probably be ‘posterior’ to the entry point if foot was ‘moving forward’ when it contacted the branch.
Two Ultrasound Artifacts
There will probably be an acoustic ‘artifact’ created by the foreign body. If need be, use these acoustic artifacts to help you in localizing the structure.
1) shadowing ( wood )
2) Reverberation ( metallic / plastic )
Ultrasound-guided FB removal
Static marking vs. dynamic real-time assessment
Static Marking
a) identify location of FB by placing marks on the skin – use the ‘X Marks the Spot technique’. Make note of the depth of the FB by looking at the scale on the US screen.
A Sharpie marker or surgical skin marker will work through the gel
OR
b) advance a 22g or 25g needle down through the skin to the FB using the fanning technique until the needle is in contact with the FB
Once the needle has contacted the FB, the injection of local anesthetic serves a dual-purpose of pain relief during the procedure and “hydrodissection” of adjacent soft tissues, facilitating foreign body removal.
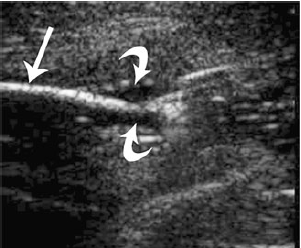
Curved arrows indicate Lidocaine hydrodissection
after bolus injection surroundingthe tip of a sewing needle ii
If you are going to use the ultrasound to guide your forceps, consider applying sterile gel at this point
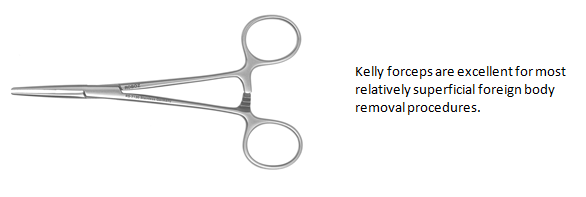
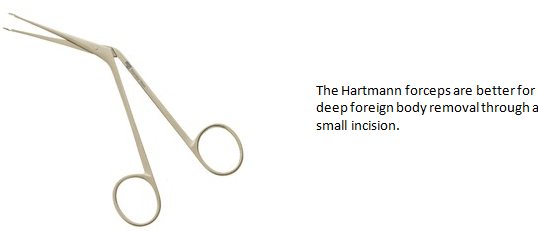
A small skin incision is made and forceps are advanced to the foreign body. The combination of blunt dissection of soft tissues by the forceps and the hydrodissection of surrounding tissues should be adequate to facilitate foreign body removal. Straight forceps are recommended for ultrasound-guided foreign body removal, “specifically those with serrated jaws, as opposed to needle drivers with smooth-faced jaws”ii.
Ultrasound FB Limitations
Due to a variety of factors, including the size of the foreign body, the location, availability of a high-frequency probe, and operator ability, it is very possible to not see a foreign body on ultrasound. If there are clinically suspicious indications, do not rely on ultrasound imaging alone.
References
[1] Aras, M; et al. Comparison of the sensitivity for detecting foreign bodies among conventional plain radiography, computed tomography and ultrasonography British institute of Radiology; 39(1). 72-78. 2010
Thapa, M, et al. Ultrasond-guided musculoskeletal Procedures in Children. Pediatr Radiol. 43(Suppl 1). S55-60. 2013
Courter, BJ. Radiographic screening for glass foreign bodies – what does a “negative” foreign body series really mean? Ann Emerg Med 1990; 19(9); 997-1000
Gilert, FJ, Campbell RS, Bayliss, AP. The Role of Ultrasound in the Detection of Non-Radiopaque Foreign Bodies. Clin Radiol 1990; 41(2). p109-112
Turkcer, I; et al. Do We Really Need Plain and Soft-Tissue Radiographies to Detect Radiolucent Foreign Bodies in the ED?. Amr J. of Emerg Med 2006. 24. p763-8
Reviews- Physics & Probes #
Introduction to Ultrasound Probes
The ‘art’ of ultrasound is a continuous trade-off between penetration and resolution. The probe can be good at either penetration or resolution, but not both at the same time. Some probes are good at only penetration ( can penetrate very deep into the patient, but resolution is compromised) or only resolution ( the quality of the image is vastly superior, but you are only able to look at very superficial structures ), and some probe walk the line between penetration and resolution by making some compromises to both.
The trick to remember with ultrasound is that you are using sound waves to generate an image. These ultrasound waves are measured in Mega-Hertz ( MHz), with a lower frequency ( 2-5MHz) having good penetration but less-than-ideal resolution. The higher-frequency probes (10-15MHz) have much better resolution, but due to the heightened frequency, are unable to penetrate as far into the body. A good analogy to the ultrasound probes is to think about those ‘pimped-out’ cars where you can hear the stereos from 3 blocks away.
If you think about it, you’re not hearing the full range of the stereo, you are only hearing the base ( low frequency). The lower the frequency, the farther the sound wave can travel. In order to hear the high-end of the stereo, you would actually have to be sitting in the vehicle. This is because high-frequency sound wave cannot travel as far as can lower frequency.
Low Frequency -> travel farther -> “sounds terrible” = decreased resolution
High Frequency -> shorter travel distance -> “clearer sound” = increased resolution
Curvilinear ( 2-5MHz)
This probe is the work-horse of ultrasound. It is a low frequency probe that results in a relatively good amount of penetration. Since the probe is curved, the beam ‘fans’ out through the body, to produce a wide field-of-view. As indicated, this will result in a relative loss of resolution. As the probe is quite large, it is not ideal for fitting into small areas ( such as intercostally for cardiac views )
Phased Array ( 2 – 5 MHz) ( AKA – Cardiac Probe )
This probe also uses a low frequency, but due to the smaller size of the probe-head ( read: smaller ‘foot-print”), it is more useful for fitting into tighter locations, such as intercoastal windows when assessing the heart. The name is derived from the way the computer activates the crystals in the probe – it occurs through “sequential phasing”. Due to the way the crystals are arranged in the probe head, the ‘near field’ is quite small.
Orientation Markers
Every probe in the world will have and indicator marker on them. This marker will ALWAYS be directed towards the patients HEAD (when the probe is in a longidutinal orientation) OR towards the patients RIGHT (when rotated into a transverse orientation ). This marker corresponds to the indicator marker on the screen. If the probe is every orientated the other way, the image will be ‘backwards’ to convention. The probe marker will also become of critical importance in procedures as the needle will be advanced on the same side of the marker, and will therefore always enter from the left side