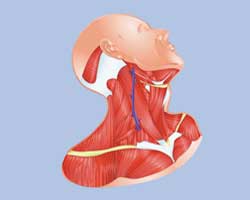
Description #
This unit is intended for training of undergraduate, clerkship, and the first year of the core residency program in order to learn topographical anatomy and techniques for Venous and Arterial Access.
Learning Objectives #
At the end of this unit, students should be able to perform:
1) Venipuncture
2) Arterial Puncture
3) Subclavian Catheterization
4) Internal Jugular Vein Catheterization
5) External Jugular Vein Catheterization
6) Swan-Ganz catheter
7) Arterial Canulation
Overview #
It is difficult to define the basic surgical procedures and to have a general consensus as to which surgical procedures are to be considered basic. This chapter describes procedures that are simple to perform and that may be performed by family physicians or any MD regardless of their specialty. In this chapter, the theoretical basis of the procedures including indications, contraindications and complications are not discussed. This chapter describes the anatomical considerations and the techniques for the performance of the procedures.
Contents #
Venipuncture
Technique
Arterial Puncture
Technique
Venous Cutdown (cannulation)
Topographical Anatomy
Technique
Subclavian Catheterization
Topographical Anatomy
Technique
Internal Jugular Vein
Topographical Anatomy
Technique
External Jugular Vein
Topographical Anatomy
Technique
Swan-Ganz Catheter
Technique
Arterial Cannulation
Techniques for Airway Access
Topographical Anatomy
Cricothyroidotomy
Tracheotomy (Tracheostomy)
Thoracentesis
Topographical Anatomy
Needle Insertion Techniques
Chest Tube Techniques
Tendon Repair (posterior, tibial or Achilles’)
Peripheral Nerve Repair (tibial)
Diagnostic Peritoneal Lavage
Venipuncture #
It is important to remember that the first, and most important, step in any surgical procedure is preparation. This includes gathering and opening supplies such as instruments, solution for prepping the skin, garbage can, etc. Both the patient and the doctor should be positioned appropriately. Procedures are not always simply done on the first attempt, therefore both the doctor and the patient should be comfortable and prepared for repeated attempts. The last step in any procedure is to clean up, and in particular, to safely dispose of all sharps in a sharps container.
Venipuncture
The most common site of venipuncture is the antecubital vein. Venipuncture can also be performed in any other superficial vein in the upper or lower extremities.
Technique
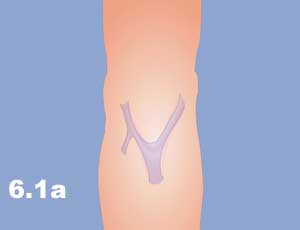
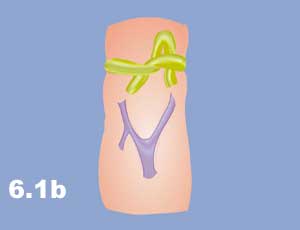
- Apply a tourniquet on the arm proximal to the puncture site, sufficiently tight to interfere with the venous return, but not restricting arterial flow. To aid in filling the veins, the patient can open and close his/her hand. Slapping the arm over the vein is also helpful (Figure 6.1a and 6.1b).
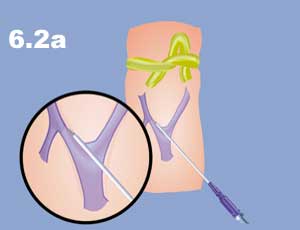
- Insert the needle bevel up, first through the skin parallel to the vein. Then change the direction so that the needle is pushed against the side of the vein, with the bevel facing away, in order to enter the vein (Figure 6.2a – 6.2b).

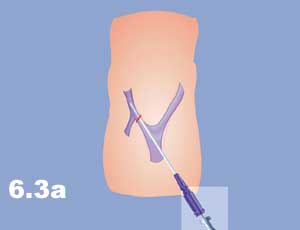
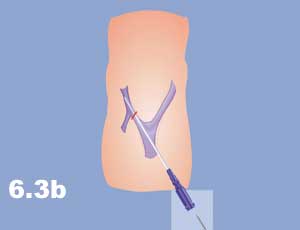
- When the needle is inside the vein, blood shows within the syringe. With a further change in direction, advance the needle into the venous cavity (Figure 6.3a – 6.3b). If a Teflon catheter is used for the purpose of IV infusion, advance the catheter, take the needle out, and connect the infusion set (Figure 6.4).
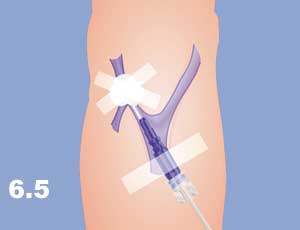
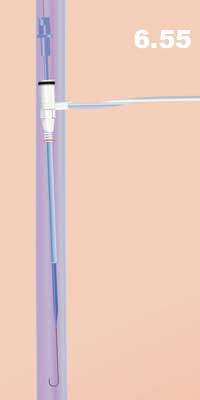
- Fix the needle with adhesive plaster by crossing and wrapping the needle at the hub before the junction with the IV set (Figure 6.5).

Arterial Puncture #
Arterial puncture is performed for blood gas analysis, arterial blood pressure monitoring or delivery of drugs and contrast materials. Arterial puncture is best performed on femoral or radial arteries.
Technique
- Provide aseptic conditions.
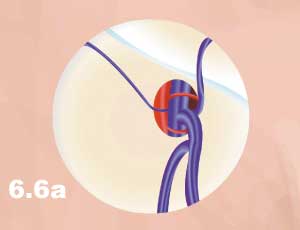
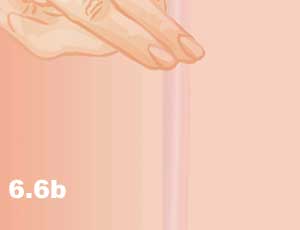
- Palpate the pulse on the artery (location of the artery) (Figures 6.6a – 6.6b).
- Insert the needle above the artery through the skin with bevel up, just under the palpated pulse. The femoral vein is located medially and the femoral artery is lateral to the vein in the femoral triangle just beneath the inguinal ligament (Figure 6.7).

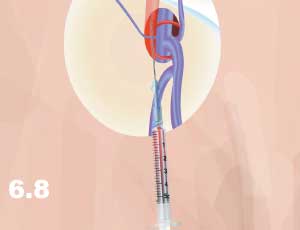
- When blood appears in the needle, withdraw from the artery to the syringe (Figure 6.8). In the case of monitoring, push a Teflon catheter into the artery.
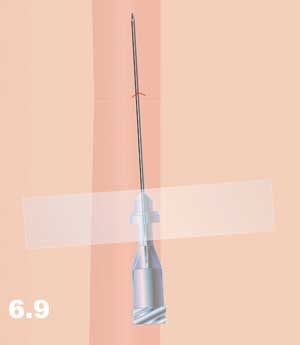
- Fix the catheter with adhesive plaster or a suture (Figure 6.9).
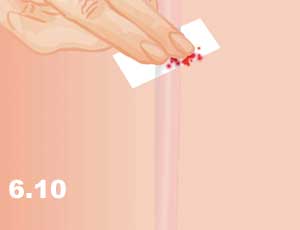
- Fix the needle with adhesive plaster by crossing and wrapping the needle at the hub before the junction with the IV set (Figure 6.10).
Venous Cutdown (cannulation) #
Topographical Anatomy
a) The Greater Saphenous Vein
- The greater saphenous vein is the longest vein in the human body and its pathway is almost subcutaneous. In the region of the popliteal fossa, the saphenous vein runs deep in the fat tissue, it then ascends medially into the thigh and lies more superficially such as in the malleolar and knee-tibial region. The greater saphenous vein can be reached for venous cutdown at the following locations:
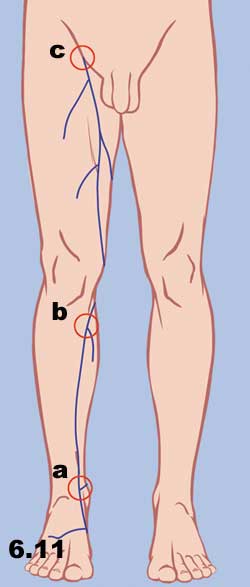
- Medial Malleolus. At this location, the vein lies adjacent to the periosteum and is accompanied by the saphenous nerve, which if transected, causes sensory loss in a small area along the medial aspect of the foot. At this location, the vein can be exposed with minimal blunt dissection. This superficial, isolated, and predictable location has made this site a classical cutdown site for the “great” (long) saphenous vein (Figure 6.11a).
- Medial Aspect of the Knee. At this location, the saphenous vein lies superficially. A cutdown performed 1 to 4 cm below the knee and immediately posterior to the tibia is described in older pediatric literature. However, this site of cutdown is now seldomly used. Disadvantages of this technique include kinking of the line as the knee is flexed and risk of injury to associated structures. Improper incision may cause injury of the following structures: the saphenous vein and the saphenous branch of the genicular artery (Figure 6.11b).
- Fossa Ovalis. In the thigh, the saphenous vein ascends from the medial aspects of the knee (above popliteal fossa) toward the femoral triangle. Proximally, it enters the fossa ovalis and joins the femoral vein. The outside diameter of the great saphenous vein in this region is 4-5 mm. Lateral to the great saphenous vein lies the lateral femoral cutaneous vein, which has a smaller diameter (2-3 mm) and is therefore easily distinguishable from the great saphenous vein through the cutdown operation (Figures 6.11c and 6.6a)
b) The Basilic Vein
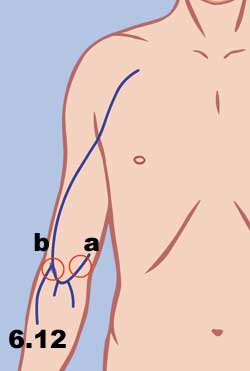
The basilic vein is a preferred site for a venous cutdown in the upper extremity. At the mid-forearm level, the basilic vein crosses anterolaterally and is consistently found 1-2 cm lateral to the medical epicondyle on the anterior surface of the upper arm. The basilic vein continues proximally, occupying a superficial position between the biceps and pronator teres muscles. The basilic vein is generally cannulated at the antecubital fossa 2 cm above and 2-3 cm lateral to the medial epicondyle (Figure 6.12a).
c) The Cephalic Vein
The cephalic vein is also an appropriate site for a venisection in the upper extremity because of its large diameter and superficial location. In the antecubital fossa, it lies subcutaneously, just lateral to the midline, and then ascends in the upper arm, overlying the lateral aspect of the biceps muscle. At the shoulder, the cephalic vein lies in the deltopectoral groove. Just below the clavicle, it passes deep to end in the axillary vein (Figure 6.12b).
d) The Brachial Veins
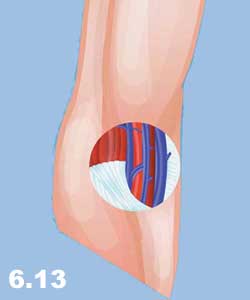
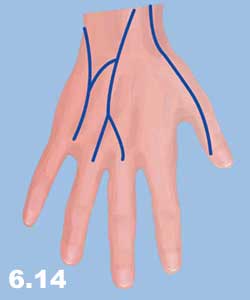
The brachial veins are small, paired vessels lying on either side of the brachial artery (Figure 6.13). These vessels are not superficial and will not accommodate a large cannulae. Their most superficial location is 1-2 cm above the antecubital fossa just medial to the biceps muscle. Palpation of the brachial pulse serves as a useful landmark but the artery may be inadvertently cannulated in patients with low blood pressure. Additionally, there is the risk of injury to the closely associated median nerve. This site may be acceptable when access time and vessel size are not critical factors. In addition, the metacarpal veins (Figure 6.14) are also used frequently for venous access.
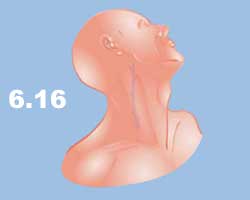
e) The External Jugular Veins
The external jugular vein begins below the angle of the mandible formed by the confluence of the posterior auricular and retromandibular veins. It descends posterolaterally across the surface of the sternocleidomastoid muscle and then pierces the facia to join the subclavian vein deep to the clavicular head of this muscle. The greater auricular nerve, which supplies sensation to the external ear, travels parallel to the external jugular vein (Figure 6.15 – 6.16).

Technique #
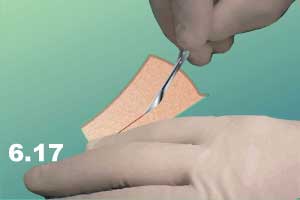
Venous cutdown is performed when a suitable vein is not available or percutaneous insertion is impossible. The most commonly used veins for cutdown are the greater saphenous vein , basilic vein, cephalic vein, brachial vein and the external jugular vein.
- Clean the area with antiseptics.
- Infiltrate anesthesia around the vein.
- Make a transverse incision perpendicular to the target vein (Figure 6.17).
- Anteroposterior projection
- Skin
- Subcutaneous tissue
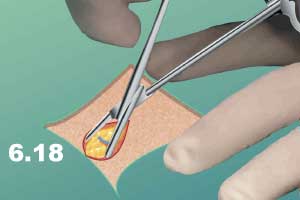
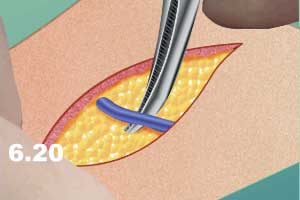
- Dissect the vein from the surrounding tissue (Figures 6.18 – 6.21).
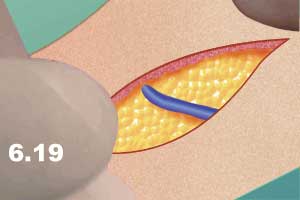
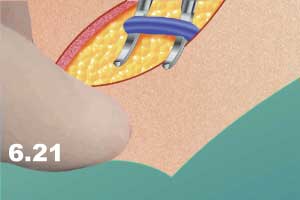
- Pass two ties around the area of the vein designated for cutdown, one proximally, one distally (Figures 6.22 – 6.23).


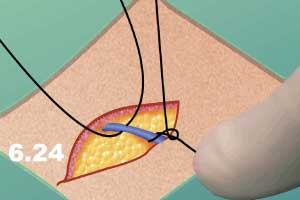
- Ligate the distal tie (Figure 6.24).
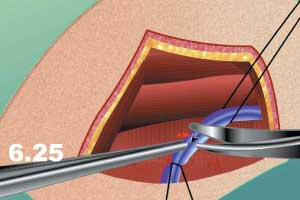
- Make a “V” shaped incision in the vein or insert a Teflon cannula directly (Figure 6.25).
NB: Remember that the superficial veins are located at the subcutaneous layer. The search for the vein should be performed in the subcutaneous fat. If muscle or other deep structures are exposed, the dissection is too deep.
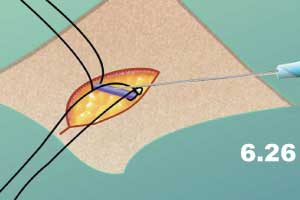
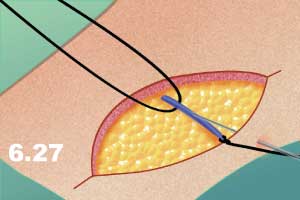
- Insert the cannula proximally. Insertion of the cannula can be performed from inside the wound (Figure 6.26) or from outside the wound (Figure 6.27).
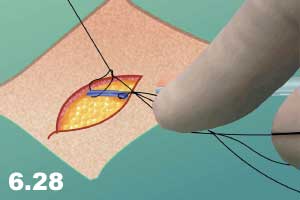
Remove the needle (Figure 6.29).
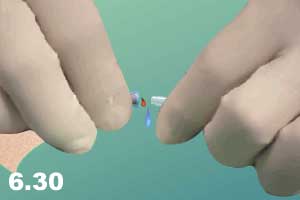
Connect the cannula and needle to the system (Figure 6.30).
- Test the cannula by running the fluid.
- Close the wound with interrupted sutures (Figure 6.31).

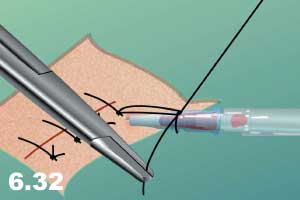
- Secure the cannula with an air knot (Figure 6.32)
- Apply sterile dressings.
Cannulation of the vein from outside the wound is preferred. In this case the long-term presence of the needle will not interfere with the wound healing. It is important to secure the needle with the air knot as it will prevent the needle from coming out.
Subclavian Catheterization #
The subclavian vein is used for central venous catheterization. The popularity of central venous catheterization has grown rapidly in recent years. The development of sophisticated monitoring techniques, transvenous pacemaker devices, total parenteral nutrition, and emergency resuscitation protocols have created a need for rapid and reliable methods of central venous access. Peripheral venous sites can be used but the veins may be collapsed, thrombosed, buried in subcutaneous fat, or difficult to locate. The subclavian vein has a predictable relationship to easily identifiable landmarks and can be cannulated within minutes.
Due to potential complications such as infection, sepsis, pneumothorax, and others, subclavian catheterization is considered to be a surgical procedure. This should be indicated to the patient and a strict aseptic approach is recommended.
Topographical Anatomy #
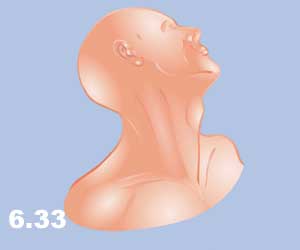
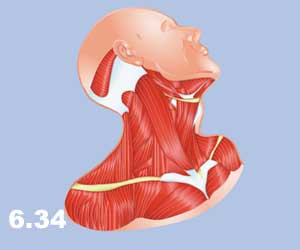
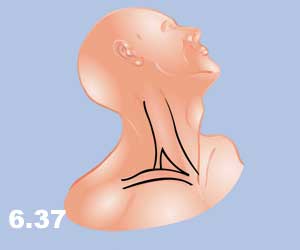
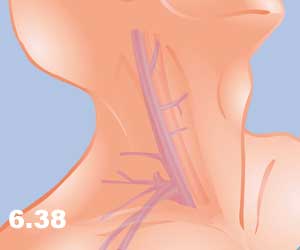
The subclavian vein begins as a continuation of the axillary vein at the outer edge of the first rib. It joins the internal jugular vein to become the innominate vein 3-4 cm proximally. It has a diameter of 10-20 mm and is valveless. After crossing the first rib, the vein lies posteriorly to the medial third of the clavicle. It is only in this area that there is an intimate association between the clavicle and the subclavian vein. The costoclavicular ligament lies anterior and inferior to the subclavian vein and the fascia that is contiguous to this ligament invests the vessel. Posterior to the vein, separating it from the subclavian artery, lies the anterior scalene muscle, which has a thickness of 10-15 mm. The phrenic nerve passes over the anterior surface of the scalene muscle and runs immediately behind the junction of the subclavian and internal jugular veins. The thoracic duct (on the left) and the lymphatic duct (on the right) pass over the anterior scalene muscle and enter the subclavian vein near its junction with the internal jugular vein. Superior and posterior to the subclavian artery lies the brachial plexus. The dome of the left lung may extend above the first rib, however, the right lung does not extend this high (Figures 6.33 – 6.38).

Technique #
- Place the patient in the Trendelenburg position with a rolled towel between the shoulder blades.
- Prep and drape the area.
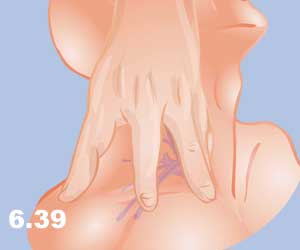
- Landmarks:
- Lateral – the lateral aspect of the clavicle.
- Medial – the sternal notch.
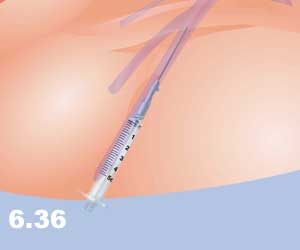
- Place the thumb on the lateral landmark and the middle finger on the medial landmark, the index finger will fall at the subclavian vein where the needle should be inserted. (Figure 6.39).
- Anterior-Posterior projection
- Skin
- Subcutaneous tissue, clavipectoral fascia
- Pectoral major muscle (clavicular part)
- subclavial vein
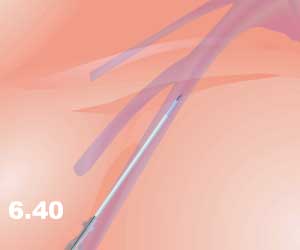
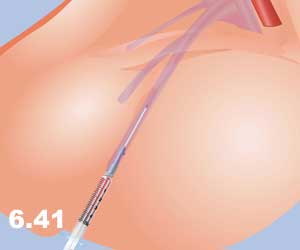
- Anesthetize the skin and insert the needle (16 gauge) beneath the clavicle with the bevel down. Advance the needle parallel to the bed with the tip directed toward the suprasternal notch. Maintain constant suction on the syringe while moving it forward (Figure 6.40 – 6.41).
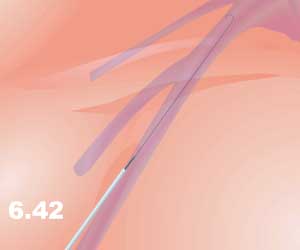
- When blood appears in the syringe, disconnect the syringe, withdraw the needle and insert a J wire through the Teflon catheter left in place, to the superior vena cava (Figure 6.42).
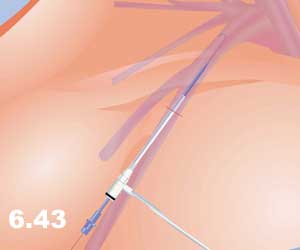
- Withdraw the catheter and insert an introducer with a catheter into the vein through a 1-2 cm skin incision adjacent to the J-wire (Figure 6.43).
- Connect an IV set to the catheter, or use the port for other intravenous procedures.
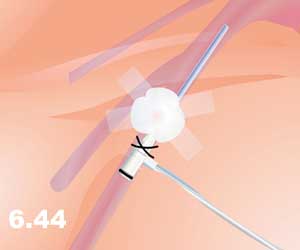
- Fix the catheter with a suture to the skin and apply an aseptic dressing (Figure 6.44).
Venous & Arterial Access #
Internal Jugular Vein #
The landmark for the identification of the internal jugular vein (IJV) is the sternocleidomastoid (SCM) triangle (Figure 6.45 – 6.46).

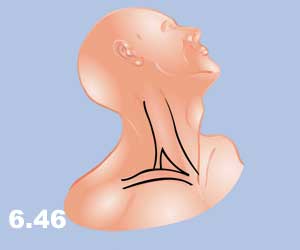
The lateral wall of this triangle is the clavicular head of the SCM muscle, the medial wall is presented by the sternal head of the SCM muscle and the base of the triangle is formed with the clavicle. The IJV is located under the medial border of the clavicular head (lateral border) of the SCM muscle. The carotid artery is located deeper and at the medial border, i.e. sternal head of the SCM muscle. In order to identify the triangle, the patient must be awake. The right IJV is preferred as it leads directly into the superior vena cava.
The patient should be in a 15° Trendelenberg’s position, with the neck extended and turned sharply to the left. When the patient lifts his/her head thereby tensing the muscle, the triangle borders are identified (Figure 6.46). The point of venous puncture is the apex of the SCM triangle which is identified as the junction of the clavicular head and the sternal head of the muscle approximately 1.5-2 inches above the clavicle and lateral to the carotid pulse.
Technique #
- Position the patient as above. Prepare and drape the neck in a sterile fashion.
- Raise a skin wheal with local anesthetic at the apex of the SCM triangle.
- Locate the vein with a 14 gauge needle on a 5 ml syringe. Advance the needle in the caudal direction at a 30° angle to the skin under the lateral head of the muscle while aspirating on the syringe (Figure 6.47).

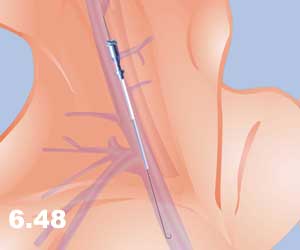
- Remove the syringe and the needle, and introduce a J-wire into the IJV via a Teflon catheter left in the vein (Figure 6.48).
- After the J-wire is well advanced into the IJV, remove the catheter.
- A 1-2 mm cut is made in the skin adjacent to the guidewire with the tip of a #11 scalpel blade.
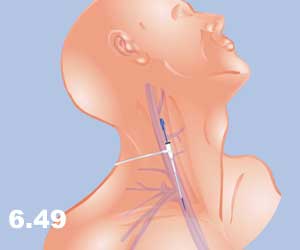
- Pass a dilator over the guidewire to dilate a tract for insertion of the catheter (Figure 6.49).
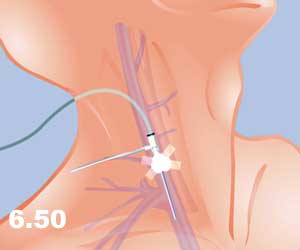
- Remove the dilator and pass the catheter, with an introducer, over the guidewire. Remove the guidewire.
- Remove the introducer and connect the catheter to the intravenous tubing or flush with heparinized saline (Figure 6.50).
- Suture the catheter in place and apply a sterile dressing.
External Jugular Vein #
Topographical Anatomy
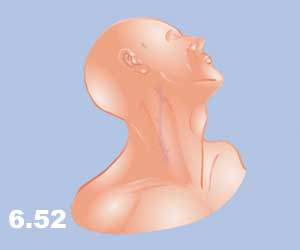
The external jugular vein (EJV) is rarely used as an alternative to the IJV when it is difficult to access the IJV. The landmark for the EJV is the body of the SCM muscle. The EJV descends posterolaterally across the surface of the SCM muscle. The vein may be easily reached at the middle part of the posterior border of the SCM muscle (Figure 6.51-6.52).
.
Place the patient in a 15° Trendelenberg’s position with the neck extended and turned sharply to the left. The vein is usually visible on the surface of the SCM muscle. It is extremely difficult to have central access via the EJV, therefore a J-wire catheterization technique should be used.
NB: Some practitioners do not find the EJV to be a good route for insertion of the Swan-Ganz catheter.
Technique #
- Position the patient as discussed above. Prepare and drape the neck in sterile fashion.
- Raise a skin wheal with local anesthetic at the surface of the SCM muscle above the apex of the SCM triangle.
- Enter the EJV with a 5 ml syringe using a 14 gauge needle with over the needle Teflon catheter. Advance the needle while aspirating.
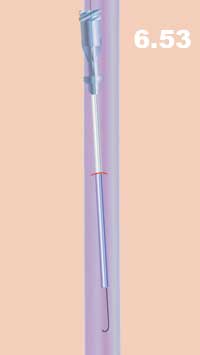
- Introduce a J-wire through the Teflon catheter after the needle is removed. Rotate the J-wire past venous valvular obstructions into the central circulation (Figure 6.53).
- Make a 1-2 mm cut in the skin adjacent to the guidewire with the tip of a #11 scalpel blade.
- Pass a dilator over the guidewire to dilate a tract for insertion of the catheter.
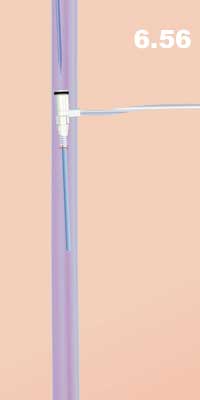
- Remove the dilator and pass the catheter, with an Remove the introducer and connect the catheter to the intravenous tubing or flush with heparinized saline (Figure 6.56).

- introducer, over the guidewire (Figures 6.54 – 6.55).

- Remove the introducer and connect the catheter to the intravenous tubing or flush with heparinized saline (Figure 6.56).

Swan-Ganz Catheter #
The Swan-Ganz catheter is considered to be one of the major advances in hemodynamic monitoring. For adults, Swan-Ganz catheters are available in 5-Fr. and 7-Fr. sizes. The catheter has two pressure lumens with one located at the tip and the second about 30 cm back from the tip. It also has an inflatable balloon and a thermistor located behind the balloon. The lumen at the tip measures systolic, diastolic, and mean pulmonary artery pressure (PAP). The second lumen, 30 cm back from the tip, measures the central venous pressure (CVP). When the balloon is inflated inside the pulmonary artery, it occludes the blood flow and thus the catheter is capable of measuring the pulmonary capillary wedge pressure (PCWP). The PCWP can be used as an indirect measurement of the left atrial pressure (LAP) due to its good correlation with the LAP. Thus PCWP can be used as a measure of left ventricular filling pressure.
Technique #
The Swan-Ganz catheter can be introduced by a variety of techniques:
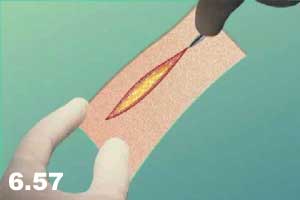
a) Open technique (venous cutdown)
- Cleanse the area with an antiseptic solution.
- Infiltrate the skin over the vein with 0.5% lidocaine.
- Make a transverse incision perpendicular to the site of the venous cutdown (Figure 6.57). The antecubital fossae was the original site for Swan-Ganz catheters but is rarely used at the present time.
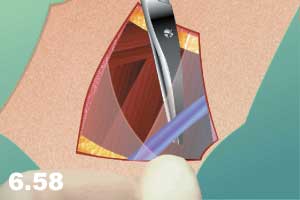
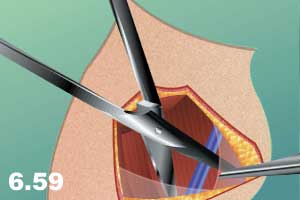
- Isolate the vein by blunt dissection from the surrounding tissue (Figures 6.58 – 6.59).
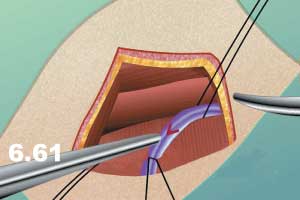
- Pass two ties around the area designated for cutdown, one proximally and one distally, and ligate the distal tie (Figure 6.60).

- Make a “V” shaped incision in the vein (Figure 6.61).
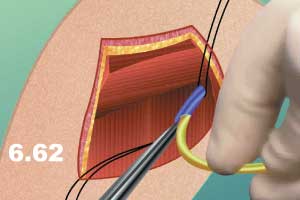
- Advance the Swan-Ganz catheter through the cutdown into the right atrium (Figure 6.62).
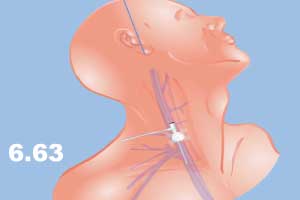
b) Percutaneous technique through central vein access such as IJV access (Figure 6.63) (see IJV for detailed description).
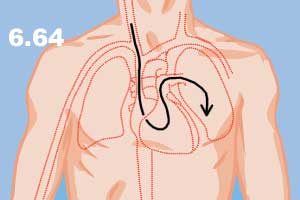
In both techniques, the Swan-Ganz catheter is passed to the right atrium and the location of the catheter is judged via a high-frequency pressure transducer connected to a monitor. In general, the catheter is advanced with the balloon inflated (“floated” in), and withdrawn with the balloon deflated, to avoid damage to the cardiac valves (Figure 6.64).
Steps:
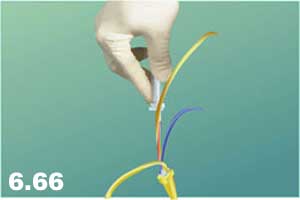
- Fill the Swan-Ganz catheter with fluid, examine the balloon with air and attach it to the transducer (Figure 6.65 – 6.66).

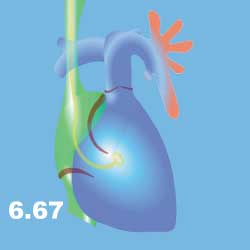
- Pass the catheter through the sheath or venous cutdown into the superior vena cava and advance about 20 cm into the superior vena cava. At this time the monitor should show atrial tracing with the pressure of about 6/0 mmHg. This indicates that the catheter is in the right atrium (Figure 6.67).
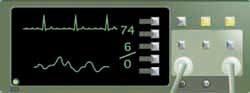
- The indication for the location of the catheter is a change in the character of the pressure tracing, as well as the values (30/5 mmHg, Figure 6.68).
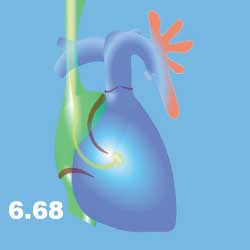
- In the right ventricle, put 1.5 cc of air into the balloon to completely cover the tip of the catheter in an effort to reduce complications such as ventricular arrhythmias (Figure 6.68).


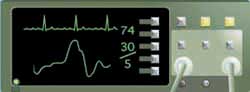
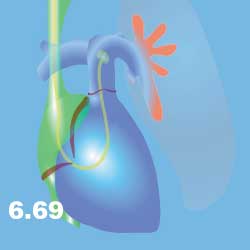
- Advance the catheter further into the pulmonary artery. The inflated balloon will be carried with the flow to the pulmonary artery. In the pulmonary artery the character of the pressure waves is changed again, with values of about 25/10 mmHg (Figure 6.69).
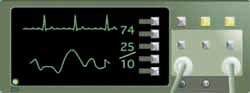
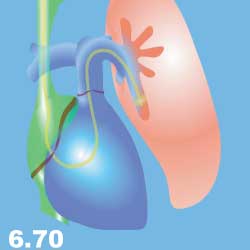
- When the pulmonary artery tracing is absorbed, advance the catheter further up until the PCWP is observed (Figure 6.70). The monitor at this time shows a straight line with values of about 12/1 mmHg.
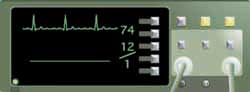
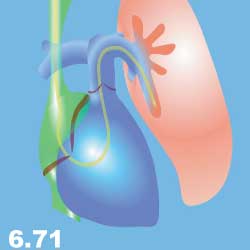
- Deflate the balloon to observe the pulmonary artery tracing again. Values should return to about 25/10 mmHg (Figure 6.71).

- Determine cardiac output by thermal dilution technique. This can also be obtained with a Swan Ganz catheter.
- Inject a 2 ml aliquot of cold (0°-2°C) 5% dextrose in water to the proximal lumen of the catheter. The cardiac output computer can calculate the cardiac output via the thermal dilution method.
The most common site of long-term and efficient venous access is the internal jugular vein.
Arterial Cannulation #
Arterial cannulation is mainly used for direct monitoring of blood pressure, cardiac and coronary artery catheterization, multiple arterial blood gas measurement, selected anesthetic procedures, and others.
The preferred sites for arterial cannulation are:
- Radial artery
- Ulnar artery
- Brachial or axillary arteries
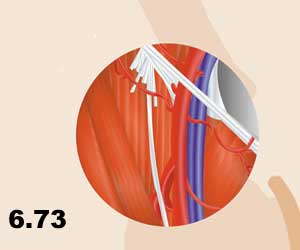
- Femoral artery (Figure 6.72 – 6.73).

- Dorsalis Pedis artery
- Percutanous Cannulation Technique
- Lay the patient in the supine position.
- Raise a skin wheal over the artery with local anesthesia.
- Prepare the site of cannulation with anti-septic solution.
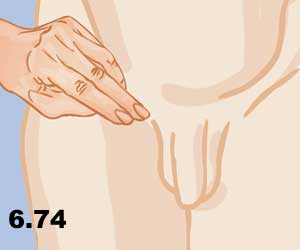
- Identify the pulse (Figure 6.74).
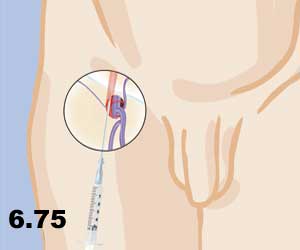
- Insert a 14-16 gauge needle with a Teflon catheter into the artery (Figure 6.75). Once the needle is in the artery, advance the catheter and remove the needle. Connect the catheter with the arterial line to the pressure transducer and monitoring system.
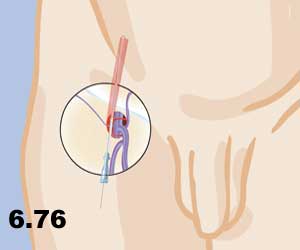
- When Atrial Catheterization is Required:
- Introduce a J-wire through the Teflon catheter into the artery and remove the Teflon sheet (Figure 6.76).
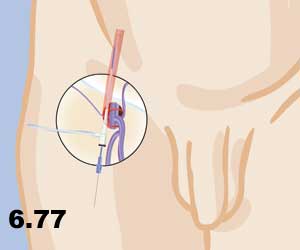
- Make a 1-2 mm cut in the skin adjacent to the guidewire with the tip of an #11 scalpel blade.
- Pass the dilator over the guidewire to dilate a tract for insertion of the catheter.
- Remove the dilator and pass the catheter, with introducer inserted through it, over the guidewire as described in venous catheterization (Figure 6.77).
- The port is fixed and is ready to be used for the introduction of the long special catheter.
The most common site of arterial puncture is the radial and femoral arteries.
2. Direct Cannulation Technique
The direct technique is usually used in experimental conditions or for intra-operative procedures.
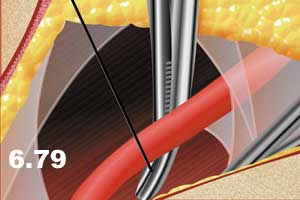
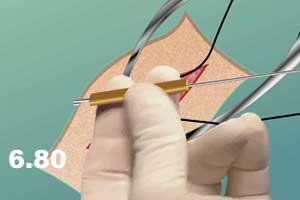
- For the direct technique, dissect the artery and pass two ties or umbilical tapes proximally and distally to the area designated for catheterization (Figure 6.78-6.79).

- Pass the ties or umbilical tape through a rubber tube (Figure 6.80 – 6.81).
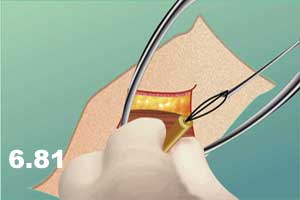
- Pull the distal snare down and secure it with the help of a mosquito clamp in order to close the artery and interrupt the flow distally (Figure 6.82).
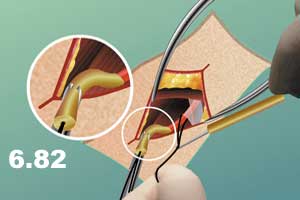
- Introduce a 14-16 gauge needle with a Teflon sheet into the artery proximally (Figure 6.83).

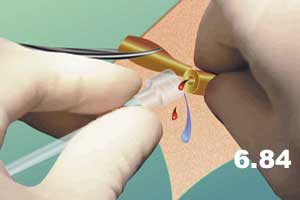
- Pull the second snare on top of the catheter to interrupt the leakage around the catheter.
- Connect the catheter to the pressure line (Figure 6.84).
- Tie and secure the line and the catheter with a silk tie to the distal rubber tube (Figure 6.85).
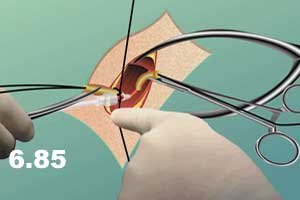
NB: Direct technique for arterial cannulation is used very rarely. It is mostly an experimental procedure.