VIST #
 #
#
Description #
This is an introductory unit that provides the important information on the set up and clinical features of the Vist endovascular simulator in order to enhance the comfort level of the trainees in the simulation environment and help them to acquire the technical skills to use the simulator more effectively.
Learning Objectives #
To understand the technical fundamentals of using the Vist endovascular simulator.
Introduction #
VIST™, Vascular Intervention System Trainer, reproduces the physics and physiology of the human cardiovascular system such that a person can learn to perform various procedures such as cardiac catheterisation. The simulator is a generalized solution to endovascular simulation. The initial content scenarios focus on coronary, carotid, renal intervention and stenting as well as pacemaker lead placement. This simulation is combined with a haptic interface to give the user a natural, correct way to interact with the simulation. In addition there is an instructional system coupled to the simulation that provides a framework for learning from the simulation.The training system consists of the software simulation of the cardiovascular system, the haptic interface device, the instructional system and two monitors, one for the synthetic x-ray and one for the instructional system. The simulation consists of units replicating the hemodynamics, blood flow and dye contrast media mixing, and catheter-vasculature physical interaction. In addition, a unit produces a synthetic x-ray image to replicate the fluoroscopic image used by interventional cardiologists to guide them during their work.
Overview of Equipment #
The simulator is currently set up on a stationary table with its monitors on top of the boxes that contained the system when it was delivered to the centre. It will be moved to a mobile workstation for ease of use and transport in the near future.

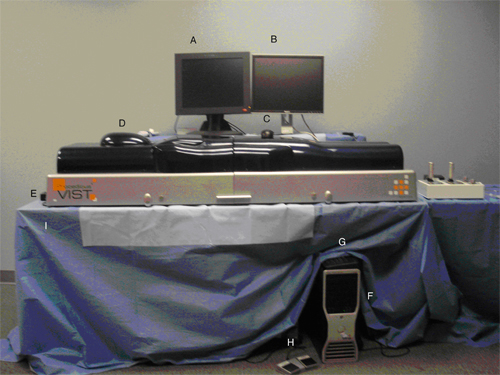
Figure 1: VIST setup with tools laid out on adjacent table
The following equipment accompanies the simulator:
A. Monitor (on left): User interface screen. Once the program has been started and the user has logged in and chosen a case to simulate, there will be eight tabs at the top of the screen, which can be accessed by clicking on them.
B. Dell monitor (on right): The Fluoro Monitor. It is only active when you press the fluoro pedal. Information such as which unit, status for cineloop, roadmap and autotrack, fluoro position, time and contrast spent are found on this monitor.
C. Mouse: Controls cursor (mouse pointer) on the screens (can go from one screen to the other by simply moving it).
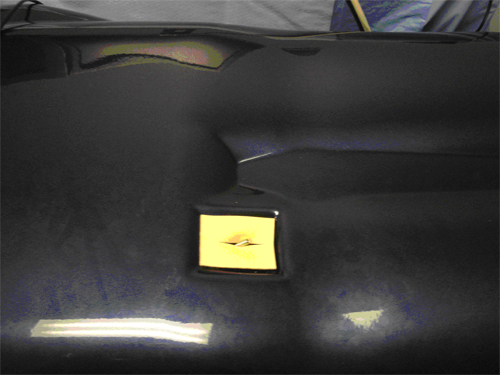
D. VIST Simulator: The equipment is inserted through the port (see figure 2) ONLY AFTER ONE HAS SPECIFIED WHAT EQUIPMENT WILL BE INSERTED BY ACTIVATING THE EQUIPMENT USNG THE TOOLS SELECTION TAB LOCATED ON THE ADMINISTRATIVE MONITOR.

Figure 2: Port that the tools are inserted into.
E. VIST Power Switch: ONLY TURN ON AFTER THE COMPUTER HAS LOADED EVERYTHING.
F. Dell Computer: Only to be turned on, nothing else should be done to the computer.
G. Keyboard: Press F1 when the screen asks you to. Enter your username and password to access your account.
H. Fluoro/Cine pedal: Pedal marked ‘Fluoro’ will activate the fluoroscope, while the pedal marked ‘Cine’ will activate the cineloop.
I. Tables: Physically support the equipment.

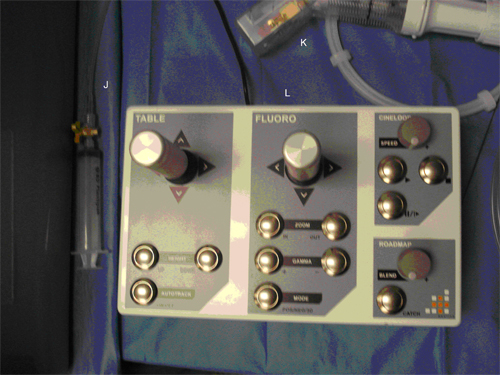
Figure 3: Overhead view of joystick and other tools.
J. Contrast Syringe: Simulates the release of contrast in the patient.
K. Pump: Expands balloons and stents (which are simulated inside the machine, no actual balloons or stents must be put in the machine; they will clog it up and damage it).
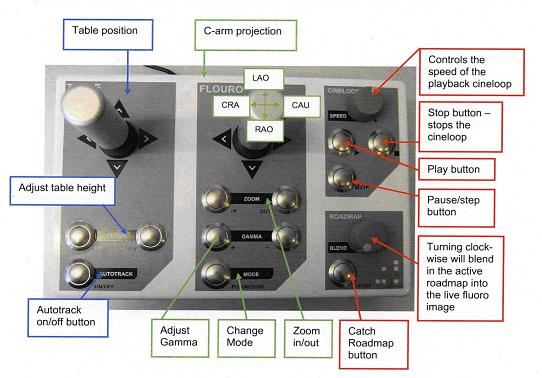
L. Joystick: Representation of what is used in actual surgical suits, will accomplish the same tasks in the same desired manor. The functionality controlled by the joystick is the same as on software tabs.
M. Medical Equipment (not in picture): Used during the simulated surgeries ONLY AFTER ONE HAS SPECIFIED WHAT EQUIPMENT WILL BE INSERTED INTO THE MACHINE BY ACTIVATING THE EQUIPMENT USNG THE TOOLS SELECTION TAB LOCATED ON THE ADMINISTRATIVE MONITOR.
Scenario Preparation**** #
Room Policy and Safety Precautions #
Safety Precautions
- Turn on the Computer and let it load everything before you turn the VIST simulator on.
- Activate the tools in the tool selection tab before putting them in the simulator.
- Do not use damaged, bent or soft tipped tools in the simulator.
- It is of uttermost importance that tools are inserted slowly. If a tool is inserted too quickly the simulator might detect it when it has been inserted some distance (because of fixed time until detection). This could make the tool protrude to long in the device and push onto the end wall, inhibiting further movement.
- Tools should be moved as carefully as in a real case.
- When running crm/rav, 0.14” guidewire should always be through and in front of the lead tip.
- Remove all tools from the VIST simulator BEFORE EXITING THE CASE.
- Do not yank on anything if it gets stuck.
Troubleshooting
- If anything isn’t working get a technician.
Technical and Functional Aspects of VIST #
In this section, we will first introduce the VIST and supporting technical equipment through images. After completing this unit, we want you to be able to recognize each component of the VIST and be able to use each component properly. As well you should be able to start up the simulator and also to be able to shut it down properly. Click on Next Page on the top or bottom of the screen, or use the Content Navigation window to the right of the screen to access the startup and shutdown procedures for the VIST, followed by the comprehensive instructions on the use of the accompanying peripheral devices and software. If at anytime you have a question, please ask CanHealth staff immediately.
Startup Sequence #
Start Up:
- Sign in at the front desk of CanHealth.
- Press the power button on the computer (located under the table, possibly covered with the blue smock).
- When prompted by the screens, press F1 on the keyboard (which is located on top of the computer terminal. If there is nothing on the screens, get a technician)
- Wait for the Windows operating system to load completely (everything will be at rest on the screen when the load has been completed, i.e. there will be no more pop ups and all previous pop ups will have disappeared) then press the power button on the VIST simulator (which is located on the left side of the mannequin).
- Double click on “VIST – Neuro” to access neurological procedure simulation or “VIST generic” to access all other simulation cases that are available.
- Login with your username and password and choose a type of surgery by clicking on it, then choose a specific case and click the arrows to start the case.
Note: If one does not have a username and password then one should request them from one’s instructor, only after one has gone through an orientation and explanation of the simulator. Once one has been assigned then one should remember them. Instructors will be given an administrative account while residents and fellows will have student accounts. The administrators will be able to create courses and assign specific curriculum to student accounts, while those with student accounts can access their assigned curriculum and complete the cases within.
Software:
Dell monitor (on right):
- Once a case has been started there will be various tabs that appear on the left side monitor, which one can choose from in order to complete the surgical simulation.
- The first tab that will appear when a case is chosen is the journal tab; this tab has a basic description of the case that has been chosen.
- The ‘Table/Fluoro’ tab will allow the user to change the table and C-Arm position, zoom in and out, adjust gamma and decide which mode of viewing to use, positive, negative or 3d-Mode. Autotrack is a function that is unique to the simulator; it follows the furthest tip of the furthest tool. It is turned on by default and can be turned off by pressing the Autotrack button. In the Neuro program, the autotrack is automatically turned off when the table is moved or the cineloop is activated. The Status of the Autotrack can be viewed on the right hand screen.
- The tool selection tab is the next tab to the right. It is very important to select the tools on this tab before you insert it into the VIST device. NOTE! NEVER INSERT BENDED OR SOFT TIP TOOLS INTO THE SIMULATOR. THE TIP SHAPE IS ADDED IN THE SOFTWARE WHEN YOU MAKE THE TOOL SELECTION ON THIS PAGE. THE BENDED TOOLS MAY DAMAGE THE SIMULATOR!
- The Cineloop tab. It is used for recording one or several clips from the fluoro. After recording a cineloop one can play, pause the cineloop, increase and decrease the speed and swap between cineloops.
- The Roadmap tab is used to take a snapshot from the fluoro screen. One does this by clicking on the ‘catch’ button to either catch the paused cineloop or the active fluoro picture. One can catch as many roadmaps as they would like and can scroll through them with the arrows. There is a slider that can be used to blend in the roadmap. The roadmap will not appear until the fluoro is once again activated.
- The ‘Ruler’ tab has a button that can be used for turning a ruler on and off that can be used to estimate the size needed for a balloon or stent. It cannot be moved or rotated, it will automatically appear next to a lesion.
- The ‘About’ tab describes which version of different software is used in the system.
- The last tab is ‘Exit’. REMOVE ALL TOOLS BEFORE EXITING. One can exit the current simulation by pressing the button that appears once the ‘Exit’ tab has been selected.

Shutdown Sequence #
- Remove all tools from the VIST simulator BEFORE EXITING THE CASE.
- Exit any current case that you are undertaking.
- Click the arrows that are pointing to the left until you see an option on the top right of the screen to logout. Click ‘Logout’.
- Click ‘Exit’ which will have taken the place of ‘Logout’ on the screen layout.
- Click yes, when prompted, “The Web page you are viewing is trying to close the window. Do you want to close the window?”
- Click, Start, then Turn Off Computer and Turn Off.
- Turn off the VIST.
- Replace all equipment in proper location.
- Sign out at the front desks of CanHealth.
