Pediatric Simulator (PediaSim) #
 #
#
Description #
This is an introductory unit that provides the important information on the set up of PediaSIM Care Unit and Clinical features of the PediaSIM in order to enhance the comfort level of the trainees in the simulation environment and helps them to acquire the technological skills to use the simulator more effectively.
Learning Objectives #
At the end of this unit trainees will master the use of PediaSIM which includes the following:
- 1. PediaSIM Care Unit set up and supporting equipment
- 2. Room Policy and safety Precautions
- 3. Technical and Functional aspects of PediaSIM (for Instructors, for Trainees to be familiar only)
- 4. Introduction to PediaSIM (Clinical Features and possible interventions)
- -Airway
- -Breathing
- -Circulation
- -Disability assessment
- -Possible clinical interventions
- -Patient monitoring
- -Administration of the pharmacological agents
- 5. Practice Session
PediaSim setup and supporting equipment #
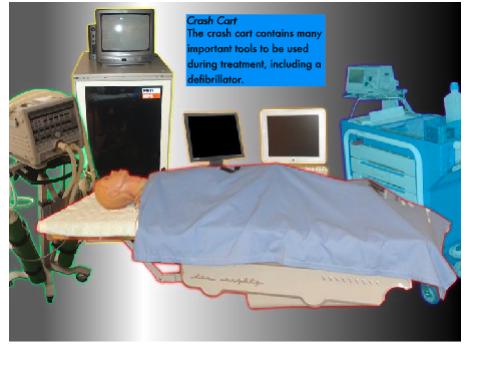
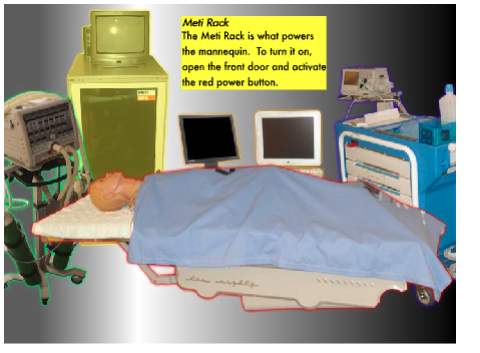
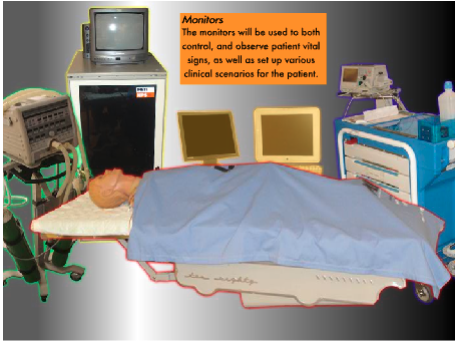
Room Layout: Below you will find the equipment to be used with the PediaSim #


Room Policy and Safety Precautions #
Simple care and maintenance steps help to ensure the manikin stays in good working condition. We recommend the following steps each time you use the simulator:
- Avoid using writing instruments and sharp objects while standing over the patient mannequin, to prevent markings, snags and rips in the skin.
- Use only distilled or sterile water for injection through any port.
- Position the mannequin horizontally and do not place anything on top of it.
- Avoid improper and aggressive use of equipment in event of difficult airway and intubation.
- PediaSIM is not suitable for needle chest decompression, pericardiocentesis, chest tube insertion and using jelly pads.
- Avoid giving fluid or inhalers through the mouth.
- NO FOOD OR DRINK IN SIM Room
Startup Sequence #
Startup the gases and PediaSim tower #
Turn on the gases.
- Turn on gas valves on the top and bottom of the gas closet. On position is when the valve is vertical. Off position is when the valve is horizontal. Blue labeled valves are for HPS. Red labeled valves are for PediaSim. Note that bottom valves are used for HPS and PediaSim.
- Open the CO2 gas tank by turning the grey lever in the direction of the arrow labelled Open.
- When you are ready to start a case, turn medical air by pushing it away from you.
- Note: Instructions are gases are also posted near the gas closet.
Activate the PediaSim Tower.*******
- Turn on the red switch at the bottom of the PediaSim Tower.
Shutdown Sequence #
Shutdown the Macbook laptop #
- Click on the red Stop icon to end your session.
- Click on HPS on the top menu bar and select Quit HPS.
- Click on the Apple Icon on the top menu bar and select Shut down to power off the Macbook.
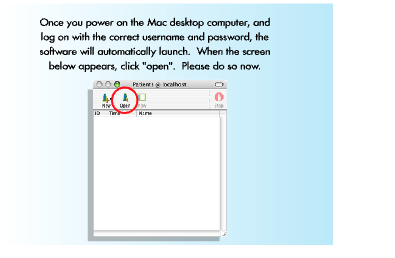
Shutdown the Mac desktop computer #
- Click on the red Stop incon to end your session.
- Click on HPS on the top menu bar and slect Quit HPS.
- To quit the Waveform, click on Waveform Display on the top menu bar and select Quit Waveform.
- Click on the Apple Icon on the top menu bar and select Shut down to power off the desktop computer.
Shutdown the PC Laptop #
- Exit any software/powerpoints/images you are running on the PC.
- Click on the Start icon on the bottom left hand corner of the screen, select Shutdown and press OK.
Shutdown the PediaSim Tower and all AV Equipment #
- CanHealth staff will shut down all audio/visual related equipment and devices.
Shutdown the gases #
- Turn off medical air valve (tiny silver valve near the bottom) by pulling the valve TOWARDS you.
- Turn off the PediaSim gases by putting them in horizontal position. Remember that PediaSim gases are labeled in red and HPS gases are labeled in blue. Also note that HPS and PediaSim share the same 4 bottom valves. Turn those off by pulling them to the horizontal position. Only turn off the bottom 4 valves if you know for certain that both PediaSim and HPS sessions are finished.
- Close the CO2 gas tank by turning the grey lever to the OFF position. (The OFF position is labelled on the CO2 gas tank.
Introduction to PediaSim (Clinical Features and possible interventions) #
Clinical Features Summary:
The PediaSIM offers highly developed pediatric patient models that generate
Realistic and automatic responses to clinical interventions and drug administration. And unlike a task-trainer, the PediaSIM automatically responds to student interventions and represents a true-to-life response to these interventions. By providing a realistic means to bridge the gap from didactic learning to clinical application, the PediaSIM provides the best transition for learners to apply their knowledge of pediatric patient care in a safe, no-risk environment.
The pediatric patient mannequin represents the physical characteristics of a five- to seven-year-old child. At 48”(122 cm) tall, 18”(46 cm) wide and weighing 38 pounds (17.2kg), it is fully operational in the supine and lateral positions.
The pediatric mannequin head offers tremendous realism with features such as blinking eyelids; adjustable pupil settings (including normal, pinpoint and blown); exhalation of air and CO2, and phonation features.
Airway #
A. Airway assessment:
1. Upper airway anatomy:
The PediaSIM provides an anatomically realistic upper airway that includes all of the following features:
• Hard and Soft Palate
• Oropharynx
• Conical Trachea
• Carina
• Nasopharynx
• Laryngopharynx
2. Critical airway landmarks:
Such as a realistic Tongue, Epiglottis, Aryepiglottic Fold, Laryngeal Inlet, Vocal Cords and Esophagus.
3. Accurate ventilation interventions:
• Oropharyngeal
• Nasopharyngeal
• Bag-Valve-Mask (BVM)
• Laryngoscopic Procedures
• Laryngeal Mask Airway (LMA)
• Endotracheal Tube
4. Mis-Intubation:
PediaSIM Mannequin accommodates intubation into the esophagus resulting in stomach distension and hypoventilation on the patient mannequin.
5. Airway trauma features:
Allow use of a variety of clinical supplies and equipment and include all of the following:
• Swollen Tongue
• Laryngospasm
• Upper Airway Obstruction
• Bronchial Occlusion
• Esophageal, Nasal and Oral Intubation
• Cricothyrotomy
B. Breathing:
The pediatric mannequin offers:
Bilateral Breath Sounds, normal and abnormal, bilateral and unilateral, synchronized with breathing and ventilation
breath sounds are audible over the apex, axilla, and posterior of each lung with the use of a standard stethoscope.
Circulation #
C. Circulation assessment:
1) Palpable Pulses:
The PediaSIM mannequin has five bilateral pulses including the brachial, radial, femoral, carotid and pedal pulses, which are synchronized to ECG.
2) Heart sounds:
Which are synchronized to the cardiac cycle and are audible with a standard stethoscope over the left and right upper sternal border, left lower sternal border, and apex.
3) Central IV access site (Stopcock Manifold Port).
4) Peripheral IV access (Mannequin’s right arm)
5) IM / IO access (upper left arm and right lower leg respectively).
D. Disability assessment:
PediaSim is equipped with a number of features that allow the neurologic evaluation to establish the patient’s level of consciousness (responsiveness):
1. Vocal response: Vocal response: The instructor/actor may answer the questions using wireless microphone, and the sound is audible through the manikin.
2. Eye response: The pediatric mannequin eyes offers tremendous realism with features such as blinking eyelids; adjustable pupil settings, including normal, pinpoint and blown
3. Motor response: (the information on motor response will be provided by instructor)
Possible clinical intervention:
The pediatric mannequin was designed to support a wide range of clinical interventions involving the chest cavity.
• Chest Compressions: The simulator responses to CPR.
• ECG: The 5-lead ECG is emitted from the appropriate positions on the patient’s chest for display on a standard monitor or oscilloscope. The simulator generates a normal sinus ECG, as well as a broad range of abnormalities such as myocardial ischemia, sinus tachycardia and bradycardia, ventricular fibrillation and asystole
• Electrical Therapy:
- • Defibrillators: Both Conventional defibrillators (Monophasic & Biphasic Defibrillation) and Automatic external defibrillators (AEDs) can be applied to the simulator.
- • Pacing
- • Synchronized Cardioversion
Patient monitoring:
Patient monitoring features help learners with the all-important skill set of observing patient vital signs.
The patient monitor includes the following monitoring capabilities:
1. Pulse Oximetry (SpO2)
2. Non-invasive Blood Pressure (NIBP)
3. ECG
4. End Tidal CO2 Detection
5. Temperature
6. Swan-Ganz Catheter – A virtual catheter, which physically is not possible to insert, but allows you to observe the following parameters:
- • Central Venous Pressure (CVP)
- • Arterial Blood Pressure (ABP)
- • Pulmonary Arterial Pressure (PAP)
- • Thermodilution Cardiac Output
Administration of the pharmacological agents:
The drug recognition system is designed to increase and enhance the learning process by realistically representing the injection of intravenous drugs during the course of learning unit. There are two different kinds of medication, Bar-coded and non bar-coded medications.
A. Stopcock Manifold port:
Stopcock Manifold system: The stopcock and barcode reader are two key elements of this system. The stopcock serves as an injection site for the bolus and the barcode reader is the mechanism used to identify the drug within the system. Standard syringes are labeled with the drug type and concentration as well as barcode that uniquely identify the syringe to the system. Each syringe is filled with distilled or sterile water and can be injected directly into the patient mannequin. The drug recognition system’s barcode reader automatically identifies the drug and its concentration. The system then simulates the appropriate physiologic response according to the drug information.
In order to create this functionality, there are a few key components to understand about the drug recognition system.
1. Select the desired syringe (standard syringes are labeled with the drug type and concentration as well as a barcode that uniquely identifies the syringe to the system) and fill it with water (preferably distilled).
2. Make sure that no air remains in the syringe and that the plunger is aligned conveniently with a graduation on the syringe.
3. Insert the syringe into the syringe port of the stopcock (a two-way type of stainless steel construction and is firmly fixed in place).
4. Confirm that the bare code reader is scanning the syringe by observing the small green LED on the top of its case. The red LED can also be observed to blink rapidly while scanning the syringe.
5. Open the stopcock to inject the syringe by turning the lever 90 degrees counterclockwise. The lever should now be aligned with and pointing towards the syringe.
6. Gradually depress the syringe’s plunger to dispense the desired dose.
7. Return the stopcock lever to its original position once the dose has been dispensed. For improved accuracy, be certain that the stopcock lever is not rotated to the IV position too early. A sound technique is to pause for about 1 second after injecting the dose and returning the stopcock lever.
8. Remove the syringe from the stopcock port.
B. IV access port: (Mannequin’s right arm)
Medications administered through this system are not recognized by the PediaSIM system therefore, medications given through this port should be verbalized to the instructor during the scenarios.
C. IO access port: Medications can also be given IO (right lower leg, calf) and IM (left upper arm).