Description #
Unit intended to provide the essentials of operating, troubleshooting and maintenance of the Simulator in order for participants to acquire the skills to work with the METI Emergency Care Simulator (ECS). Participant also will become familiar with the structure and organization of the Simulated Educational Environment.
Learning Objectives #
At the end of the unit participants will:
1. Learn (all levels) about Simulation Lab Set-up and supporting equipment
2. Learn (all levels) about Simulation Lab Policy and Safety Precautions
3. Master ( for technicians and instructors only; learners and program coordinators will get familiar) Technical and Functional Aspects of the ECS Simulator.
4. Master (for instructors and learners only; technicians and program coordinators will get familiar) Clinical features of the ECS Simulator and possible interventions
5. Master (for instructors only; learners, technicians and program coordinators will get familiar) scenario design and creation in the ECS Simulator
ECS Care Unit set up and supporting equipment #
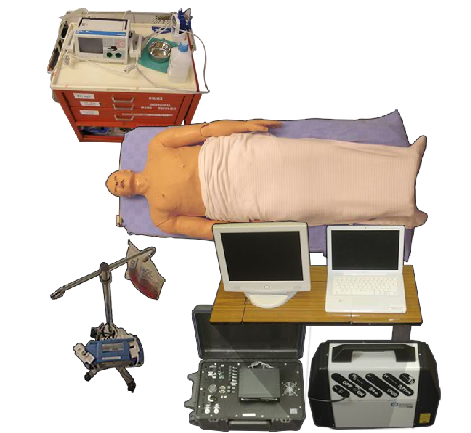
Welcome to the Supporting equipment page. On this page you will be introduced to the Emergency Care Simulator and its supporting equipment. It is important to spend the time on this page to familiarize yourself with the equipment before moving on. Be aware that many of the images on this page contain interactive elements that will require you to either move your mouse over them or click on the hot-spots when prompted.
The schematic form of the ECS and supporting equipment. Please now roll your mouse over the image below to learn more about the ECS and its supporting equipment. #
Room Policy and Safety Precautions #
Simple care and maintenance steps help to ensure the mannequin stays in good working condition. We recommend the following steps each time you use the simulator:
- Avoid using writing instruments and sharp objects while standing over the patient mannequin, to prevent markings, snags and rips in the skin.
- Use only distilled or sterile water for injection through any port.
- Position the mannequin horizontally and do not place anything on top of it.
- Avoid improper and aggressive use of equipment in event of difficult airway and intubation.
- Avoid giving fluid or inhalers through the mouth.
- NO FOOD OR DRINK IN SIM Room
Troubleshooting: #
- If any thing is not working get a technician.
- For further instruction on operating the system, please Contact CanHealth staff.
Technical and Functional aspects of ECS #
(For Technicians and Instructors, Leaners and Program Coordinators will get familiar only )
This section covers the Startup and Shutdown Sequences for the Emergency Care Simulator (ECS). If you have any questions, please contact CanHealth staff.
Please now continue on to the “Start Up Sequence” page.
Startup Sequence #
PCU Setup #
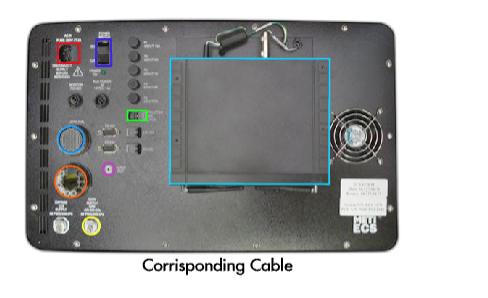
The first step in setting up the ECS is to set up the PCU. Be sure to follow these simple instructions in the order that they are listed. Below is a diagram that will help you locate the proper ports and cables. Click on the PCU to view it in more detail, then roll your mouse over the highlighted areas to see what cable corresponds with what port.
- Plug the black power cable into the PCU – (Red Highlight)
- Plug 2 cables (fluidic/pneumatic coupler, electrical fitting) from the ECS mannequin into the the PCU. – (Orange / Blue Highlight)
- Plug the blue Ethernet cable into the PCU – (Green Highlight)
- Plug the air hose from the compressor into the PCU – (Yellow Highlight)
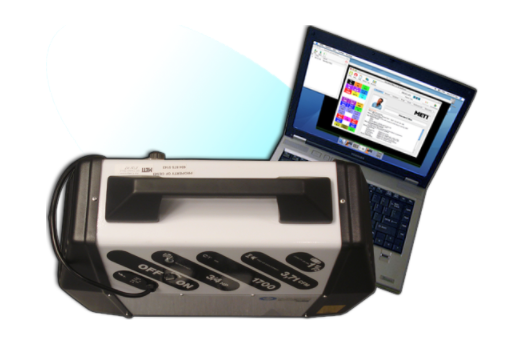
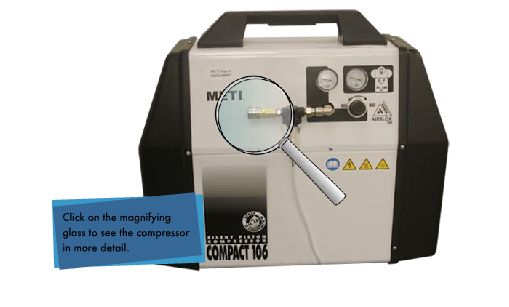
Compressor #
- Plug the yellow air hose into the back of the compressor. Please be sure the compressor is off when you do this.
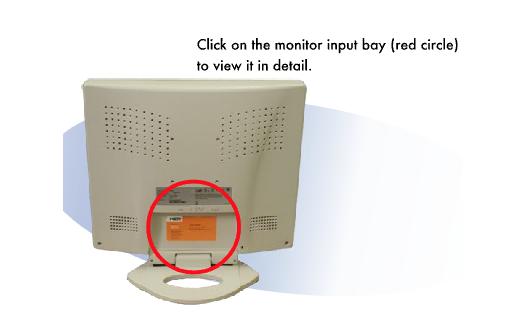
Patient Monitor and Laptop #
We must now set up the Patient Monitor and the Laptop. After you read each step in the setup, be sure to refer to the diagrams below so that you can properly identify the proper ports and cables.
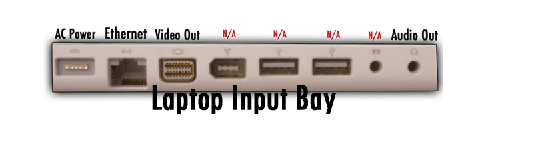
1. The first step is to connect the power cords for both the patient monitor and the laptop. They go from the power bar, to the ports marked “Power”
2. Secondly connect the Ethernet cable that is coming from the PCU into the Laptop port marked “Ethernet”
3. Lastly, connect the blue Video cable to the adapter, (see below) then one end into the “Video In” port, and the other into the “Video out” port.

Power On #
- Turn on the power for the PCU
- Turn on the power for the compressor.
- Turn on the power for the patient monitor.
- Turn on the power of the Macbook.
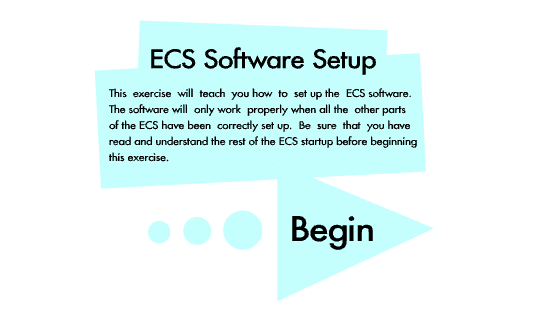
Software Setup #
Patient monitor #
- Turn off the external monitor.
- Disconnect cables from the external monitor to the Macbook.
Compressor #
- Turn the compressor power switch to the off position.
PCU #
- Turn off the PCU
- Unplug the 2 umbilical cables from the ECS mannequin.
- Unplug the cable from the compressor.
- Unplug the ethernet cable from the Macbook.
- After all cables are unplugged and the PCU is cleared of any debris, close up the ECS Kit and lock it.
Shutdown video #
Introduction to ECS (Clinical Features and possible interventions) #
(For Instructors and Leaners, Technicians and Program Cooridnators will get familiar only.)
Clinical Features Summary:
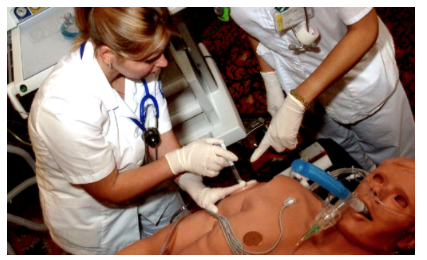
The ECS provides an anatomically correct, portable mannequin, which allows for the physical demonstration of various clinical signs including bleeding, breathing, blinking eyes and convulsions. The human physiology models at the core of the ECS provide appropriate responses to treatment interventions, including airway and oxygenation management, fluid administration, defibrillation and the administration of drugs. Together, these systems deliver a realistic and objective training ground for learners to practice and perfect patient care without risk to real patients.
ECS profile:
The ECS mannequin represents the physical characteristics of a 33 years old male. It is fully operational in the supine and lateral positions.The ECS head offers features such as blinking eyes and Variable pupil sizes (Including normal, pinpoint and blown); exhalation of air and CO2, and phonation features.
The ECS provides the following clinical features
- Airway assessment
- Breathing
- Circulation assessment
- Disability assessment (responsiveness)
- Possible clinical interventions
- Patient monitoring
- Administration of the pharmacological agents
We will now cover each of the above clinical features.
Airway #
1. Upper airway anatomy:
The ECS provides an anatomically realistic upper airway that includes all of the following features:
- Hard and Soft Palate
- Oropharynx
- Conical Trachea
- Carina
- Nasopharynx
- Laryngopharynx
2. Critical airway landmarks:
Such as a realistic Tongue, Epiglottis, Aryepiglottic Fold, Laryngeal Inlet, Vocal Cords and Esophagus.
3. Accurate ventilation interventions:
- Oropharyngeal
- Nasopharyngeal
- Bag-Valve-Mask (BVM)
- Laryngoscopic Procedures
- Laryngeal Mask Airway (LMA)
- Endotracheal Tube
4. Mis-Intubation:
ECS Mannequin accommodates intubation into the esophagus resulting in stomach distension and hypoventilation on the patient mannequin.
5.Airway trauma features:
Allow use of a variety of clinical supplies and equipment and include all of the following:
- Swollen Tongue
- Laryngospasm
- Upper Airway Obstruction
- Bronchial Occlusion
- Esophageal, Nasal and Oral Intubation
- Cricothyrotomy
Breathing #
The ECS mannequin offers:
Bilateral Breath Sounds, normal and abnormal, bilateral and unilateral, synchronized with breathing and ventilation Breath sounds are audible over the apex, axilla, and posterior of each lung with the use of a standard stethoscope.
Circulation #
1. Palpable Pulses:
- Bilateral carotid, brachial, radial, femoral, popliteal and pedal pulses.
- Pulses synchronized to physiology of circulation and chest compressions
- Pulse dependent on BP and anatomical position on patient mannequin.
2. Heart sounds:
Which are synchronized to the cardiac cycle and are audible with a standard stethoscope over the left and right upper sternal border, left lower sternal border, and apex.
Disability assessment #
ECS is equipped with a number of features that allow the neurologic evaluation to establish the patient’s level of consciousness (responsiveness):
- Vocal response: (there is a microphone option (instructor/actor may speak directly through the manikin)
- Eye response: (the eye has functional eyelids that blink and has pupils that can be adjuted independently to three levels of dilation)
- Motor response: ( the information will be provided by instructor)
Possible clinical interventions #
The ECS mannequin was designed to support a wide range of clinical interventions involving the chest and abdominal cavities.
1. ECG:
The 5-lead ECG is emitted from the appropriate positions on the patient’s chest for display on a standard monitor or oscilloscope. The simulator generates a normal sinus ECG, as well as a broad range of abnormalities such as myocardial ischemia, sinus tachycardia and bradycardia, ventricular fibrillation and asystole.
2. Electrical Therapy:
- Defibrillators: Both Conventional defibrillators (Monophasic & Biphasic Defibrillation) and Automatic external defibrillators (AEDs) can be applied to the simulator.
- Transthoracic Cardiac Pacing
- Synchronized Cardioversion
3. Trauma Features
- Chest Compression with Cardiac Output: The simulator responses to CPR.
- Needle decompression of tension pneumothorax with automatic resolution of symptoms and physiology
- Chest Tube Placement and Management
- Realistic pericardiocentesis with actual withdrawal of fluid dynamically linked to cardiac performance and blood pressure.
- Diagnostic Peritoneal Lavage
Patient monitoring #
Patient monitoring features help learners with the all-important skill set of observing patient vital signs.
The patient monitor includes the following monitoring capabilities:
- Pulse Oximetry (SpO2)
- Non-invasive Blood Pressure (NIBP)
- ECG
- End Tidal CO2 Detection
- Temperature
- Swan-Ganz Catheter – A virtual catheter, which physically is not possible to insert, but allows you to observe the following parameters:
Central Venous Pressure (CVP)
Arterial Blood Pressure (ABP)
Pulmonary Arterial Pressure (PAP)
Thermodilution Cardiac Output
Administration of pharmacological agents #
- IV Drug Administration (Mannequin’s right arm)
- Extensive drug library which includes ACLS drugs
- Simulated patient response to drug administered is automatically linked to physiology.
- Medications can also be given SC and IM (right upper arm).