SimBaby #
Description #
Introduction to Laerdal SimBaby
Learning Objectives #
To be announced
Room Policy and Safety Precautions #
This section provides the information on simple care and maintenance steps that will help to ensure mannequin stays in good working condition.
Each time you attend the Simulation program and use the simulator:
- Avoid using writing instruments and sharp objects while standing over the patient mannequin, to prevent markings, snags and rips in the skin.
- Use only distilled or sterile water for injection.
- Position the mannequin horizontally and do not place anything on top of it.
- Avoid improper and aggressive use of equipment in event of difficult airway and intubation.
- While using defibrillator or pacer, it is better to use lower energy levels.
- Avoid giving fluid or inhalers through the mouth.
- NO FOOD OR DRINK IN SIM Room
Troubleshooting: #
- If anything is not working get a technician.
- If further instruction is needed in how to operate the system, please ask CanHealth staff for more clarification.
Technical and Functional aspects #
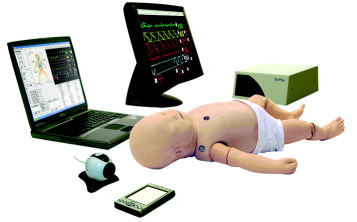
These are the main components of the SimBaby
- SimBaby
- Link box
- Compressor
- Laptop (Instructor’s Workstation)
There are many similarities between SimBaby and the original SimMan. Please see the PDF below
- Note: The PDA functions as a remote control and is not available with the original SimMan at CanHealth.
Startup Sequence #
The SimBaby Mannequin #
- Connect the mannequin cable from the SimBaby to the Link Box labeled “Mannequin”
- Connect the air cable from the SimBaby to the Compressor labeled “Air”
- Connect the cable from SimBaby’s blood pressure cuff to the Link Box labeled “Blood pressure cuff”
- Connect an SPO2 device to the SimBaby’s toe and connect the other end of it to the Link Box labelled “SP02”
The Laptop Computer #
- Connect a USB cable from the computer to the USB Hub.
- Connect the mouse to the USB hub.
- Connect the webcam to the laptop USB slot.
- Connect the PDA dock to the USB hub.
- Dock the PDA onto the PDA dock.
Patient Monitor #
- Connect the monitor cable from the Patient Monitor to the laptop.
- Connect an audio cable from the Patient Monitor to the laptop’s headphone jack.
- Connect a USB cable from the Patient Monitor to the USB Hub.
- Position the webcam so that it sits firmly above the patient monitor.
Power Connections #
- Connect a power cable from the Link Box to a surge protected power bar.
- Connect a power cable from the Compressor to a surge protected power bar.
- Connect a power cable from the USB Hub to a surge protected power bar.
- Connect a power cable from the PDA dock to a surge protected power bar.
- Connect a power cable from the Laptop to a surge protected power bar.
- Connect a power cable from the Patient Monitor to a surge protected power bar.
Power Switches #
- Turn on the power for the Link Box.
- Turn on the power for the compressor.
- Turn on the power for the USB Hub.
- Turn on the power for the laptop.
- Turn on the power for the PDA dock.
- Turn on the power for the PDA.
- Turn on the power for the Patient Monitor.
Software Startup #
- After the laptop has started up and is ready to use, double click on the SimBaby icon.
- When prompted for a username or password, don’t type anything. Simply press OK.
- If everything has been started up properly and all equipment is functioning normally, the SimBaby software will show animated lungs and the BabySim mannequin will be breathing and have pulses.
- You are now ready to start a scenario.
Shutdown Sequence #
The shutdown sequence is the reverse of the startup sequence.
Shutdown the software #
#
Power off the equipment #
#
Most cable connections can be left in place #
Airway Features #
Airway opening acquired by head tilt, chin lift and jaw trust
- Suctioning, practicing the motions of suctioning
- Oropharyngeal and nasopharyngeal airways
- Bag-Valve-Mask ventilation
- Oro-and nasotracheal intubation
- Sellick Maneuver
- LMA insertion
- Fiberoptic intubation
- Gastric tube insertion
- Variable lung compliance
- Variable airway resistance
- Tongue edema
- Laryngospasm
- Pharyngeal swelling
- Right mainstem intubation
Breathing #
- Spontaneous breathing with variable rate, depth and regularity
- Bilateral and unilateral chest rise and fall
- CO2 exhalation
- Normal and abnormal breath sounds – bilateral
- Oxygen saturation
- See-saw respiration
- Retractions
- Unilateral chest tube insertion
- Pneumothorax:
- Unilateral chest movement
- Unilateral breath sounds
- Unilateral needle thoracentesis mid-clavicular
Circulation #
- Blood pressure (BP) measured manually by auscultation of Korotkoff sounds
- Radial, brachial and femoral pulses synchronized with ECG
- Pulse strength variable with BP
- Heart sounds
- Reading of cardiac rhythms via 4-connector 3-lead ECG monitoring
- 12-lead dynamic ECG display
- Defibrillation and cardioversion
Other features #
- Venous access antecubital fossae, dorsum of the hand and long saphenous vein
- Intraosseous insertion – bilateral
- IV bolus and infusion
- Simulated blood flashback upon venous cannulation
- Vocal sounds: Crying, coughing, hiccup, etc:
- Lung sounds: Normal, crackles, stridor, wheezes, etc.
- Heart sounds: Normal, diastolic murmur, systolic murmur, etc.
- Interchangeable eyes with normal, constricted and blown (dilated) pupils
- Distendable fontanel
- Torso motion