Welcome to SimMan 3G #
#
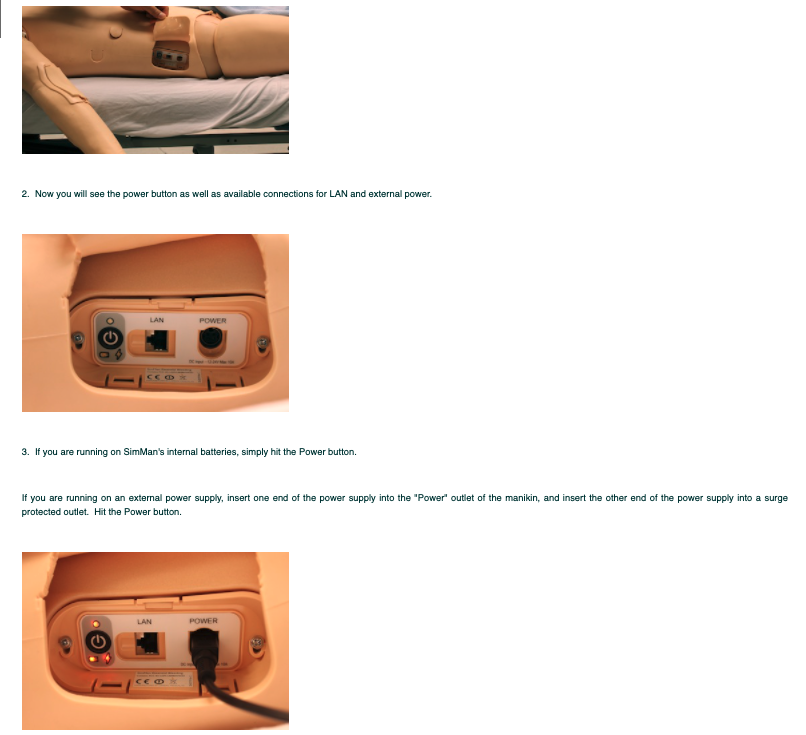
Description #
Unit intended to provide the essentials of operating, troubleshooting and maintenance of the Laerdal SimMan Simulator in order for participants to acquire the skills to work with the SimMan Simulator. Participant also will become familiar with the structure and organization of the Simulated Educational Environment.
Learning Objectives #
At the end of the unit participants will:
- 1. Learn (all levels) about Simulation Lab Set-up and supporting equipment.
- 2. Learn (all levels) about Simulation Lab Policy and Safety Precautions.
- 3. Master ( for technicians and instructors only; learners and program coordinators will get familiar) Technical and Functional Aspects of the Simulator
- 4. Master (for instructors and learners only; technicians and program coordinators will get familiar) Clinical features of the Simulator and possible interventions
- 5. Master (for instructors only; learners, technicians and program coordinators will get familiar) scenario design and creation in the Simulator
This section will help you to get familiar with the simulation environment by providing the information on the Laerdal SimMan 3G and medical equipment/supplies that are available during the simulated sessions.
Standard SimMan 3G Equipment
- SimMan 3G manikin
- Laptop PC – Instructor Workstation with headset
- Laptop PC – Patient Monitor
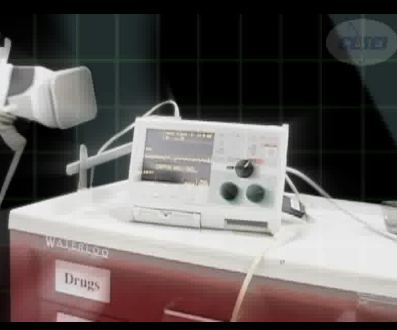
Supporting Equipment
- Crash Cart
- Defibrillator
- IV Pole
- Audio/Visual Debriefing System
- Other equipment as defined by your instructors
Some Key Features of SimMan 3G
- Wired or Wireless Connectivity
- Manikin can operate on batteries or power cable
- Instructor PC and Patient Monitor PC are touch screen enabled
- Ability to use internal compressor or (optional) external compressor
- Automatic pupil light reaction
- Automatic drug recognition
Technical and Functional aspects of SimMan #
In this section, we will first introduce the SimMan 3G and supporting technical equipment through:
- Step-by-step instructions with pictures and diagrams.
- Instructional videos with voice narration.
After completing this unit, we want you to be able to recognize each component of the SimMan 3G and be able to start up the simulator and also to be able to shut it down properly. This section is mandatory for instructors. For trainees, you are only responsible to be familiar with the technical and functional aspects of SimMan. Click on Next Page on the top or bottom of the screen, or use the Content Navigation window to the right of the screen to access the comprehensive startup and shutdown procedures for SimMan. If at anytime you have a question, please contact CanHealth staff immediately.
Startup Sequence #
1. Power On the SimMan 3G Manikin #
The manikin can run on batteries or on an external power supply.
1. On the right side of the manikin, lift up the skin.
2. Startup the Instructor PC #
1. Start up the Instructor PC Laptop and the Patient Monitor laptop. Login as necessary. If connecting wireless, ensure you are connected to the SimMan wireless network.
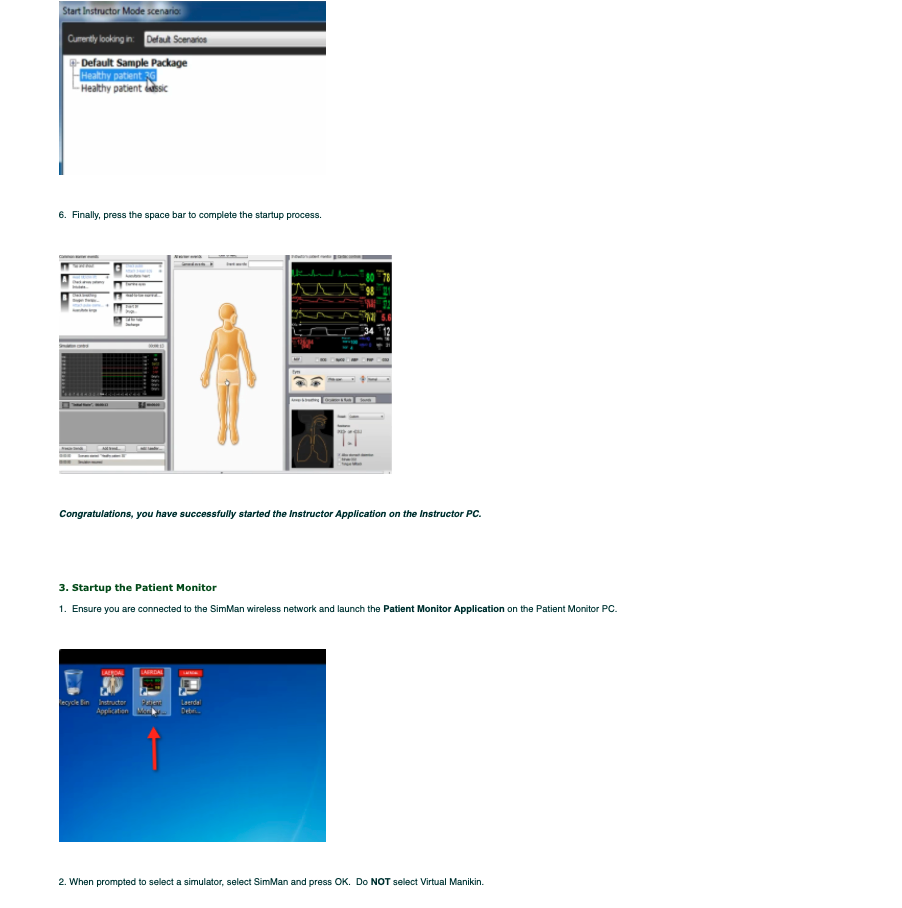
2. On the Instructor PC laptop, launch the Laerdal Instructor Application.

SimMan 3G Startup Sequence Video #
Shutdown Sequence #
(For Technicians and Instructors. Learners and Program Coordinators will be familiar only.)
After you have completed your SimMan session, it is important to shut everything down properly for the safety of yourself and others. Furthermore, proper shutdown will extend the lifespan of the SimMan unit. The Shut-Down Sequence, entails a 3 step process which we will perform as follows.
(The Shutdown Sequence is actually the Startup Sequence in reverse.)
1. Shut down the Patient Monitor Application #
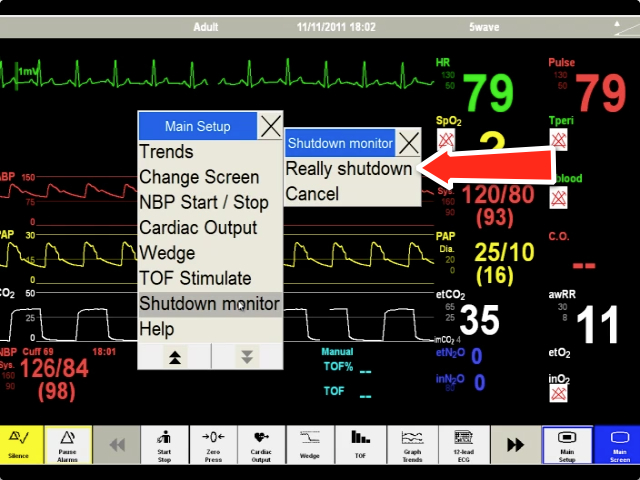
NOTE: The patient monitor application can be controlled by the mouse or by touch screen. Please follow the red arrows below to safely shut down your patient monitor.
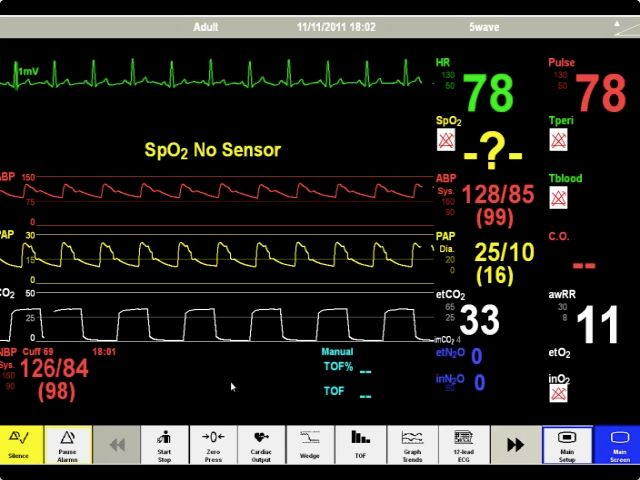
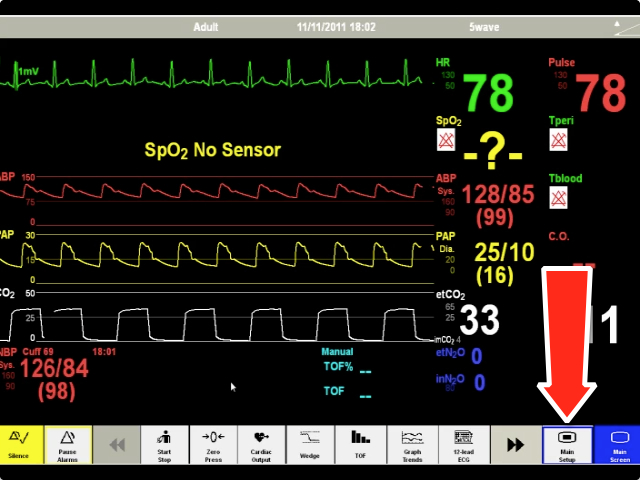
1. Click your mouse or point your finger at “Main Setup,” as indicated by the red arrow.
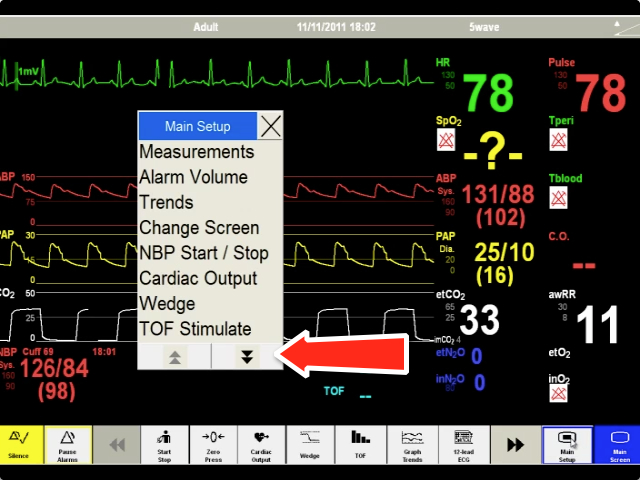
2. A Main Setup menu should appear. Click your mouse or your finger on the black double arrow located on the submenu.
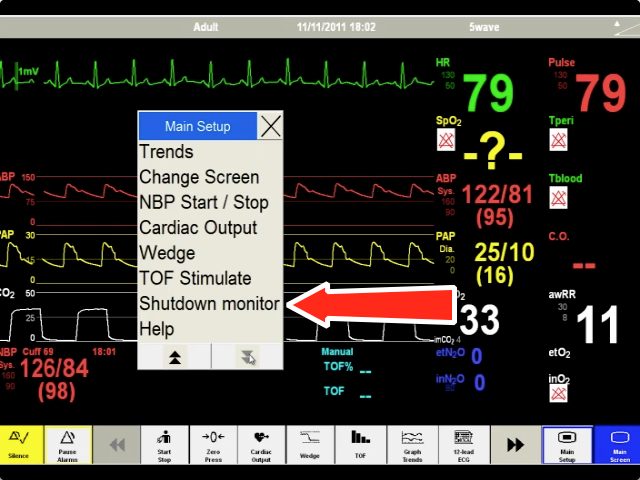
3. Click your mouse or your finger on “Shutdown monitor“
4. A Shutdown monitor submenu should appear. Click your mouse or your finger on “Really Shutdown.”
Now shutdown your Patient Monitor laptop as you normally would.
Congratulations, you have successfully shutdown the patient monitor.
2. Shut down the Instructor PC Laptop #
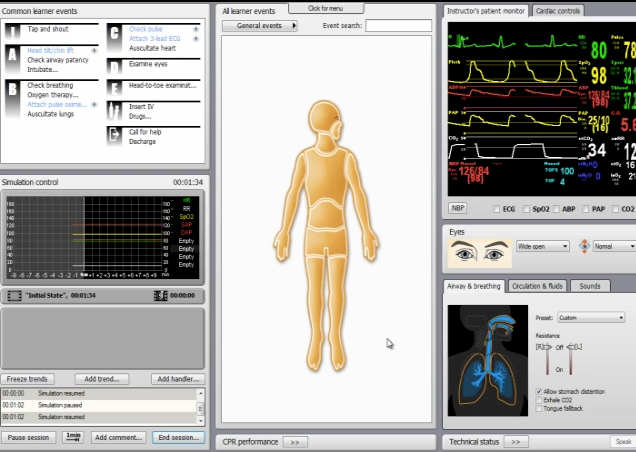
1. The first step is to shut down the Instructor Application. Focus your attention on the bottom left region of the screen.
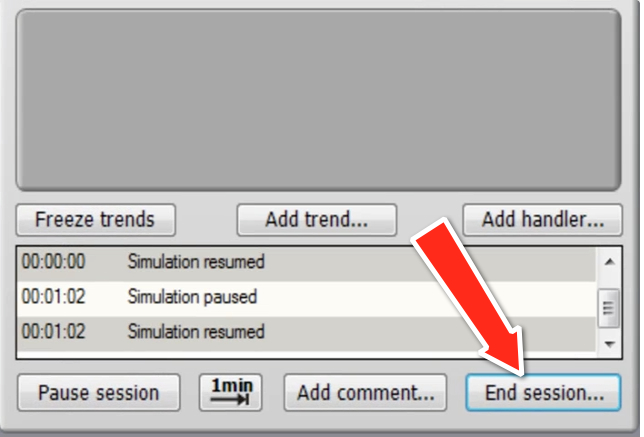
2. Here is a close-up of the bottom left region of the screen. Use your mouse or finger to click on “End Session.”
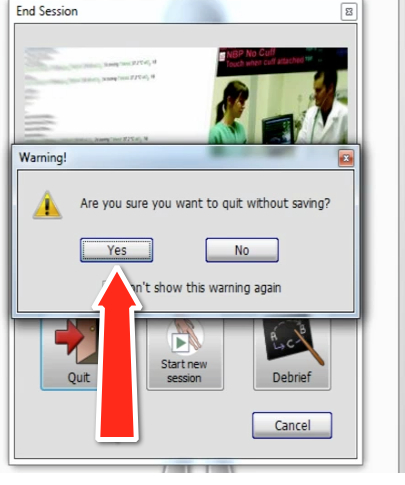
3. In the middle of the screen, an “End Session” window will appear. In that window, click your mouse or finger on the “Quit” icon.
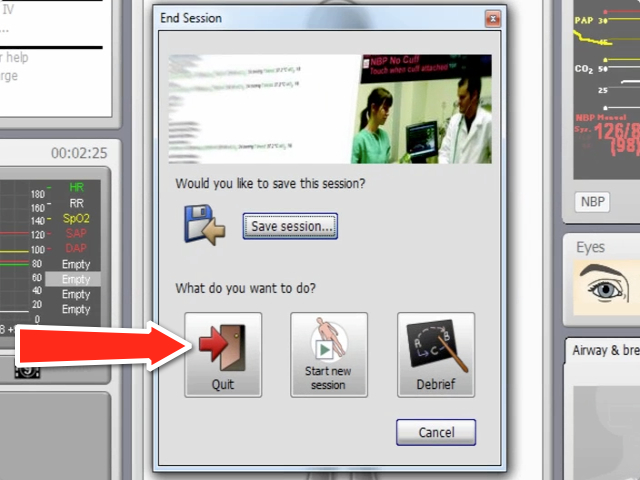
4. Click on “Yes” when asked to confirm to quit without saving.
5. After the Instructor Application has been closed, shut down the Instructor PC as you normally would
3. Power Off the SimMan 3G Manikin #
1. Press the power button to power off the SimMan 3G Manikin.
2. If you used a LAN cable to connect to the manikin, please remove the LAN cable and store in a safe place.
3. If your SimMan 3G manikin was operating on batteries, now would be a good time to recharge them. If you were running on AC power, please unplug the AC power.
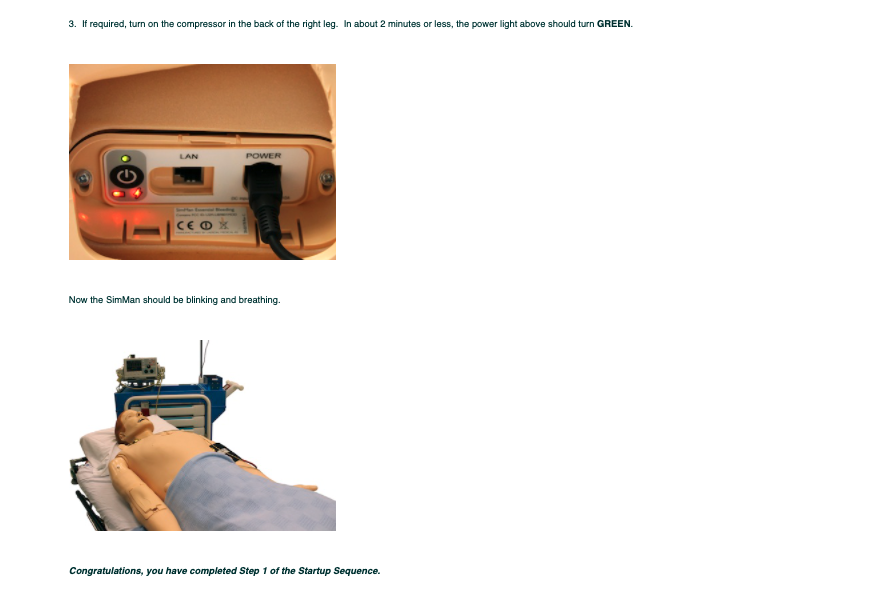
4. Drain the compressor in the back of the right leg by turning the compressor switch.
Congratulations. You have completed the Shut-Down Sequence for SimMan 3G
SimMan 3G Shutdown Sequence Video #
SimMan 3G Clinical Features and Possible interventions #
(For Instructors and Learners. Technicians and Program Coordinators will be familiar with.)
This section will make you familiar with the clinical features of SimMan 3G manikin. An advanced patient simulation system, SimMan 3G, representing the physical characteristics of an adult male/female patient, allows the performance of the physical examination, patient monitoring, and interventions.
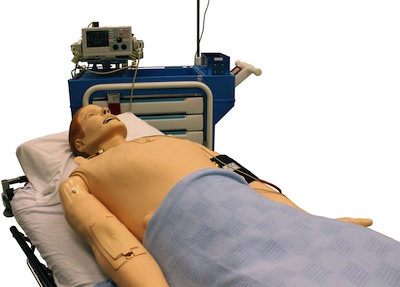
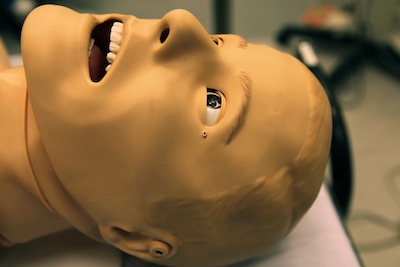
SimMan 3G Manikin: #
SimMan 3G is a full body, adult male/female manikin that has realistic anatomy and clinical functionality, and provides simulation-based education to challenge and test students’ clinical and decision-making skills during realistic patient care scenarios.
Clinical Features and Possible Interventions #
- Airway assessment
- Breathing
- Circulation assessment
- Disability assessment (responsiveness)
- Possible clinical interventions
- Patient monitoring
- Administration of the pharmacological agents
Airway #
The SimMan 3G provides 5 main clinical features. The first feature we will cover is Airway assessment.
AIRWAY ASSESSMENT #
SimMan 3G’s airway is instructor–controlled to allow simulation of various airway complications, including the failure of therapeutic airway devices.
Head of the manikin allows performance of
- head tilt / chin lift and jaw thrust
- cricoid pressure and manipulation
- suctioning (oral and nasopharyngeal)
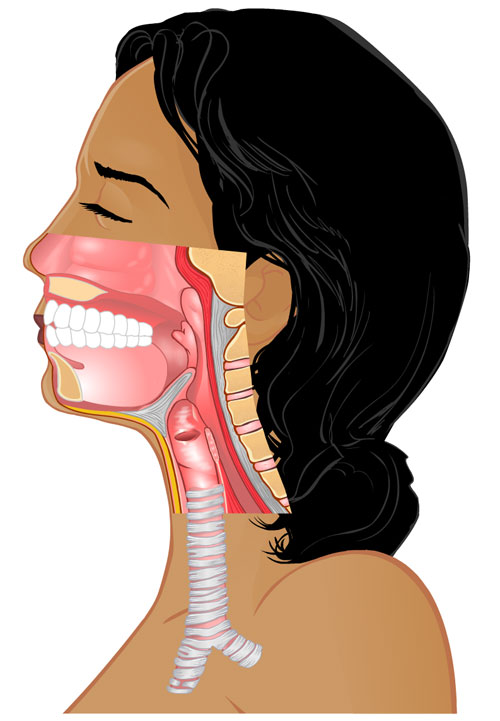
Upper airway anatomy:
The SimMan 3G provides an anatomically realistic upper airway that includes all of the following features:
- Hard and Soft Palate
- Oropharynx
- Conical Trachea
- Carina
- Nasopharynx
- Laryngopharynx
Critical airway landmarks #
Such as a realistic Tongue, Epiglottis, Aryepiglottic Fold, Laryngeal Inlet, Vocal Cords and Esophagus.
Accurate ventilation interventions:
- Bag-Valve-Mask (BVM) ventilation
- Orotracheal intubation
- Nasotracheal intubation
- Transtracheal intubation
- Retrograde intubation
- Fiberoptic intubation
- Laryngeal Mask Airway (LMA)
- Combitube
- Needle cricothyrotomy
- Surgical cricothyrotomy
Mis-Intubation #
SimMan Manikin accommodates intubation into the esophagus resulting in stomach distension and lack of chest sounds. The manikin contains two lungs. Intubation that is too deep will result in unilateral lung filling. This usually occurs on the right side, due to the accurate anatomical modeling of the trachiobranchial junction tree.
Airway and trauma features: #
Allows use of a variety of clinical supplies and equipment and include all of the following:
- Tongue Edema – multiple levels
- Trismus
- Pharyngeal swelling
- Laryngospasm
- Upper Airway Obstruction
- Bronchial Occlusion
- Decreased cervical Range of motion
- Decreased right / left Lung compliance
- Teeth – soft or hard set
SimMan 3G Airway Assessment video #
Breathing #
The next clinical feature of the SimMan 3G that we will cover is breathing.
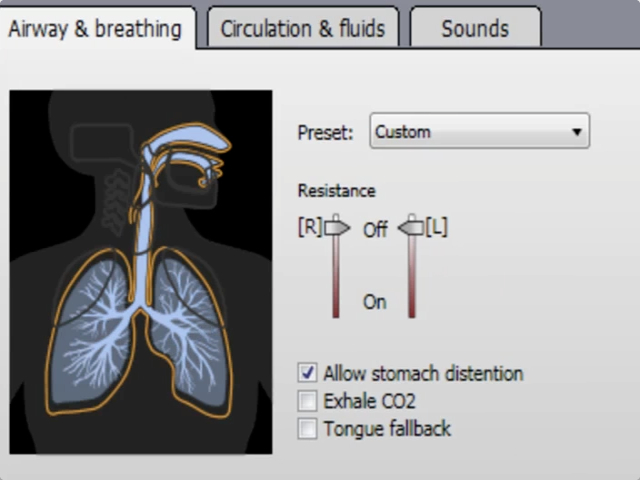
The manikin can simulate spontaneous breathing and can be connected to ventilators and used with assisted ventilators.
The SimMan 3G manikin offers :
- Bilateral and unilateral chest rise and fall
- Variable lung compliance : 4 compliance settings from normal to extremely tight
- Normal and abnormal breathing sounds
- 5 anterior and 6 posterior auscultation sites
- Unilateral, bilateral and breathing sounds
- Oxygen saturation and phlethysmogram
- Cyanosis – indicated by blue lights on the lips
- CO2 exhalation for use with third-party ETC CO2 detectors
Breathing Assessment video #
Circulation #
The next clinical feature of SimMan 3G we will cover is Circulation Assessment.
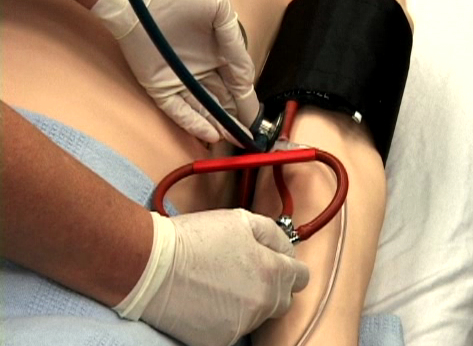
CIRCULATION ASSESSMENT #
1) Pulses:
SimMan 3G has physiologically correct palpable pulses that are synchronized to ECG.
- Bilateral carotid pulses
- Left brachial pulse
- Bilateral radial pulses
- Bilateral femoral pulses
- Bilateral popliteal pulses
- Bilateral dorsalis pedis pulses
- Bilateral posterior tibialis pulses
Please note: There are no pulses on the right brachial artery.
2) Heart sounds
The simulated patient generates heart sounds (including a range of pathological ones) which are synchronized to the cardiac cycle and are audible with a standard stethoscope over every anterior location.
SimMan 3G manikin also offers Bowel Auscultation sounds, normal and abnormal, that are audible with a standard stethoscope in all four quadrants.
Circulation Assessment video #
Disability assessment #
The next clinical feature of SimMan 3G we will cover is Disability assessment (responsiveness)
DISABILITY ASSESSMENT (RESPONSIVENESS) #
SimMan 3G is equipped with a number of features that allow the neurologic evaluation to establish the patient’s level of consciousness (responsiveness):
1. Vocal response:
Numerous vocal sounds (moan, vomit, cough, etc) and pre-recorded sound clips are available.
Using the headset, the instructor/actor can communicate and interact directly through the loudspeaker in the manikin’s head.
2. Eye response:
Pupil size / Eyelid status / Blinking frequency / Light sensitivity – All these can be controlled in Instruction mode.
3. Motor response:
The information on motor response will be provided by instructor
Disability Assessment video #
Possible clinical interventions #
The next clinical feature of SimMan 3G we will cover is Possible Clinical Interventions.
POSSIBLE CLINICAL INTERVENTIONS #
The SimMan 3G manikin was designed to support a wide range of clinical interventions involving the chest cavity and other part of the body.
- Chest Compressions: The simulator responses to CPR.
Compliant with 2000 and 2005 Guidelines
Detection of depth, release and frequency of compressions
Compression generate palpable pulses, blood pressure wave form, and ECG artifacts.
Real-time view of Quality of CPR on the Instructor’s PC.
- ECG: The simulator generates a normal sinus ECG, as well as a broad range of abnormalities such as myocardial ischemia, sinus tachycardia and bradycardia, ventricular fibrillation and asystole. (12-lead ECG display / pulses from 0-220)
- Electrical Therapy:
Pacing
Synchronized Cardioversion
Defibrillators: Both Conventional defibrillators (Monophasic & Biphasic Defibrillation) and Automatic External Defibrillators (AEDs) can be applied to the simulator.
Caution
Defibrillation must be performed on the defibrillator connectors only.
Do not exceed a maximum of 3 shocks in 45 seconds, cease shocks for at least 15 minutes before starting a new sequence.
The manikin must not come into contact with electrically conductive surfaces or objects during defibrillation.
Do not apply conductive gel or conductive defibrillation pads intended for patient use.
Do not press down too hard on the defibrillation connectors during defibrillation.
Do not defibrillate the manikins when it is turned OFF or if it is not functioning normally.
Do not defibrillate the manikins if the torso skin is not in place.
Do not use automated chest compression machines on SimMan 3G
- Pneumothorax
Tension pneumothorax with needle decompression (we recommend a 22 gauge needle for this purpose) can be performed.
Chest Tube insertion can be simulated on both sides.
- Stomach Decompression
- Esophageal, Nasal and Oral Intubation
- Cricothyrotomy
- Foley Catheter insertion
- Intraosseous access – sternum and left tibia
- Bleeding : To allow the manikin to bleed realistically, the manikin has internal reservoirs for simulated blood.
- Bleeding treatment – bandage, pressure point, tourniquet, surgical clamps
- Cyanosis – indicated by blue lights on the lips.
- Convulsions : both hands – tonic / tonic-clonic
- Secretions : sweat on forehead / tears / ears / right nose / right side mouth / urine
Other features: #
Bowel Auscultation Sounds in all four quadrants, which adds a very valuable assessment capability for learners.
Possible Clinical Interventions #
Patient Monitoring #
The next clinical aspect of SimMan 3G we will cover is Patient Monitoring.
PATIENT MONITORING #
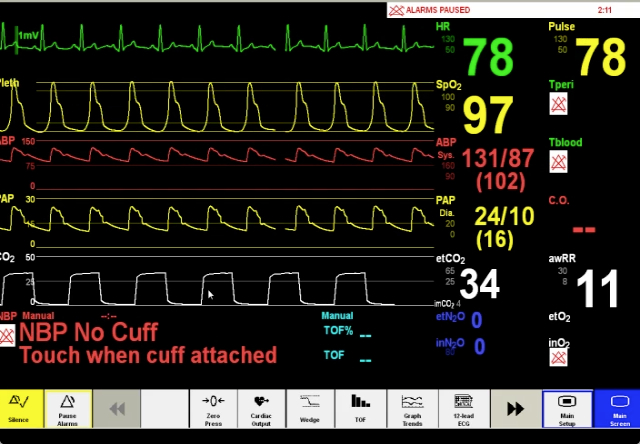
Patient monitoring features help learners with the all-important skill set of observing patient vital signs.
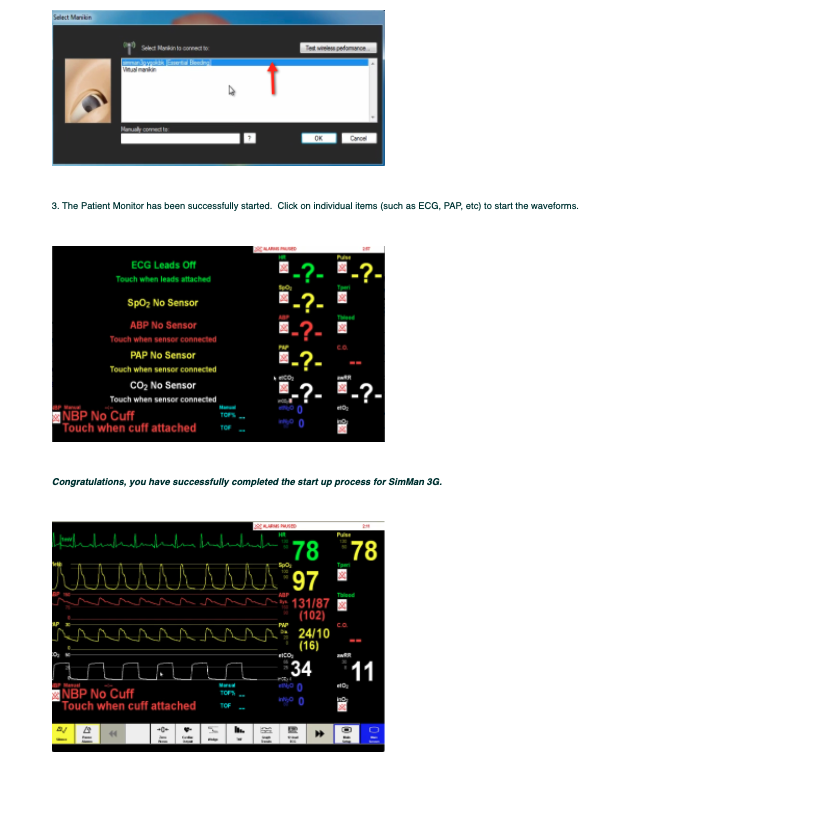
The patient monitor (touch-display) software emulates a real patient monitor as a found in hospitals and ambulances.
The patient monitor includes the following monitoring capabilities:
- ECG (12-lead ECG)
- Pulse Oximetry (SpO2)
- Respiratory rate
- BP – Non-invasive Blood Pressure (NIBP)
- Arterial BP(ABP)
- PAP
- CO2 and capnograph waveform
- Temperature (Core temperature, Peripheral temperature)
- CVP waveform and numerical display output
- End Tidal O2
- End Tidal CO2
- Cardiac Output (CO)
- Radiology – display X-ray images
- Media – display media images
- Labs – display Lab data
Patient Monitoring #
Administration of the pharmacological agents #
The last clinical aspect of SimMan 3G we will cover is the Administration of the Pharmacological agents.
 #
#
ADMINISTRATION OF THE PHARMACOLOGICAL AGENTS:
- IV access port : Manikin’s right arm
- Medications administered through this system are recognized by SimMan 3G RFID system automatically.
- Injection access locations :
- IV access port on the right arm can be replaced
- IO access port on the sternum and left tibia : can be replaced
- IM injection : can be done on the right buttock – but, DO NOT INJECT FLUIDS into this pad.