Description #
Overview of the preparation of the patient for the surgical procedure including positioning of the patient, preparation of the skin, draping and a discussion of surgical incisions used. In addition to previous unit discussion of surgical instruments, this unit will review sutures, needles and intraoperative staplers. Also, factors affecting wound healing (including drain/ dressing options and care) and how to deal with specimens retrieved during the surgical procedure will be discussed.
Learning Objectives #
At the end of the session students will be able to:
- 1. List the criteria for patient positioning.
- 2. List the most common causes of injury as a result of patient positioning on the OR table.
- 3. Demonstrate the most common intraoperative surgical positions.
- 4. Demonstrate the use of common skin preparations for surgical procedures.
- 5. Demonstrate draping techniques for common surgical procedures.
- 6. Describe the different types of surgical incisions.
- 7. Describe wound healing and factors affecting wound healing.
- 8. Describe the various drains and dressing used for surgical wounds.
- 9. Describe the various suture materials and needles and how to load needle holders.
- 10. Demonstrate the use and reloading of stapling devices.
- 11. Describe the safe handling of patient specimens.
Surgical Patient Positioning #
Learning Objectives #
The goal of proper patient positioning on the OR table is maintaining the patient’s comfort and safety. Patients are placed in a variety of positions in order to obtain surgical access. It is the responsibility of all operating room team members to ensure that proper body alignment is achieved to avoid injury to the patient.
At the end of the session the nurse will be able to:
- Describe how patients can be safely transferred between stretcher/bed and the OR table, both pre-operatively and post-operatively.
- List the criteria for positioning patients safely on the OR table.
- List the most common risk factors, causes and and anatomical areas of injury associated with positioning patients.
- Describe the challenges involved in positioning patients who are: elderly; obese; emaciated; suffering from poor nutritional status; immunosuppressed; chronically ill.
- Describe the advantages and disadvantages of the four most common surgical positions.
- Describe the process and necessary equipment for positioning a patient in the four most common surgical positions .
Patient Transfer #
It is important for perioperative nurses to be able to safely transfer patients from the stretcher or bed to the operating room (OR) table without causing any injury to the patients or themselves. The following discussion will focus on the transfer of adult patients who are awake. The process and principles of transferring patients with specific needs (e.g. pediatiric patients, patients who are intubated or have special needs or injuries [e.g. fractured hip]) will be reviewed during the full-time clinical program.
The transfer of a patient from a stretcher to the OR table preoperatively, is based on the follwing principles:
 #
#
Watch the following video on the demonstration of a safe patient transfer to the OR table:
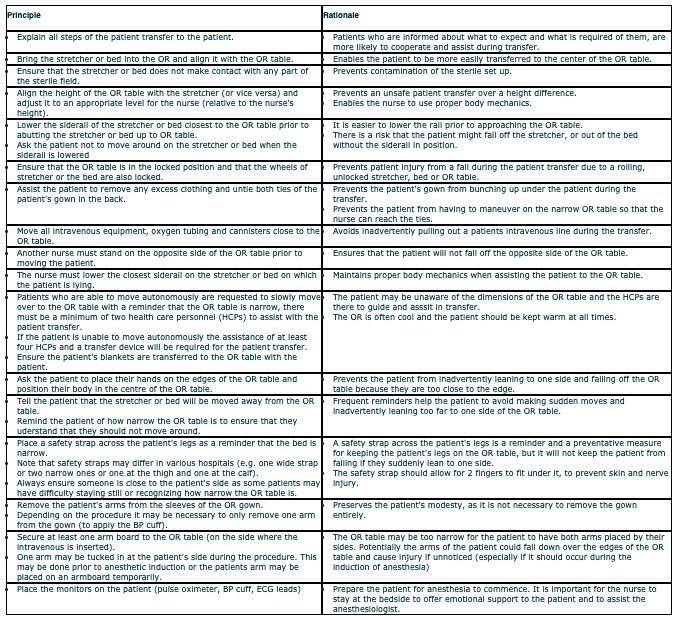
Supine Position #
Supine/Dorsal Position #
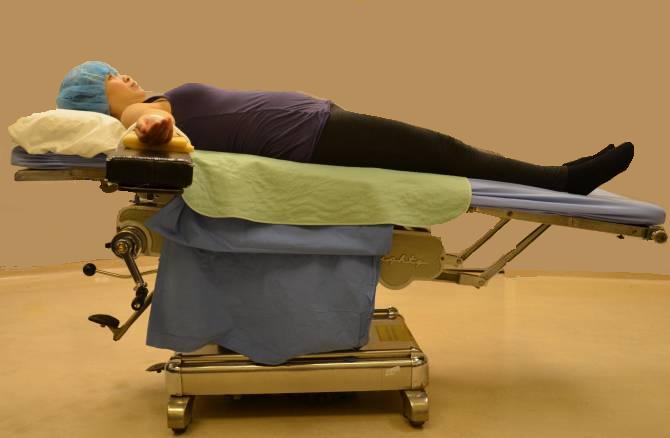
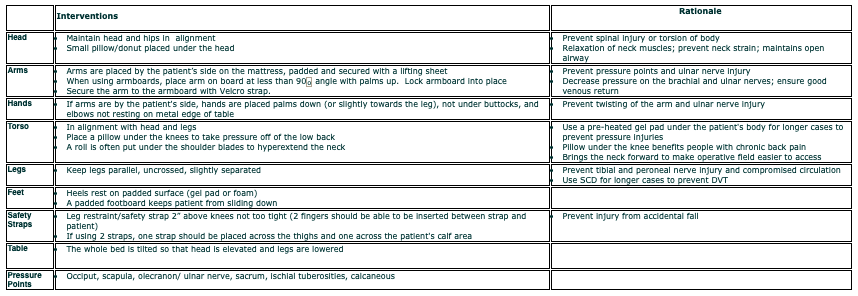
The supine or dorsal position is one of the most commonly used positions and is the least harmful to the patient, in that it causes the least circulatory changes. However, as with any procedure, the length of time a patient spends in any one position will increase the risk for injury.
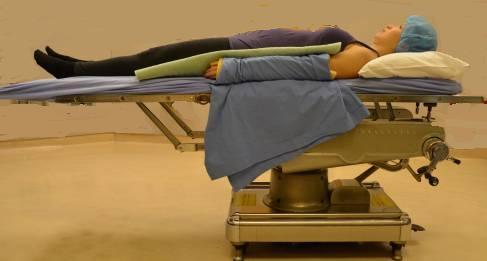
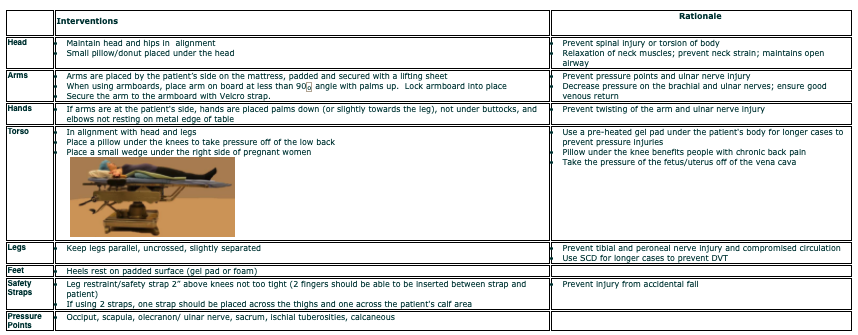
Review the following positioning interventions, rationale and potential areas of injury for the supine position.
Disadvantages, Complications and Common Injuries of the Supine Position
- Stasis or obstruction to venous return, i.e. abdominal retractors, packs, intra-abdominal mass as in pregnancy.
- Brachial plexus injury in abducted arm; causes motor and sensory loss to arm and shoulder movement – to prevent this, keep arm at less than 90° angle.
- Hyperabduction of arm causes compression/occlusion of subclavian and auxiliary arteries.
- Radial nerve palsy, i.e., misplacing/compressing arm against the side of the table can cause wrist drop as well as damage to the median nerve and ulnar nerve.
- Leg vessel injuries, i.e., mechanical occlusion by leg straps/misplacing a pillow directly under popliteal space (compression causes venous thrombosis).
- Tibial/sural nerve damage, i.e., pressure injury under knee causes numbness on planter (upper) surface of foot.
- Skin pressure injuries over bony prominences.
- Obese/underweight individuals are vulnerable to pressure(s) over bony prominences. Underweight – pressure more intense in smaller areas. Overweight – pressure more extensive overall; heavy arm extremities prone to displacement.
Trendelenburg and Reverse Trendelenburg #
The following two positions are similar to supine, however, there is an alteration in the level of the OR table that changes the position of the patient and therefore creates different physiological challenges for the patient. Review the video on supine position for information on the procedure for positioning in the two Trendelenburg positions.
Trendelenburg Position #
The Trendelenburg position is commonly used when it is necessary to allow gravity to push the abdominal contents up out of the pelvis (i.e. for gynecological procedures), to insert central venous lines and to improve venous return in emergency/ recovery situations. Review the following positioning interventions, rationale and potential areas of injury for the Trendelenburg position.
Disadvantage and Possible Complications
- Venous return impaired; can cause circulatory problems in cardiac patients.
- Brachial plexus injury in abducted arm (causes motor and sensory loss to the arm and shoulder girdle).
- Hyperabduction of the arm causes compression &/or occlusion of the subclavian and axillary arteries.
- Can create breathing difficulties in overweight patients due to displacement of organs against diaphragm.

Reverse Trendelenburg Position #
The Reverse Trendelenburg position is commonly used to bring the neck into easier view, i.e. during thyroid procedures. Review the following positioning interventions, rationale and potential areas of injury for the Reverse Trendelenburg position.
Disadvantages and Possible Complications
- Circulation is compromised due to peripheral pooling of blood in the lower extremities.
- Movement from this position to normal must be slow to allow the heart time to adjust to changes in blood volume.
Sitting Position #
The sitting position is a variation of the supine position. It is often used for craniotomies, facial surgery and shoulder procedures. Review the following positioning interventions, rationale and potential areas of injury for the sitting position.


Disadvantages and Possible Complications
- Systemic circulation is greatly compromised resulting in low blood pressure.
- Skin pressure areas and sciatic nerve damage due to most weight resting on ischial tuberosities.
- Foot injuries due to sacral pressure (place feet at right angles).
- Eye injuries due to improperly placed head support.
- With neurosurgery patients, the maintenance of blood pressure without increasing intracranial pressure is a problem with this position.
Lateral Position #
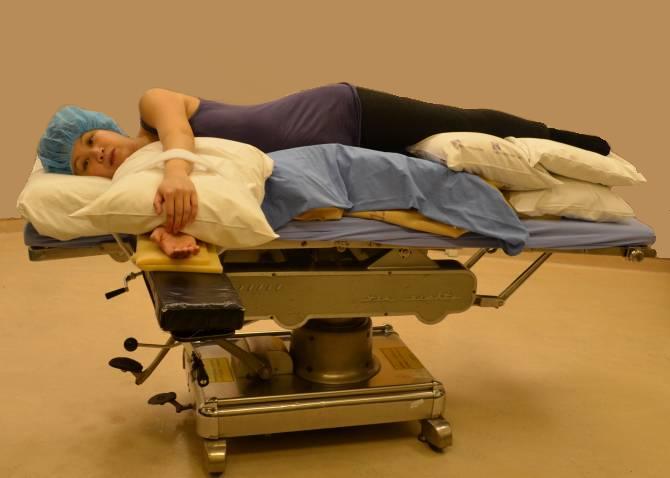
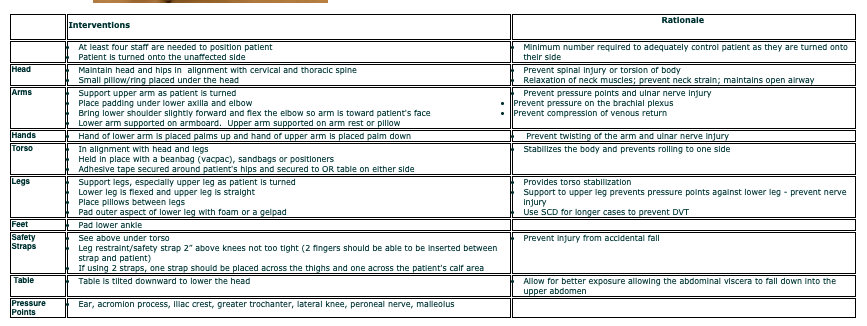
The lateral position is commonly used for thoracic, renal and hip surgery. The patient can be placed in either the left lateral position (lying on the left side) or the right lateral position (lying on the right side) – the side to be operated on is upwards. This may sound confusing, but the positioning is concerned with what side the patient is lying on, as this is where the pressure is. Review the following positioning interventions, rationale and potential areas of injury for the lateral position.
Disadvantages and Possible Complications
- Respiratory effectiveness reduced on dependent lower lung.
- Respiration is impaired due to restricted chest movement.
- Blood pools in dependent limbs.
- Skin pressure between the legs from the weight of the upper leg on the lower leg and greater pressure under greater trochanter of femur.
- Potential brachial plexus and medium, radial and ulnar nerve injury (i.e. if upper arm extended to overhead position and not properly supported).
- Peroneal nerve damage from compression of lower knee against a hard surface.
Lithotomy Position #
The lithotomy position is commonly used for perineal, rectal and gynecological procedures. Review the following positioning interventions, rationale and potential areas of injury for the lithotomy position.

lithotomy in candy cane (shepard’s hook) stirrups
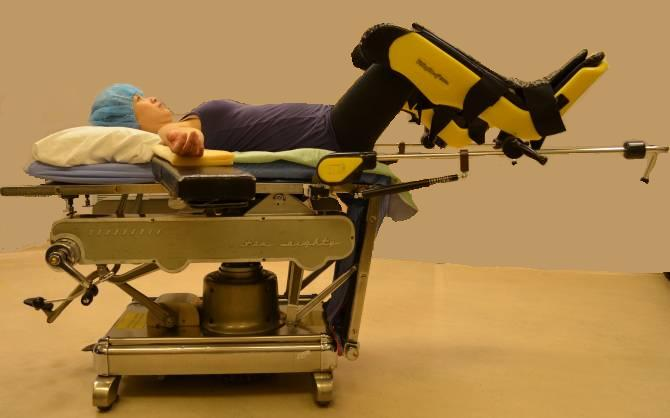
lithotomy (modified) in yellowfin type stirrups
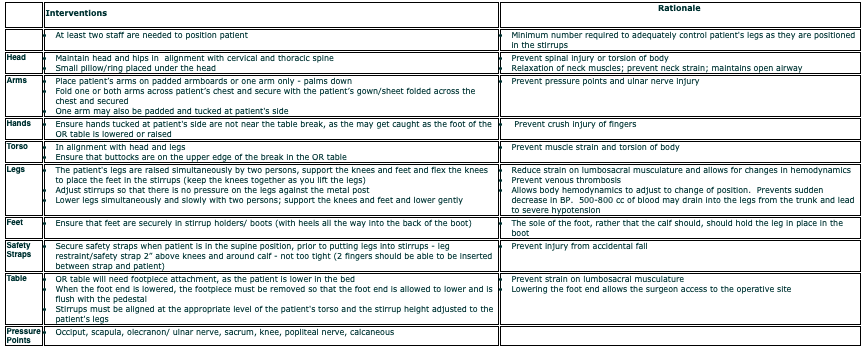
Disadvantages and Possible Complications
- Restricted chest movements due to pressure of thighs on the abdominal organs against the diaphragm.
- Pulmonary volume is increased, engorging lung tissue and reducing its compliance and ability to expand.
- Circulatory pooling of blood occurs in lumbar region. Venous flow may be reduced due to interference from lung expansion.
- May be difficult for elderly patients to abduct legs sufficiently
- Possible injury:
- Hand hanging over edge of bed – pressure injury
- Hand caught in bed during raising/lowering end of bed – crushing injury.
- Folding arms across chest – restricted respiratory effort
- Pressure of elbow against bed – ulnar nerve damage
- Femoral and obturator nerves (in groin) from pressure from misplaced instruments leading to sensory disturbances to inner aspects of legs.
- Damage to saphenous vessels/nerves (medial aspect of knees) due to improper padded/misplaced stirrups.
- Peroneal nerve damage (lateral aspect of knee) leading to foot drop.
Prone Position #
The prone position is commonly used for spinal procedures. Review the following positioning interventions, rationale and potential areas of injury for the prone position.

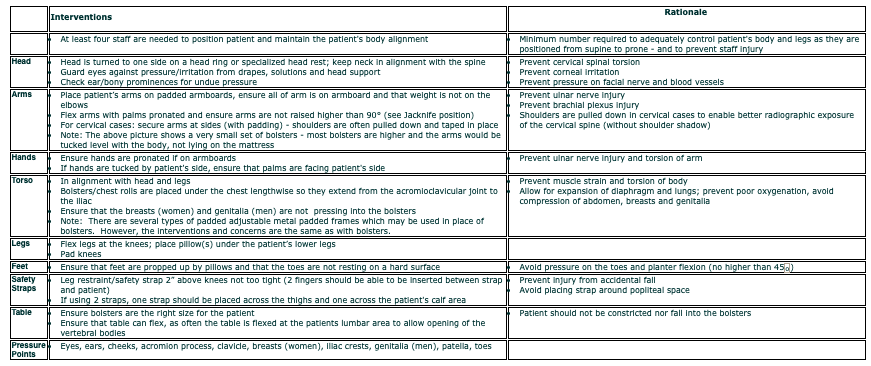
Jack Knife Position #
The Jack knife position is commonly used for anal or rectal procedures. Review the following positioning interventions, rationale and potential areas of injury for the Jack knife position. It is essentially the same positioning procedure as prone, except that the OR table is flexed acutely and placed in some Trendelenburg.
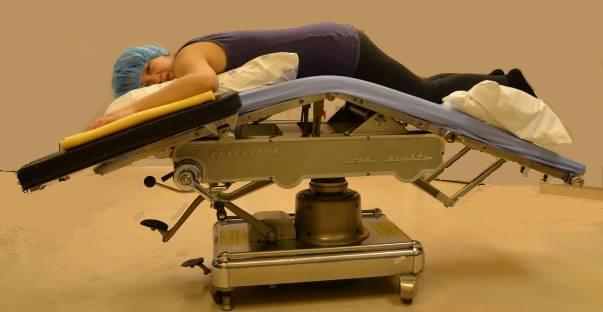

Disadvantages and Possible Complications
- Adversely affects breathing and blood flow. Respiratory effectiveness is reduced due to decreased lung expansion.
- Ability to expand lungs reduced due to restricted diaphragmatic movement and heavy volume of blood in lungs.
- Marked peripheral pooling of blood in dependent (lowered) portions of body, compounded by severe obstruction to inferior vena cava.
- Pressure is greatest on chest, knees, ankles, shoulders and iliac crests on thin individuals.
- Brachial nerve damage if arms are flexed more than 90°.
- Pressure on breasts and genitalia if they are not allowed to hang down into bolsters (i.e. patient is lying on them).
Surgical Skin Preparation #
Learning Objectives #
At the end of the session the student will be able to:
- Describe the purpose of skin preparation.
- Describe the criteria for when a preoperative shave is required with clippers
- List the criteria for choosing an appropriate antiseptic solution.
- Understand the principles of skin preparation.
- Understand the skin preparation parameters for different surgeries
In order to prevent dirt and the skin’s transient microbes from entering the surgical wound, it is necessary
Principles of Skin Preparation #
Purpose of Skin Prep #
- Patient should shower before surgery to remove superficial debris and soil. Sometimes a prescrub is done in the OR – the patient’s skin is washed with an antimicrobial soap (or scrub brush) before applying the skin prep solution
- To remove dirt and transient microbes
- To reduce the microbial count as much as possible in the shortest time, with the least amount of tissue irritation
- To prevent rapid rebound growth of microbes
Layers of Skin #
Epidermis:
- Stratified squamous epithelium
- Constantly shedding cells
- Carries transient bacteria easily removed by mechanical cleansing
- This is the layer that is cleansed and disinfected
Dermis:
- True skin
- Connective tissue containing blood vessels, sebaceous glands, sweat glands, nerves and hair follicles
- Muscle to bone (periosteum)
- Harbors resident bacteria – Forced to the surface by perspiration and other secretions
- Resident bacteria is often the cause of infection
Skin cannot be sterilized.
Skin should be cleansed with antimicrobial detergent or soap and prepped with an antimicrobial solution.
Soaps & Antimicrobial Agents #
Carefully review the textbook and ORNAC standards for the criteria and correct timing for performing hair removal (if necessary, electric clippers are recommended to prevent nicks and potential infection), and for choosing an appropriate soap and antimicrobial agent. Some of the common antimicrobial agents are:
A) Chlorhexidine Gluconate (i.e. Baxedin)
Soap (2% or 4%) and solution (tincture or aqueous)
- Significantly reduces and maintains a reduction of microbial flora for at least four hours
- Broad spectrum
- Not sporicidal
- Rapid acting
- Nontoxic
- Effectiveness not affected by traces of soap
- Effectiveness reduced in the presence of organic matter
- Activity increased at elevated temperature
- Should not be used on mucous membrane, especially above the neck due to potential corneal damage and toxicity when introduced into the auditory canal
- Comes in a tincture variety. Tincture indicates solution contains a percentage of alcohol. It is FLAMMABLE so ensure that fumes evaporates before using cautery
B) Poviodine – iodine (i.e. Betadine)
- Complex of polyvinylpyrolidone and iodine
- Potent germicidal effects of iodine without the irritating properties
- Prolonged activity as it is released slowly from the binding polymer as the brown color fades from the skin
- Effective in the presence of pus
- Shorter duration of activity in the presence of blood and serum
- Can be safely used on mucous membranes
There is no conclusive evidence that links an allergy to shellfish to an allergy to iodine. Iodine contact allergies are sometimes seen to providone-iodine (Betadine®) scrub used as surgical preps. One study: Of 10 people who had skin reactions to providone-iodine (1 person – skin allergic to the iodine, 5 people – allergic to the providone-iodine solution and 4 people – had direct skin irritation reactions but not allergic responses).
Investigate your hospital policy on alternative antiseptics for Poviodine like:
- J&J “No more Tears” for eyes
- Chlorohexadine
- Alcohol 70%- when not contraindicated
C) Tincture of Iodine
- Not as commonly used as providone-iodine
- 44-50 % alcohol by weight
- Tuberculocidal in combination with alcohol and appears to increase the efficiency of alcohol as a skin antiseptic
- “Tincture” indicates it contains a percentage of alcohol. It is FLAMMABLE so ensure that fumes evaporates before using cautery
- Can cause irritation and sensitization
D) 70% Alcohol
- Satisfactory for skin antisepsis
- Coagulates protein, so not used on mucous membranes
- Highly flammable
Prepping Principles #
Review ORNAC Standards for Prepping Guidelines:
- Expose only the area of the patient to be prepped (reduces heat loss).
- Start from the cleanest area first then move to the less-clean areas
- Wet sponge but squeeze out excess solution to avoid pooling
- Start at the incision line (except when incision site is the least clean area e.g. anus).
- Use a circular motion in ever widening circles to the periphery
- Discard sponge at periphery
- Never bring a soiled sponge back toward the center
- Be careful not to let the prep solution pool under the patient
- Never lean over a prepped area – if you are the circulating nurse doing the prep and reach a point where you are going to lean over a prepped area; move around to the other side of the patient/ OR table.
- It is not best practice to prep when you are the scrub nurse, however if this occurs in your hospital, avoid leaning in too close so as not to contaminate yourself
Prepping contaminated areas:
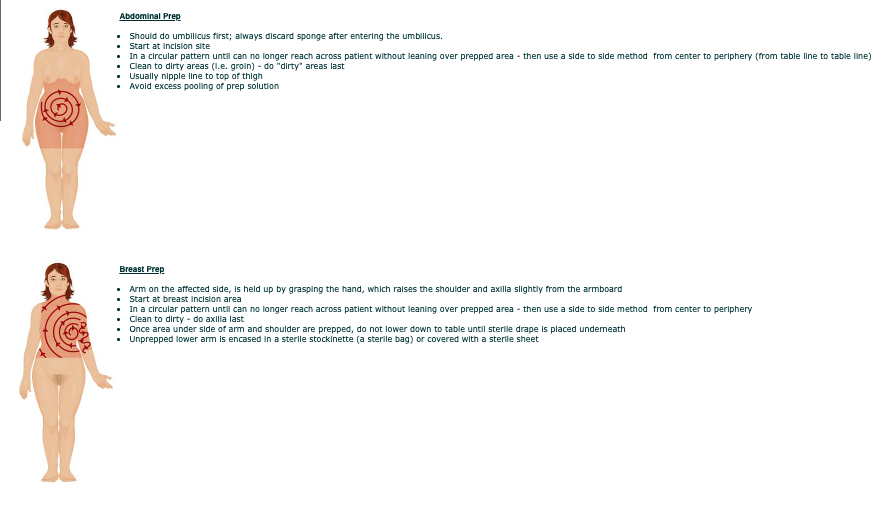
- Always discard sponge after entering the umbilicus
- Umbilicus should be done first to avoid potential contamination of adjacent areas
- May need to use Q-tips to remove detritus from umbilicus prior to start of prep
- May be sealed off from the operative site with a steri-drape
- Sponge or gauze may be placed over stoma while doing incision prep
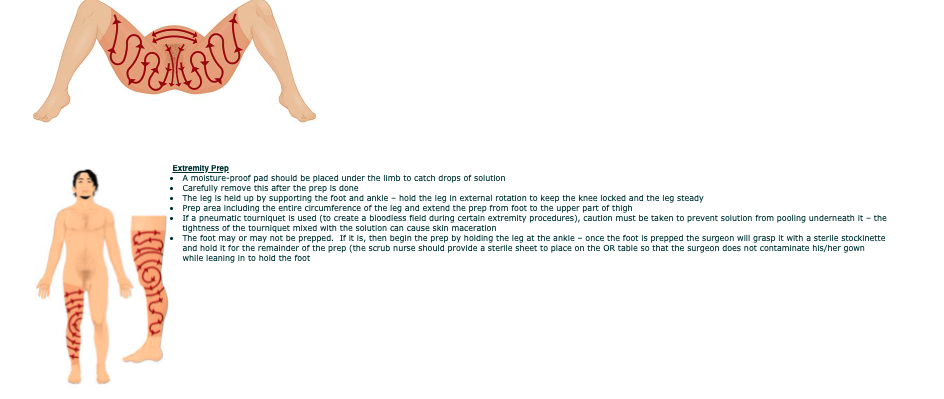
Skin Prep Parameters #
There are many different areas of the body to prep depending on the type of surgery. The extent of the incision and whether other areas of the body need to be accessed will determine the area (or parameters) of the prepped area. The following are 4 common preps and the principles and parameters involved:
Perineal Prep with a Vaginal Prep
A perineal prep may be done for a variety of procedures (i.e. cystoscopy, anal procedures, etc) and in these instances steps 6 & 7 would be omitted, as the vagina is not entered and does not need to be prepped. In all vaginal procedures and other procedures where the vaginal vault may need to be entered (i.e. urinary incontinence procedures), it is necessary to do a perineal prep with a vaginal prep.
- If the abdomen is also to be prepped (i.e. for gynecological laparoscopy) – the vagina prep set up must be separate from the abdomen set up because the vagina is considered dirty
- Place a towel under the buttocks to catch excess prep solution
- Begin over the pubic area scrubbing downward over the vulva and perineum
- Use a new sponge to prep the inner aspects of the thighs to the knees always move from proximal to distal
- Insert catheter, if indicated, at this time
- Cleanse the vagina and cervix using sponge forceps and sponges – these sponges are round in shape and may be called CHIX- these sponges are often counted to ensure they have not inadvertently been left in the vagina during the prep
- Cleanse the vagina and cervix with a generous amount of prep solution (because the vagina mucosa has many folds and crevices), by inserting the sponge forceps and Chix sponge as far into the vagina as possible and with a twisting/rotating motion, slowly withdraw it – This is usually done at least 2 times.
- Cleanse anus last and discard sponge.
Surgical Draping #
Learning Objectives #
At the end of the session the student will be able to:
- Describe and demonstrate the principles of draping
- Describe the different types of drapes available and their uses
- Be familiar with the draping for different surgical procedures
- Be familiar with the how to recognize and correct drape contamination
Wound Healing #
Learning Objectives #
At the end of the session the student will be able to:
- Describe the 3 phases of wound healing
- List at least 3 factors that affect wound healing and the complications of wound healing
- Describe the 3 types of wound closure (healing by intention)
- Understand and differentiate surgical procedures between the 4 types of surgical wound classifications
- Describe different methods of wound care: irrigation and debridement, dressing materials, and drainage systems
If perioperative nurses understand the factors that affect wound healing, then their ability to prevent postoperative complications (mainly surgical site infections) in their patients can be avoided. Sometimes patients present with preexisting wounds and if the nurse has a comprehension of the etiology of wounds, how they are classified and how wounds can be closed then the nurse has a means to promote optimum wound healing.
Wound Classification #
Wounds can be classified in two ways: open or closed.
Open wounds
Open wounds can be classified into a number of different types, according to the object that caused the wound.
The types of open wound are:
- Incisions or incised wounds – caused by a clean, sharp-edged object such as a knife, a razor or a glass splinter. Incisions which involve only the epidermis are legally classified as cuts, rather than wounds.
- Lacerations – Irregular wounds caused by a blunt impact to soft tissue which lies over hard tissue (e.g. laceration of the skin covering the skull) or tearing of skin and other tissues such as caused by childbirth. Lacerations may show bridging, as connective tissue or blood vessels are flattened against the underlying hard surface. Commonly misused in reference to injury with sharp objects, which would not display bridging (connective tissue and blood vessels are severed).
- Abrasions (grazes) – a superficial wound in which the topmost layers of the skin (the epidermis) are scraped off, often caused by a sliding fall onto a rough surface.
- Puncture wounds – caused by an object puncturing the skin, such as a nail or needle.
- Penetration wounds – caused by an object such as a knife entering the body.
- Gunshot wounds (GSW) – caused by a bullet or similar projectile driving into or through the body. There may be two wounds, one at the site of entry and one at the site of exit.
Closed wounds
Closed wounds have fewer categories, but are just as dangerous as open wounds. The types of closed wounds are:
- Contusions – (more commonly known as a bruise) – caused by blunt force trauma that damages tissue under the skin
- Hematoma – (also called a blood tumor) – caused by damage to a blood vessel that in turn causes blood to collect under the skin
- Crushing Injuries – caused by a great or extreme amount of force applied over a long period of time.
Surgical Wound Classification #
Surgical wounds classifications are commonly defined as outlined below. It is important to remember that the wound classification can change from the beginning of the case to the end of the case. For example, a removal of the gallbladder can start as a clean/contaminated procedure (GI tract entered), but if during the procedure there is gross spillage of bile into the abdominal cavity, it is now considered a contaminated wound. Therefore it is important to make note of the wound classification at the end of the procedure.
Compare the definitions below to the ones in Alexander’s (Class 1-4). Do these definitions and examples differ?
Clean: Clean wounds are:
- Elective/ nonurgent/ not an emergency
- Not traumatic
- No inflammation
- Closed primarily and only closed drains are used
- No breaks in aseptic technique occurred
- The gastrointestinal, respiratory, genitourinary and genital tracts were not entered
- Examples are breast biopsy, hernia repair, (primary) total hip replacement, and open-heart surgery.
Clean/ Contaminated: Clean contaminated wounds are:
- Urgent or emergent wounds that are clean
- The respiratory, urinary, gastrointestinal, genitourinary and biliary tracts were entered with minimal spillage and no infection is present
- A minor break in surgical sterile technique occurred
- Examples of clean contaminated wounds are nonperforated appendectomy, hysterectomy, cholecystectomy, nephrectomy, tonsillectomy, tracheal surgery and thoracotomy.
Contaminated: Contaminated wounds are:
- Open with non-purulent inflammation or chronic open wounds
- There may be gross spillage from the gastrointestinal tract and entry into the genitourinary tract with infected urine or biliary tract with infected bile
- A major break in surgical technique has occurred
- Examples of contaminated wounds are ruptured appendix, closure of colostomy, gangrenous bowel resection, nephrectomy in the presence of infected urine and fresh open fractures, traumatic penetrating wounds <10 hours old.
Dirty: Dirty and infected wounds are:
- Those with purulent drainage, devitalized tissue, foreign bodies, fecal contamination
- Preoperative perforation of gastrointestinal, genitourinary, biliary or respiratory tracts
- Examples of dirty or infected wounds are excision and drainage of abscess, pilonidal sinus with infection, open fractures, traumatic wounds and closure of same >10 hours old.
Surgical Site Infections (SSI)
Some hospitals require documentation of the wound classification on the operative record, as a means of tracking postoperative clinical outcomes, especially the development of a surgical site infection (SSI). The wound classification is one predictor – the more contaminated a wound is considered, the more likely a surgical site infection could develop.
Due to the common practice of antibiotic prophylaxis, most hospitals will record a patient’s morbidity status (i.e. ASA classification) as a further indicator for potentially adverse clinical outcomes.
A third predictor of surgical site infection is the length of the surgery – surgeries lasting longer than one hour in duration are also more likely to lead to wound contamination.
Strict adherence to aseptic technique and prompt administration of antibiotic prophylaxis (when required) contribute greatly to lessening the occurrence of the patient developing a SSI.
Wound Care #
Working as an LPN, you have probably encountered many types of wounds and have had a variety of experiences with wound and drain care. After having reviewed the required readings and ORNAC standards – at this point in time only the following points will be outlined regarding wound care in the perioperative setting:
Irrigation and Debridement (I&D):
- When a patient presents with a wound it may be debrided. Debridement means that all devascularized tissue is removed. In the presence of infection, a sample of tissue or a swab may be sent for culture and sensitivity.
- After the debridement, the wound will be cleansed with copious amounts of irrigation fluid (with or without antibiotics) – usually Normal Saline – and then suctioned out.
- Irrigation may also be done at the end of many surgical procedures to remove any remaining blood or contaminants that may be present. Normal Saline is usually used, however, Sterile Water may be used in cancer surgery. It is thought that the Sterile Water causes lysis of any remaining cancer cells that may have been dislodged during the excision of a tumor.
Dressings:
- Preoperatively if any wounds are found to be draining purulent material, it should be reported to the surgeon. Ensure any dressings that are currently on the patient (and not involved in the current operation) remain clean and intact – if not, they must be replaced when appropriate.
- Be aware of patient allergies (regarding dressing material and/ or tape) and doctor preference when choosing a dressing. It must also be of a sufficient size to cover the wound and of sufficient absorbency to capture any drainage.
- The dressing must not be dispensed to the sterile field until the final skin count is completed. Left over radioopque sponges should not be used for dressings.
- The wound and surrounding skin should be cleaned of all blood and dried thoroughly before the dressing is applied. The wound should be covered with a sponge and the drapes removed by the scrub nurse prior to placement of the dressing (ideally by the circulating nurse to prevent contamination).
- Negative pressure wound therapy dressings, also known as Vacuum Assisted Closure (VAC) may be used for wounds that are not able to be closed with primary closure. The VAC dressing allows the wound to heal by secondary intention, while at the same time drawing out any fluid accumulation, stimulating blood flow to the area, and by bringing the wound edges closer together by the suction (vacuum) force that is applied, either continuously or intermittently.
- Casts, splints and slings are used for orthopedic and some plastic surgery procedures (fracture care) – this will be discussed more in the orthopedic lecture in the full time clinical program).
- Document on the operative record
Drains:
- Provide the appropriate drainage system as requested by the surgeon. Ask if the drain will be sutured in place and have a suture available.
- Provide an appropriate dressing to cover the stab wound (if not part of the incision).
- Label the drain as per location if more than one drain is in place near the same incision.
- Ensure that the drain is not pulled out during the transfer to the postoperative bed and that it is not under the patient after the transfer is complete.
- When transferring a patient with a chest tube, ensure that the canister is below the level of the patient to prevent and pressure changes within the chest cavity.
- Document: type and size of drain, location, if inserted via the incision or a separate stab wound, whether it is sutured in place, and what type of collection system it is attached to.
- Include presence and location of drains to the postoperative recovery room nurse (and whether or not it is sutured in place), as they may not be readily seen.
During the clinical portion of the program you will be shown a variety of dressings and drainage systems – what they look like and what they are used for – this part may not be new to you, but how to insert them, how to assemble them, and how to care for them intra-operatively and immediately postoperatively may be.
Surgical Incisions #
Learning Objectives #
At the end of the session the student will be able to:
- Describe the most common surgical incisions and list surgical procedures used for each.
- Describe the advantages and disadvantages of different incisions.
- Understand and list the layers of the abdominal wall dissected during an incision.
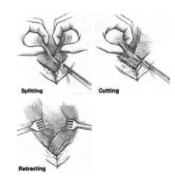
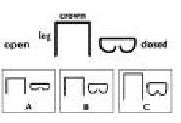
There are a variety of options when it comes to entering the abdominal cavity. Abdominal incisions include: midline, transverse (i.e. Pfannenstiel and thoracoabdominal), paramedian and oblique (i.e. McBurney and subcostal). The incision of choice will depend on a variety of factors including providing the best access to the intended operative area. As the surgeon cuts through the muscle layer, they will make a decision on how best to cut through it – will they split it, cut it or retract it (see pictures below). Splitting and retracting is the least disruptive to the tissue. A surgeon may make a certain incision of the skin (i.e. Pfannenstiel) and yet cut through the subsequent layers in a different direction (split the muscle layer in a midline fashion) – this will also assist with wound healing. Each surgical incision has advantages and disadvantages, some of which involve factors described in the previous unit on wound healing.
Understanding what type of incision is most common for a particular surgery will enable the perioperative nurse to prepare appropriately for positioning and draping the patient.
Layers of the Abdominal Wall
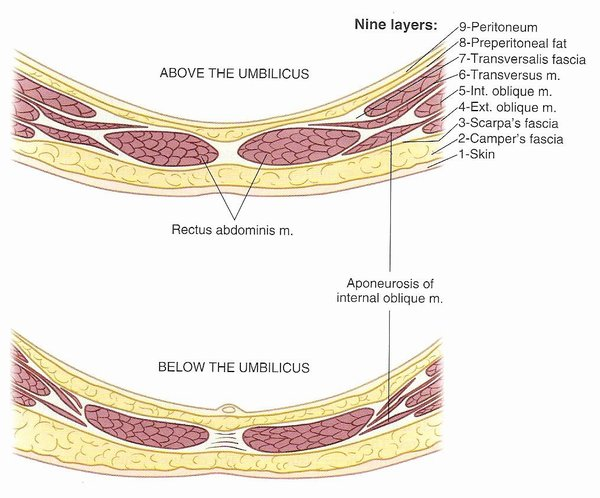
(Revised from Rothrock, J., ed. Alexander’s Care of the Patient in Surgery. 13th ed. St. Louis: Mosby, 2007. p. 313.)
Sutures and Needles #
Learning Objectives #
At the end of the session the student will be able to:
- Identify the four major classifications of needles and indications for use of each classification.
- Describe the four main needle curvatures and indications for use of each curvature.
- Compare eyed and swaged needles.
- Compare absorbable and nonabsorbable suture material and the indications for use.
- Compare natural and synthetic suture material and describe the criteria for choosing each one.
- Compare monofilament and multifilament suture material and describe the criteria for choosing each one.
- Identify the important information on a suture package.
- Explain the following terms: free tie, tie on a pass, stick tie, transfixion suture, and purse string suture.
- Describe how to use a “neutral zone” for passing sutures.
- Describe how to choose the correct needle holder.
- Demonstrate how to open and load a suture and the appropriate way to pass a suture.
The type of suture material chosen to unite the wound edges and keep them secure will affect how an incision is closed, how bleeding vessels are ligated and ultimately how the wound will heal. The type of needle that is attached to the suture material will also be a factor in wound healing, depending on the type of tissue being sutured. There are a large variety of needle and suture material combinations with individual and distinctive characteristics. Students should focus on learning the different characteristics of needles and suture materials through review and memorization. (learning willbe reinforced during the clinical component of the Program).
Needle Characteristics #
Ideal Surgical Needle Characteristics #
- High-quality stainless steel
- Smallest diameter possible
- Stable in the grasp of the needle holder
- Capable of passing suture material through tissue with minimal trauma
- Sharp enough to penetrate tissue with minimal resistance
- Sterile and corrosion-resistant to prevent introduction of microorganisms or foreign materials into the wound
Needle Selection Criteria #
- Minimal tissue trauma
- High degree of sharpness (acuity)
- High degree of strength
- Stable shape
- Smooth profile
- Inappropriate needle selection: will increase operating time, damage tissue integrity that could lead to complications (wound dehiscence, poor tissue apposition, leakage of an anastomosis (i.e. bowel), tissue necrosis and bleeding)
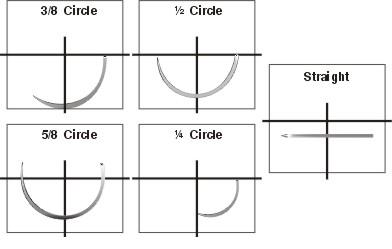
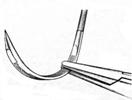
Needle Circle Length (Needle Body Curvatures) #
Needles come in a variety of curvatures. The curvature is expressed as a fraction of a circle, and ranges from 1/4 to 5/8 or it may be straight (or slightly curved at the tip = “ski” needle):
Factors determining which needle to choose are:
- Surgical site – Is it a tight area; an area deep in the pelvis where you are in close proximity to other structures? The tighter the area, the greater the curvature of the needle needs to be (i.e. 5/8 circle).
- Mass of tissue the suture will need to go through? A 1/4 circle is a smaller needle and inappropriate for going through thicker tissue (i.e. fascia).
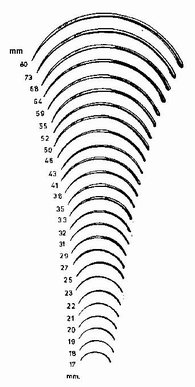
Needle Size #
Needles come in a variety of sizes. For example, in some cardiac procedures, the needle length may only be as long as 3mm (from the needle point to the suture swage = needle length), for reanastomosing small vessels. Whereas, in a thoracotomy the needle used to close the fascia and muscles of the thorax can be as long as 60mm. The diameter of the needle can also vary, but it can be in proportion to the diameter of the suture material or it may be larger in order to facilitate passage of the needle through tougher tissue. Needle diameter may also be affected by what type of point and what type of body the needle has. This is referred to as the needle classification – which will be discussed on the following page. In the picture below, the needle is exactly the same – a 1/2 circle with a tapered point – but as the needle length gets longer (17→60mm) the needle diameter gets bigger.
hoosing a Needle Driver #
Choose a needle driver that has big enough jaws to sufficiently hold the needle, without damaging the needle driver, and will allow the surgeon to easily pass the needle. Common sense dictates that the smaller and finer the needle is, the finer and more delicate the needle driver should be. It is important to choose a needle driver length that will reflect where the surgeon is working. For example, if the surgeon is deep in the abdominal cavity, then a longer needle driver will be required.
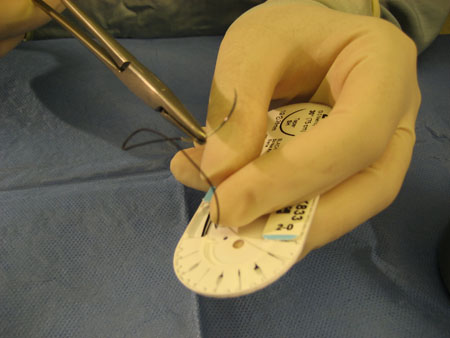
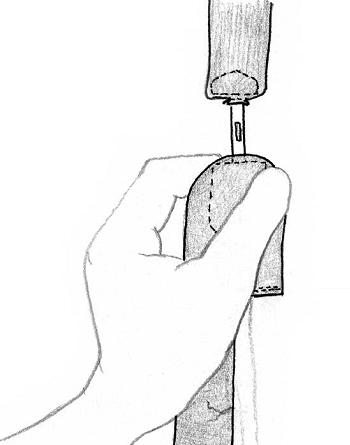
The needle is loaded onto the needledriver by:
Approaching the needle while it is in the package at a 90 degree angle
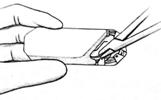
and by grasping 1/3 the way down the needle
and then the needle is pulled out of the package in a controlled manner with the suture trailing behind
Needle Classification #
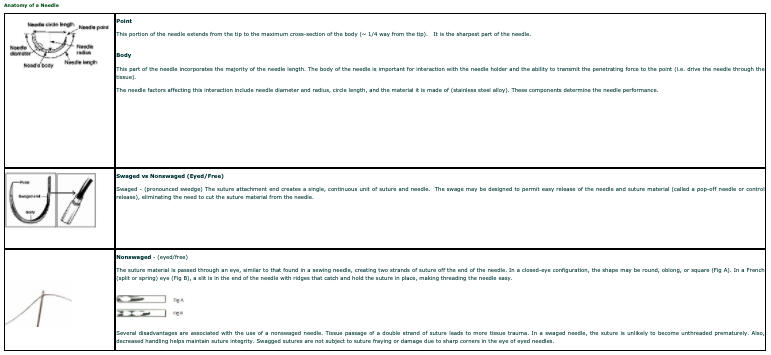
As mentioned previously, needles are either:
- Swaged – have the suture material attached
- Eyed (nonswaged; most commonly called a free needle) – have an eye (closed or open) to thread the suture material through
- Sutures may also be “double-armed” – have a needle swaged on both ends of the suture material
- Sutures may also be “looped” – have both ends of the suture material swaged to one needle, forming a long loop of suture material; making it a very strong double strand to sew with and facilitate the making of a knot.
As well as the size and curvature of the needle, the needle itself comes in many forms (called the classification). The classification of a needle refers to what type of point and body the needle has. The most common types are:
- Cutting
- Reverse cutting
- Taper
- Taper cut – Combination: the needle tip may be different than the body of the needle (a combination of two types), allowing tissue penetration without damage
- Blunt
- Spatula
- Diamond

The above chart summarizes the symbols of each of the needle points shown (also shown in the table above) – these symbols are written on the suture package, so it is easily distinguishable as to what type of needle it is just by looking.
Any one of the above needle classifications can come in any needle curvature or size – for example reverse cutting needle can be straight or a 1/2 circle and it can be as small as 20mm or as large as 40mm. It can also have any type or size of suture material attached to it, which we will discuss on the next page.
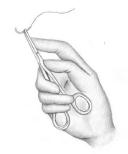
Suture Ties #
Just as needles can come without sutures (eyed, free or nonswaged needles); sutures can also come without needles. They are packaged in pre-cut lengths and are used to tie (ligate) vessels.
- Referred to as “free ties” if passed directly to the surgeon’s hand
- If free tie is loaded on an instrument, in order to ease passage of the tie around a vessel it is referred to as “tie on a pass”
- A suture may be used to ligate a vessel (usually a thin 1/2c taper needle often referred to as a GI needle) – this is called a “stick tie”
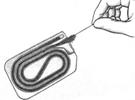
- A long length of suture can also come wound around a plastic reel – a length of suture material is dispensed off the reel as needed
Suture Characteristics #
Suture material (whether swaged onto a needle or not) has the following characteristics:
Physical Characteristics #
- Physical configuration – may be monofilament (single strand of suture material) or multifilament (multiple strands are braided to form one strand). Another term used to describe multifilament is to say the suture is braided.

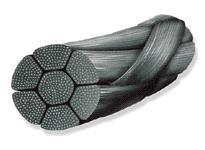
- Capillarity – extent to which fluid is absorbed up the suture strand – multifilament (braided) sutures can cause a wicking action allowing fluid to flow via the suture strand into the wound; therefore this type of suture may not be chosen if infection may be present or suspected
- Fluid absorption ability – ability to take up water when immersed
- Tensile strength – refers to the amount of strength that a suture has retained over time (i.e. ability to keep tissue approximated) – measured in number of days (i.e. VICRYL suture has 75% of tensile strength remaining at 14 days).
- Knot strength – multifilament (braided) sutures hold knots more securely than monofilament (single strand) sutures. Monofilament sutures will require more knots (to prevent knot slippage) in order to have sufficient knot strength.
- Elasticity – ability to stretch
- Plasticity – ability to deform (i.e. when stretched) without breaking
- Memory – ability to return to it’s previous shape (i.e. Prolene sutures need to be pulled to straighten them as they tend to return to the shape in which it was packaged) – high memory creates more knot slippage
- Diameter or size – measured by the United States Pharmacopeia classification system, which corresponds to metric measures. Size refers to the diameter of the suture strand and is denoted as zeroes. The more zeroes characterizing a suture size, the smaller the resultant strand diameter (i.e. 4-0 or 0000 is larger than 5-0 or 00000). The smaller the suture, the less tensile strength of the strand. The larger the diameter, the stronger the suture.
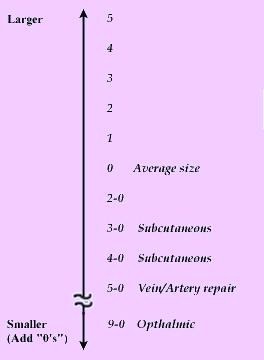
- Sutures are measured on a scale – 0 (pronounced as “oh”) is the standard size
- Sutures stronger than 0 go up in scale: 1, 2, 5
- Sutures that are finer go down the scale: 2-0, 3-0, 4-0…. 10-0 with 10-0 being ten times finer than 0 (10-0 sutures are used in ophthalmology)
- The more 0s a suture has, the finer the suture material is
Tissue Reaction Characteristics #
Tissue reaction characteristics refer to the body’s reaction to a foreign material – the suture material. These include:
- Inflammatory and fibrous cell reaction
- Absorption rate – loss of the mass of suture material (i.e. VICRYL suture is absorbed in 56-70 days). There may be suture material in the wound and yet it has zero tensile strength. For example, absorbable sutures are weakened by hydrolysis over a period of days to months whereas nonabsorbable sutures hydrolysis leads to formation of fibrous connective tissue or may not be absorbed at all (i.e. stainless steel or Prolene). Generally, nonabsorbable sutures are used in areas where the ability to retain tensile strength is of utmost importance i.e. blood vessels, tendons – whereas absorbable sutures are placed in areas that are expected to heal before the suture material breaks down i.e. skin.
- Potentiation of infection – related to tissue reactivity
- Certain sutures, such as Catgut, are being phased out due to the fact that they are largely a bovine product and could be a potential source of CJD.
- Some braided sutures come with an antibacterial coating to lessen effects of capillarity (i.e. Vicryl with Triclosan coating)
- Allergic reaction (not that common)
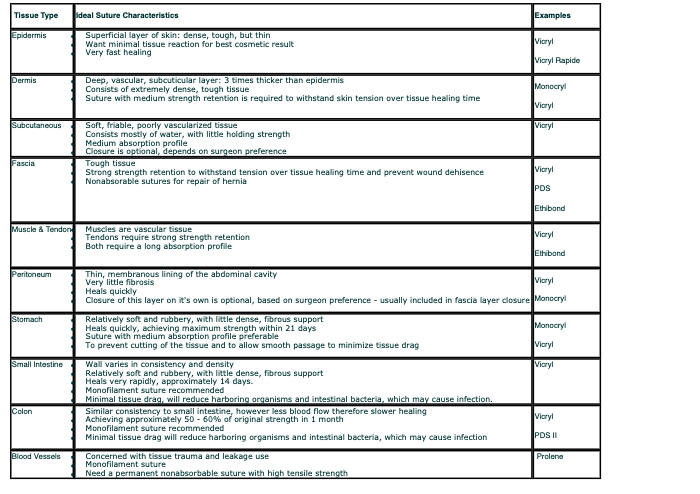
Suture Selection #
How does a surgeon decide which suture material to use? Below is a general description of different tissue types, the ideal characteristics of the suture to be used and an example of a corresponding suture material. Refer to the table below this one for the generic name of the suture material.
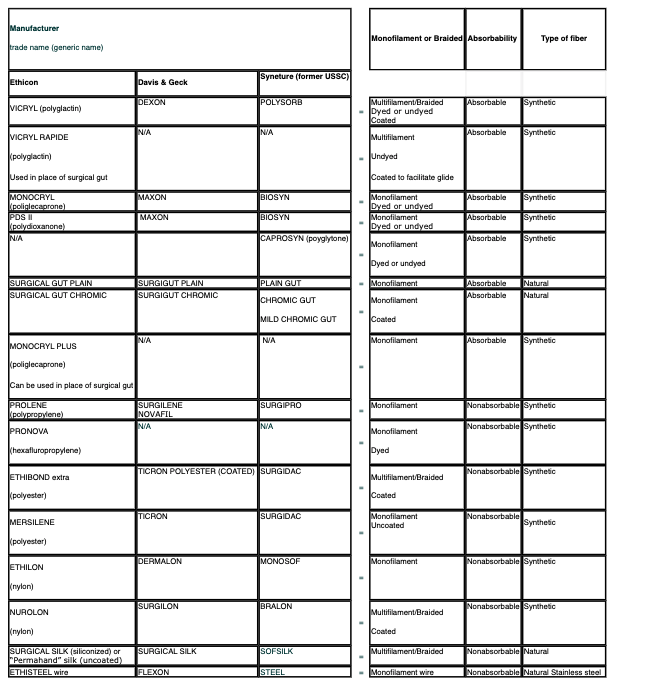
Suture Manufacturer’s #
Hospitals will occasionally change suture manufacturer’s, which sometimes causes confusion between the surgeon (who might always refer to a particular suture by the name they are used to) and the perioperative nurse. The only difference in the suture product between two different companies may be the name of the suture and the packaging. The following is a chart comparing Ethicon sutures (the current VCHA manufacturer) with two different suture manufacturers. In addition, the suture types are described as to whether they are monofilament or multifilament (braided), if they come with a coating, whether they have dyed or undyed types, the absorbability (absorbable or nonabsorbable), and the type of fiber (synthetic or natural):
This has been a lot of information about needle size, classification and curvature, and the different sizes and types of suture material. Don’t feel overwhelmed – it takes time and patience to learn what the surgeon will use for different tissue and how to read a suture package to ensure that you have the right suture. Only the basics can be learned from reading – lots of practice in the clinical setting will increase your understanding.
Now, go back to the learning activities and watch the video on how to read a suture package and how to load and pass the different types of suture material.
Intraoperative Staplers #
Learning Objectives #
At the end of the session the student will be able to:
- Describe the GIA/TLC, TA/TL/TX series and EEA/CDH their uses
- Describe the difference between laparoscopic and regular staplers
- Demonstrate the correct handling, safety features and reloading of each of the above staplers
There are a variety of instruments used to suture tissue through a mechanical method – they are called internal or intraoperative staplers. The staplers have the ability to ligate, divide, resect or anastomose tissue/ organs and others provide closure of the skin. These devices are more exact than human ability to provide a leak proof seal and require minimal tissue manipulation, and therefore less operative time and patient complications.
Purpose of Intraoperative staplers #
Purpose #
The purpose of intraoperative stapling devices is to dissect and reanastomose organ tissue – i.e. bowel, stomach, spleen, lung, bronchus, etc.
Advantages #
- Decrease surgical time
- Decrease leaking from anastomosis site and surgical complications
- Allow access to hard to reach areas (i.e. low colorectal tumors)
- Staplers can be reloaded and reused for multiple firings
Disadvantages #
- Costly, but advantages make it cost efficient
- Need to stock a variety of sizes and types
- Each stapler can only be fired a set number of times – i.e. if exceed number of allowable cartridge changes, then must open a new stapler
- Possibility of mechanical failure/ misfire
TA Staplers #
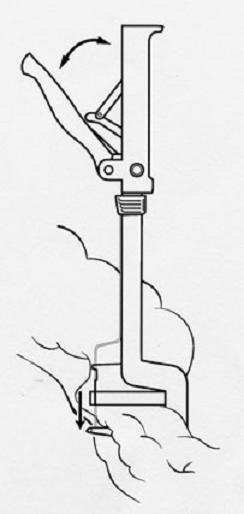
The TA (transverse anastomosis) is a linear stapler, and even though there are many manufacturers of this type of stapler and the manufacturer has different names for the stapler, it is still commonly referred to as a TA stapler. It produces a linear (double) staple line or in the case of a vascular model – a triple staple line. It is used to transect tissue. The TA stapler comes with a 30, 60 or 90mm anvil, which equates to the length of the staple line. The examples shown below are from the Ethicon (J&J) manufacturer line and are the TL or TX models. These staplers are reusable up to 7 reloads.
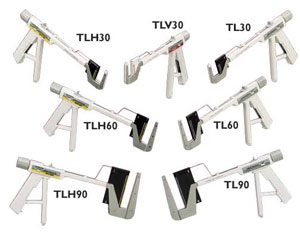

TL stapler series TX stapler series
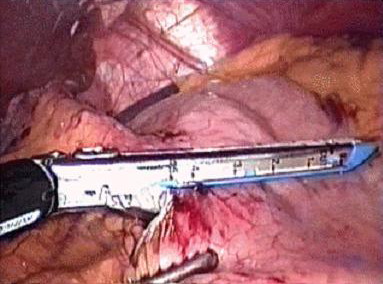
The following picture shows the TA stapler in use transecting a piece of bowel (Note: a bowel clamp would also be used to seal off the proximal side of bowel to prevent leakage, as after the TA stapler is fired, it will be seal off the distal portion of bowel and a scalpel will be used to cut away the proximal bowel):
GIA Staplers #
The GIA (gastrointestinal anastomosis) is a stapler that cuts between a double linear staple line. It is used to resect around or reanastomose hollow organs. The GIA comes in sizes 55, 75, and 100mm anvils, which refers to the length of the double line of staples on either side of the cutting edge. There is also a model that does not have a knife (i.e. for resecting lung tissue); the packaging is clearly labelled, but always ensure the correct stapler has been opened. There is also a semi-circular stapler (Contour model) that provides ease of manipulation for low anterior bowel resections and a model with a long swivel barrel for hard to reach areas (Echelon stapler) . The GIA has remained the common name for this type of stapler, but each manufacturer has their own name for this model of stapler. Pictured below is the Ethicon (J&J) manufacturer’s Echelon, Contour and TLC model staplers – these staplers can be reloaded 7 times:

Echelon 60mm stapler Contour stapler
TLC model staplers
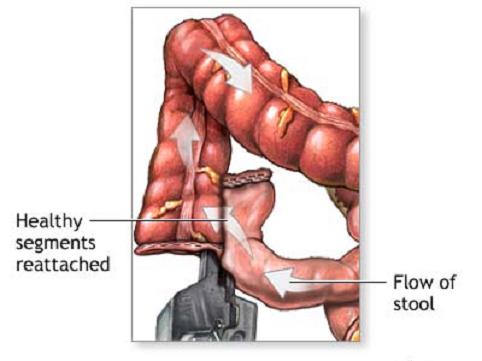
TLC model staplers The picture below shows the GIA stapler in use. First the bowel was resected using the GIA (it made 2 rows of double staples and cut between them) and now a new cartridge is being used to reanastomose the two bowel segments (cutting between these staple lines will provide a passage for bowel contents to flow) – another stapler (probably a TA) will be used to close off the hole made by the GIA:
The picture below shows the GIA stapler in use. First the bowel was resected using the GIA (it made 2 rows of double staples and cut between them) and now a new cartridge is being used to reanastomose (a side to side anastomosis) the two bowel segments (cutting between these staple lines will provide a passage for bowel contents to flow) – another stapler (probably a TA) will be used to close off the hole made by the GIA:
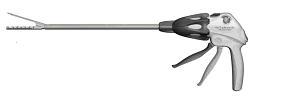
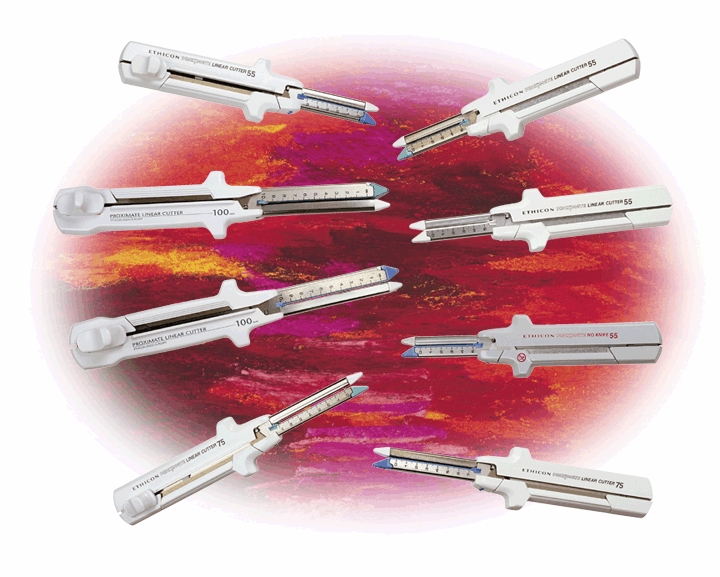
Endoscopic Staplers #
Endoscopic Linear cutters are similar to GIA staplers (also known as Endo GIA), but designed for endoscopic use (i.e. longer length & narrower diameter). They come in a variety of anvil lengths and diameters and some can also rotate or angle. Endo GIA’s are used to resect bowel, lung tissue, kidney, appendix and other tissue. The Ethicon (J&J) model shown here can be reloaded 7 times. There are also models that do not have a knife – they are linear staplers only.
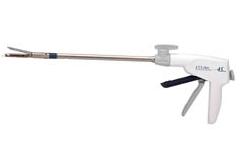
The following picture shows the endoscopic linear cutter in use transecting bowel during a laparoscopic procedure (the video camera has magnified the view and size of the stapler):

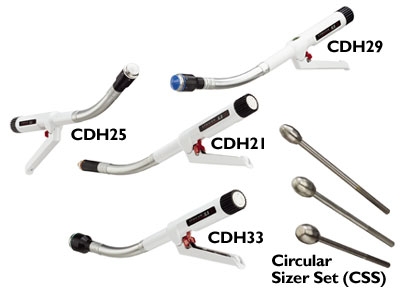
EEA Staplers #
The EEA (end-to-end anastomosis) is a circular stapling device which enables end-to-end, rather than side-to-side reanastomosis; it also cuts off excess inner edges. It is sometimes called an intraluminal stapler, as it fits into the lumen of bowel or the esophagus to reconnect the two ends from the inside their lumens. It is often used in esophageal reanastomosis and in reanastomosing bowel after rectal tumor resection. The EEA has a set of sizers to check the diameter of the opening (ie.e rectum) prior to choosing a stapler. The stapler comes in 21, 25, 29, and 33mm diameters. The EEA is capable of only one firing. Pictured below is the manufacturer’s (Ethicon J&J) CDH (intra luminal stapler) model:
The following picture shows the EEA stapler in use on what appears to be an esophagus. The distal end piece of the stapler is tied onto the proximal end of esophagus (bowel), with a heavy suture (stitched with a technique called a purse string – as the suture is pulled it closes the tissue like a drawstring on a purse). The stapler itself is inserted into the distal end of the esophagus (bowel or rectum) – the two pieces are brought together and the stapler is fired – creating a circular stapler line and cutting away the excess tissue in the lumen of the staple line. This excess tissue (called a donut) is examined to ensure is a perfect circle that is intact and has uniform edges – if not the staple line cannot be considered to have captured enough tissue inside to make a solid seal to prevent leakage.
Stapler Cartridges #
- Staple cartridges are specific to each stapler and length of anvil i.e. only 30mm TA cartridges will fit a 30mm TA stapler. However most 30mm TA stapler cartridges (i.e. thick tissue staples or short tissue staples) will fit any 30mm TA stapler.
- Not all staplers are reloadable
- Most staple cartridges have 3 rows of staples (all vascular staple cartridges will have 3 rows)
- The rows of staples are offset so that a solid line of staples is produced, preventing any possible leakage
- The legs of the staples are different heights to accommodate different tissue thickness – i.e. longer staple legs for thicker stomach tissue and shorter staple legs for bowel (see picture below)
- Staples close in a true “B” shape (see picture below)
- “Push bars” are the colored bars behind the staples that push the staple forward. They have a contrasting color to the staple cartridge, so when they are showing it indicates a cartridge has been fired – if not all push bars have come through, considered it a “misfire”. The surgeon must be notified immediately, as the suture line cannot be considered intact and measures will have to be taken to restaple or repair. The cartridge should be reported to the manufacturer.
- Each stapler can be reloaded a number of times – for example up to 7 reload cartridges may be used in a GIA for a total of 8 firings (each stapler is different – check). Staplers have mechanisms that can only hold tissue together and push staples forward a set number of times – being a disposable product, this keeps the stapler reliable (and if it has a knife – sharp) for all firings
Nursing Considerations #
- Staplers and cartridges are part of the instrument count – count number of pieces to stapler and number of cartridges – document on count sheet
- Wipe anvil off after use – this ensures that the anvil is free of blood or staples that did not connect with tissue
- Know where stapler is going – if into bowel consider it dirty after use. The stapler must then be placed in a designated area on the sterile field so that it does not contaminate other instruments/areas
- Know if stapler has a knife or not – never engage the knife – be sure the surgeon requires a stapler with a knife
- Use safety mechanism – be aware of inadvertently engaging firing mechanism – never place hands on the firing mechanism
- Ensure stapler has fired fully – all push bars are shown
- Know how many times the stapler can be reloaded
- If you know the stapler will be used again – reload after use and be adept at reloading
- Staplers are expensive – ensure that the correct stapler is chosen and opened only if it will be used
- Some staplers have cutting blades – dispose of them in a sharps bucket or place in the box they came in before disposing of them in the garbage
- If a stapler misfires – send it to the biomedical department for investigation
Specimen Care #
Learning Objectives #
At the end of the session the student will be able to:
- Identify the 3 most common specimens sent to the laboratory
- Describe formalin and what it is used for and the safety precautions surrounding formalin
- Describe “quick section” or “frozen section” and what it means to the nurse
- List the specimens that routinely go to the lab without fixative (dry)
- List the information that should be on the specimen label
- Describe the documentation necessary on the operative record
A variety of specimens are obtained from patients during a surgical procedure – for either identification or diagnostic purposes. It is the responsibility of the perioperative nurse to be diligent in caring for these specimens through proper handling, labeling and documentation; in order that patients receive appropriate postoperative treatment.
Categories of Specimens #
Specimen collection and handling is a very important part of patient care in the operating room, as it provides a diagnostic tool for patient diagnosis and treatment. Every hospital has a policy regarding specimen collection; as to what is sent and what is discarded. In regards to surgical pathology the following categories and examples of specimens are common (there are exceptions so follow the discretion of hospital policy, surgeon request, and document actions):
Discarded Minor Tissues or Materials
- Autologous (patient’s own tissue) or non-autologous specimens removed during an operation i.e. hernia sac (autologous) or hip prosthesis for revision surgery (non-autologous)
- No pathologic evaluation needed – i.e. scar tissue excision
- Document specimen not sent per surgeons request
Minor Tissue and Material for Medical/Legal Purposes
- Any foreign material that may subsequently lead to criminal/medical-legal investigation – i.e. bullets, faulty prosthesis, breast implants
- Other material used for identification purposes – i.e. ureteral stones
Other Surgical Specimens
- Include both gross and microscopic descriptions
- For diagnosis and treatment purposes – includes soft tissue, bone and body fluids
Specimen Exams #
Tissue or fluid can be sent for a variety of examinations/tests in order to determine the type of tissue, disease process or if infection is present. Some types of examinations are:
- microbiology
- pathology or histology
- cytology
- genetic testing
- variety of blood tests
- urinalysis
Labeling and Documentation of Specimens #
Labeling specimens correctly and with all appropriate information is essential – patient treatment options are based on laboratory findings and to delay treatment or provide inaccurate information can be disastrous to a patient. Every specimen must be accounted for and handled appropriately. All specimens require the following:
Labeling of specimens:
1) Patient (Addressograph/ Label) Information
- Patient’s Name
- Patient Hospital Number
- Date of Birth
- Doctor’s Name
- Date
2) Specimen information
- name
- source of origin (i.e. left or right, proximal or distal)
- any identifying markers
- patient diagnosis or suspected diagnosis (usually surgeon will fill this out)
- may need to be initialed as to who collected the specimen
3) Documentation:
- All specimen(s) must be accompanied by the proper requisition form
- All requisition forms must be filled in completely and signed by the surgeon (with the exception of quick sections – you must fill in the information if they have not done so ahead of time)
- Documentation on the intraoperative record includes: specimen type and number of specimens
- Documentation of specimen whereabouts – i.e. logged that taken to lab or stored in specific location awaiting pick-up
Specimens with Fixative – Formalin #
Specimens that are not examined within the hour or placed in a refrigerator, must be preserved. Some examples of types of fixatives used are alcohol and formaldehyde (Formalin). Formalin is the most common fixative used in the operating room for pathology specimens.
Formalin is:
- A liquid used to preserve specimens that are not going directly or immediately to the laboratory
- A combination of methanol, water, and formaldehyde (hazardous substance that can cause watery eyes and respiratory irritations)
- Ten times as much formalin as the size of the specimen is required in order to fully cover the specimen
- Avoid exposure to skin and respiratory tract – gloves and adequate ventilation (there should always be a fume hood over the formalin dispensing area) are required whenever formalin is being used
- Institutions now have containers that have a pre-measured volume of formalin, so that pouring is not required and lessens the risk of exposure – however, for larger specimens care must be taken, as these containers are too small
Review the example from the Occupational Health and Safety Agency for Healthcare (OHSAH) online database – http://msds.ohsah.bc.ca/ – of one MSDS for Formalin (Note: this MSDS refers to Neutra-form and Neutra-wipes – these are a brand of neutralizing pellets and wipes – one would use the appropriate absorbent neutralizing agent supplied by your facility). It is everyone’s responsibility to become familiar with your hospital policy regarding a hazardous spill.
What amount determines a hazardous spill? The toxic effects of hazardous material that has spilled will determine the action to be taken i.e. Who do you call within your facility for spills larger than 500cc – considered a ‘manageable’ spill (cytotoxic substances >50cc are considered a large spill); where is the spill kit, what is the procedure to follow?
Review an example of a policy (VCHA) regarding hazardous spills: Code Brown
Dry Specimens #
Some specimens cannot have fixative on them; this is due to the nature of the specimen, the type of testing required or the necessity of having a fresh (rather than preserved) tissue to examine. The following specimens must go down to the laboratory dry in the appropriate container:
- Stones – bladder, ureteral, gallbladder
- Aerobic and anaerobic culture swabs (culture medium)
- Culture & Sensitivity tissue specimens – place in sterile container
- Frozen – quick sections – very fine (i.e. core biopsy) tissue specimens may have a small amount of saline added or be placed on a saline soaked gauze
Quick Section (Frozen Section) #
Indications
- Immediate tissue identification – to identify correct tissue for excision;
- To determine adequate tumour margins
- Identification of malignancy
Specimens obtained during surgery for rapid microscopic analysis are commonly known as “quick section, “frozen section” or “rush” specimens. Specimens may be stained and sliced and examined in the laboratory under a microscope and results are communicated to the surgeon intraoperatively to allow the surgeon to determine the immediate course of action. The lab must be informed about a frozen section prior to sending the specimen and specimens are delivered directly to the pathologist. (in some hospitals the pathologist comes to the operating room to collect it and talks to the surgeon directly). Frozen section specimens are never fixed with a preservative, but placed into a dry specimen container or bag. If the specimen is very small (<1cm), it is placed on a moist towel or non-adhesive guaze and then placed into a dry specimen container or bag, so that it does not dry out completely before examination. It is important to document on the intraoperative record (and any specimen logs) that the specimen was sent to the lab. The accompanying requisition form must identify the need for a quick section and be completed in full, with a phone number or means of contact to the operating room for the pathologist to call with the results. It is important to let the pathologist know if the patient is awake (regional or local anesthetic), as sometimes they use an intercom system to relay the results. The phone lines in the OR must remain free to await the pathology results. Relaying this important information in a timely manner can reduce delays and unnecessarily prolonging the surgery and anesthesia time.
Nursing Responsibilities #
Scrub Nurse Responsibilities #
- Preserve the specimen in the state received
- Verbally confirm with the surgeon what the specimen is and how it should be labeled
- Confirm the test required
- Confirm the identity of the specimen with the circulating nurse
- Read the information the circulating nurse has written on the specimen label to ensure that it is correct, prior to placing specimen into container
- Ask if you can hand off the specimen – surgeon may want to mark it in some way (with a suture) for the pathologist (i.e. what part is proximal or lateral) or they may want to examine the specimen further
- Small specimens can go in Normal Saline or on a Telfa gauze prior to putting in a bag or a container
- Always check with the surgeon whether a fixative is required
- After case check documentation of specimens on intraoperative record is correct
- Log specimens as per hospital policy – it is usually the scrub nurse’s responsibility to take the specimens to the pick up area
Circulating Nurse Responsibilities #
- Be prepared to accept for specimen analysis – i.e. know the surgery and if specimens are expected; have containers and forms ready
- Verify with scrub nurse or surgeon the identity of the specimen – side, site, any specific markers, whether it is a quick section and any additional information that should be included on the forms
- Add appropriate fixative in consultation with the surgeon /pathologist
- Provide separate and appropriate containers for each specimen
- Confirm information and the name of the patient are correct on the requisitions and labels with the scrub nurse
- Arrange for transport of specimen if it is a quick section
- Document specimens on intraoperative record
- Log specimens sent as per hospital policy