Description #
Overview of the preparation required prior to the start of a surgical procedure. The topics featured will be the principles of asepsis and sterilization of instruments and decontamination of equipment and the environment. The types of instruments used during a surgical procedure will be discussed and how they are used and cared for will be reviewed. Also, how to perform a surgical scrub and the technique of gowning and gloving will be discussed. Finally, how and why a surgical count is performed will be outlined.
Learning Objectives #
At the end of the session the nurse will be able to:
- 1. Define asepsis & aseptic technique
- 2. Define the principles of disinfection of equipment and the environment
- 3. Describe the standards for surgical attire
- 4. Recognize categories of instruments and individual instruments within the category
- 5. Describe and demonstrate use and care of surgical instruments
- 6. Describe and demonstrate a surgical scrub
- 7. Describe and demonstrate gowning and gloving of self and of the surgeon
- 8. Demonstrate the 8 principles of asepsis while gowned and gloved
- 9. Describe how, why and when a surgical count is performed and how it is documented
- 10. Describe the procedure for an incorrect count
Learning Objectives #
At the end of the unit, the student will be able to:
- Understand the epidemiological triangle and its importance in infection control practices.
- Define aseptic technique and list the eight principles of aseptic technique.
- Describe the standards for environmental cleaning.
- Define nosocomial infections.
- Define “surgical conscience”.
Asepsis is the absence of infectious organisms. The perioperative team utilizes aseptic technique during surgical procedures to prevent patients from potential contamination with micro-organisms. The responsibility of all perioperative staff members to maintain asepsis during surgical procedures is referred to as a “surgical conscience“. Surgical conscience is further defined as self-regulatory practice in perioperative nursing involving a moral obligation and deep personal commitment to the highest practice values and standards. Personal hygiene (e.g. hair, makeup, jewelry, fingernails and attire) and the individual health status of health workers are also components of the conscientious practice of aseptic technique. All members of the surgical team are ultimately responsible to maintain high standards around the prevention of infection and patient safety.
Sterilization and Disinfection #
Learning Objectives #
At the end of the unit, the student will be able to:
- Describe the three levels of reprocessing.
- Describe the process of steam sterilization.
- Describe the low-temperature alternatives to steam sterilization.
- Describe methods of testing the efficacy of sterilization systems.
- Describe flash sterilization and the indications for use.
- Describe the process of disinfection.
The processes of sterilization or disinfection are intended to control the number of micro-organisms on surgical instruments and equipment. The perioperative nurse must have a sound understanding of these processes in order to maintain an aseptic environment.
Introduction to Sterilization and Disinfection Practices #
Nursing careplans for patients undergoing surgical procedures should always identify the patient’s risk for infection in the nursing diagnosis.
Nursing interventions to minimize the risk of infection include the following practices
- Ensuring reusable medical devices have been reprocessed correctly and are safe to use
- Implementing aseptic practices to protect sterility during each procedure
The following section will focus on the safe, correct method of reprocessing medical devices. There is evidence that people had knowledge about infection prevention in previous centuries (e.g. the use of fire to achieve cauterization , and the use of antiseptics for embalming in early Egyptian times). The biggest advances in knowledge about infection prevention took place in the late 1800s as follows:
- Semmelweis (1840): hand washing prevents puerperal fever
- Nightingale (1850): environmental cleanliness and sanitation
- Pasteur (1860): cause and effect of airborne “germs”
- Lister (1860’s): Phenolic as a disinfectant
- Tydale (1876): identified and characterized spores
- Koch et al (1881): effectiveness of moist heat
The most significant milestones in knowledge about infection prevention in the twentieth century include:
- Antibiotics
- Understanding modes of infection transmission
- Development of various reprocessing methods: sterilization and disinfection
Current issues in reprocessing include:
- Increasing numbers of instruments that are sensitive to heat and moisture
- Inconsistent standards of practice (i.e. high-level disinfection versus sterilization)
- Ethylene oxide (ETO) gas exposure limits, ban of CFCs (chlorofluorocarbons) and limits to HCFCs (hydrochlorofluorocarbons) and ETO discharge into the environment
- Low-temperature alternatives to ETO
- New high-level disinfectants
- Multi-Drug Resistant Organisms (MDRO’s) and Prions (Bovine Spongiform Encephalopathy & Creutzfeldt-Jakob Disease)*
- Reusing single-use items
*The instrument sterilization practices regarding Prions (i.e. CJD) is a complex topic that may be discussed later during the full-time portion of the Program.
Levels of Reprocessing #
There are three levels of reprocessing:
- Cleaning: the reduction of the number of micro-organisms to a “safe” level. The soil that is removed is often referred to as “bioburden” which is defined as a mixture of micro-organisms, blood and/or tissue.
- Disinfection: the elimination of disease-causing micro-organisms, but not all bacterial spores.
- Sterilization: the destruction of all forms of micro-organisms including bacterial spores.
Reprocessing takes place on a continuum as follows:
- Cleaning kills many microbes and must occur before disinfection or sterilization.
- Disinfection kills more microbes than cleaning.
- Sterilization kills all microbes
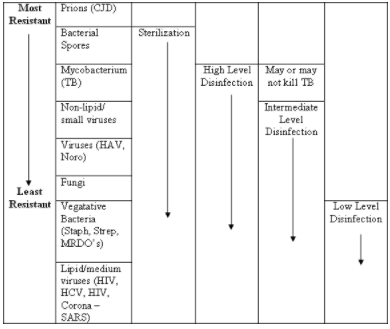
Microbial Resistance to Disinfectants & Sterilants #
The appropriate methods of sterilization or disinfection to control various micro-organisms are outlined in the following table:
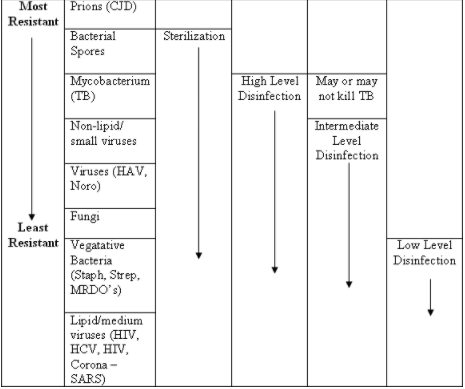
As indicated in the above table, sterilization provides the highest form of microbial kill, although it does not eradicate prions. Prions must be dealt with in a special manner prior to sterilization.
It is not always necessary or feasible to sterilize everything. The risk of infection to the patient determines the need for the sterilization of a device. According to the Spaulding Classification the following guidelines may be considered:
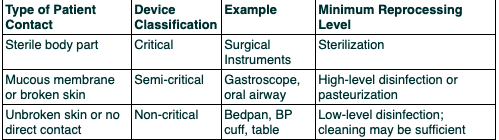
Cleaning may be sufficient in some situations; the level of reprocessing required depends on the type of patient contact as outlined below:
- Sterilization for critical contact
- High-level disinfection for semi-critical contact
- Intermediate or low-level disinfection for non-critical contact (in some situations cleaning may be sufficient)
Reprocessing Methods #
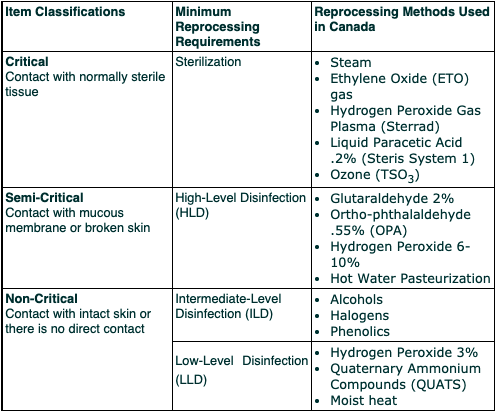
Each level of reprocessing (Sterilization, High-Level Disinfection, Intermediate-Level Disinfection and Low-Level Disinfection) will be reviewed.
Sterilization Basics #
Sterilization Methods Used in Canadian Hospitals #
- Steam
- Ethylene oxide gas (ETO)
- Hydrogen peroxide gas plasma (Sterrad)
- Peracetic acid liquid immersion (Steris System I)
- Ozone (TSO3)
All methods of sterilization consist of multiple steps that must be performed correctly and in order. The following steps of the sterilization process are based on the standards of ORNAC and CSA (Canadian Standards Association), in addition to infection control policies.
Basic Steps to the Sterilization Process #
- Decontamination
- Assembly: inspection and presentation
- Packaging
- Loading the sterilizer
- Method of sterilization
- Unloading the sterilizer and post-sterilization handling
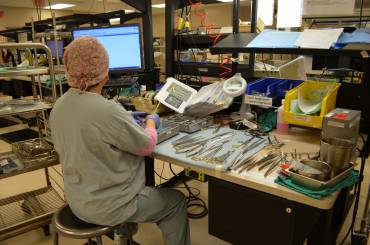
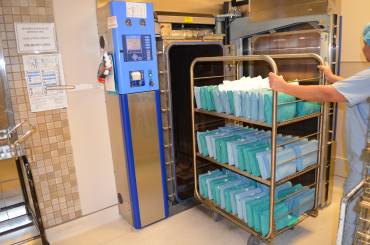
The first three steps are always carried out in an area away from the operating room theaters or areas where asepsis is controlled (i.e. scrub sinks). The Sterile Processing Department (SPD) has separate areas for decontamination, sorting and wrapping, sterilization and the sorting of sterile supplies. The following is a brief review of the steps in the process of sterilization.
1. Decontamination
All items must be thoroughly cleaned or decontaminated prior to sterilization or high-level disinfection. Items may be sprayed or immersed in an enzymatic solution before they are transferred to the decontamination area. Personal protective equipment must be worn in the decontamination area.
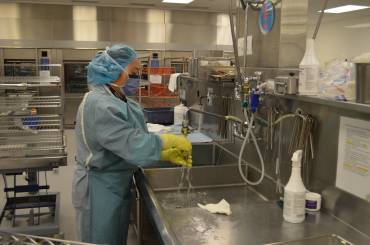
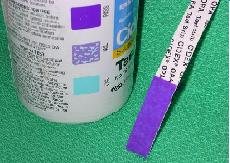
As soon as an item is returned to the Sterile Processing Department, it is sent through an automated instrument washer. The automated instrument washer uses a special enzymatic soap which breaks down the protein in blood and tissue. It operates at a high temperature which will also destroy microbes. The items removed from the washer are safe to touch with human hands and are not considered sterile. Items are repackaged prior to the sterilization process. Some items that are delicate of difficult to clean (i.e lumens of a suction catheter) may be cleaned by hand, as the force of the automated washer may damage them. The automated washer is monitored for effectivelness through regulartesting, known as the TOSI test. The TOSI (Test Object Surgical Instrument) is an indicator strip that is designed to simulate a contaminated instrument that is difficult to clean. A “pass” on a TOSI test indicates that the washer is effectively cleaning (disinfecting) instruments, including the surfaces that are difficult to reach (i.e. in the box lock).
2. Assembly
Personal protective equipment is not required for staff members who handle items that have been decontaminated. A visual inspection of items is necessary prior to the sterilizing process to identify that all items are complete and free from cracks, chips or defects.
check for function, damage, & cleanliness
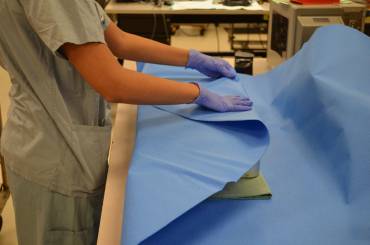
Items are combined into sets or wrapped separately. The method of wrapping will depend on the shape of the item, how heavy it is and if there are any sharp parts on it. All items must be completely disassembled and or opened (e.g. instrument ratches open, suction tips loosened) before wrapping to ensure that the sterilant is able to reach all surfaces. Depending on the method of sterilization (i.e. ethylene oxide), the item may also need to be completely dry.
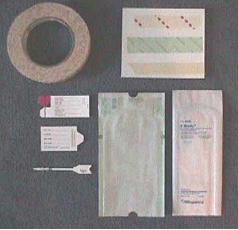
3. Packaging
Packaging Materials
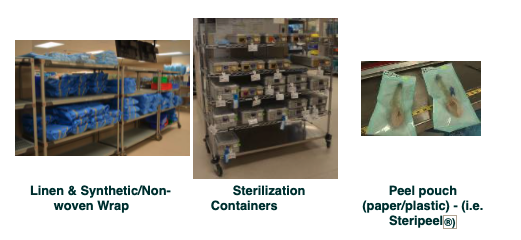
The packaging method of sequential wrapping requires that two consecutive layers of wrap are used to protect sterility.
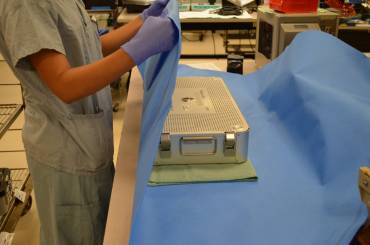
The ORNAC Standards and Alexander’s Care of the Patient in Surgery clearly outline the principles to follow when packaging items for sterilization. These references describe the types and qualities of materials to be used and how to care for reusable wrappers (i.e. linen). These standards are based on guidelines set by national and provincial health-governing bodies In Canada, standards are set by Canadian Standards Association (CSA). Linen must be freshly washed prior to use in a steam sterilizer. Linens without moisture or that have been preheated prior to the sterilization cycle, run the risk of “superheating”. This causes an alteration in the temperature of the steam sterilizer, which may be below the sterilizing temperature and therefore, inadequate.
All items will have chemical indicators (specific to the type of sterilizer) attached to the outside and inside of the packages. These indicators demonstrate that the sterilant has penetrated the package.
4. Sterilization Cycle
The principles of loading, unloading and cooling the sterilizer will be reviewed.
Items must be loaded into the sterilizer (autoclave) in a manner that ensures that all surfaces of the item will be in contact with the sterilant. Items must not impede the flow of sterilant through the sterilizer. The cycle must run at the correct temperature and for the correct lenght of time. Cycle times and temperature settings are specific to the particular type of steam sterilizer that is used.
Following sterilization, items must be cooled prior to handling. Warm items must not be placed on cool surfaces as condensation may occur beneath the warm item due to the difference in temperature. The condensation could penetrate through the sterile wrapper and cause contamination. Chemical sterilizers using ethylene oxide require aeration of items after the sterilization cycle to ensure that chemicals have dissipated.
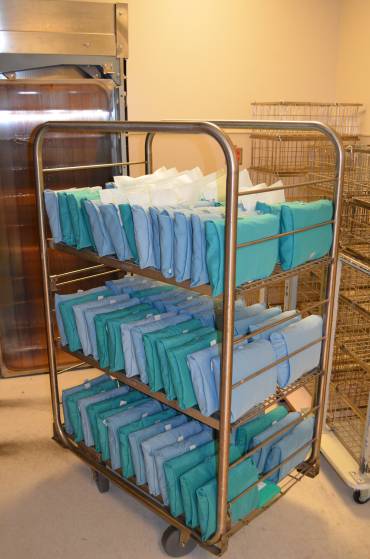
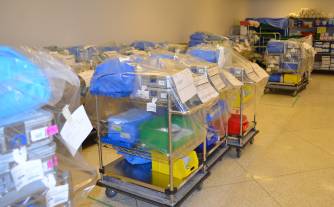
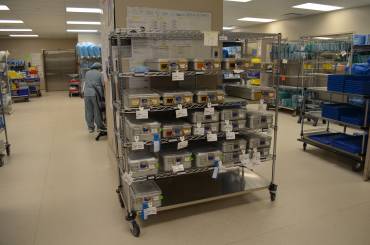
5. Sterile Storage and Distribution
Items must be stored on shelves in a clean, covered, dry area that is temperature-controlled and traffic controlled. It is important not to overcrowd or bend items that are being stored. The concept of “event related sterility” is based on the assumption that items are sterile unless a contaminating “event” refers to anything that may compromise the integrity of a package and cause contamination. Any wrapped items that fall on the floor can no longer be considered sterile as micro-organisms may enter the packages through microscopic tears that may occur as a result of the fall (“strike through”). Sterilized materials that become wet are also considered to be contaminated as micro-organisms may enter the packages via a moisture pathway. If the sterility of an item is questionable at any time, the item should be unwrapped and removed from circulation (i.e. item found on the floor or item looks like it had been wet and has now dried). In order to ensure that items do not sit for long periods, new stock is placed behind older items on the shelves and item usage is monitored so that minimum quantities of all unnecessary or rarely used items are held in storage. Previously, sterility was based on predetermined expiration dates which was indicated on the packaging. Current practice of sterility maintenance is based on the principle that the only reliable indicator of sterility is how a package is handled and stored.
Sterility is best maintained when packages are:
- Intact
- Clean and dry (protected from exposure to coughing or sneezing)
- Off the floor
- Carried away from the body
- Handled as little as possible
- Marked with chemical (internal and external) indicators that have both changed
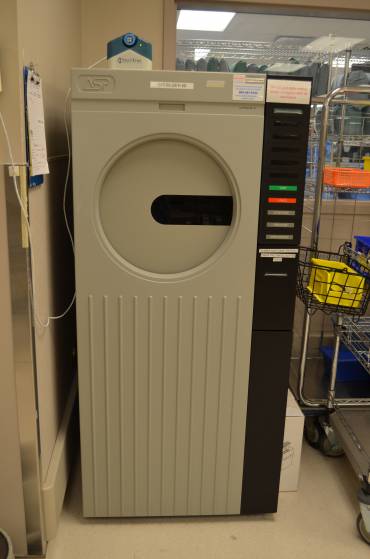
Steam Sterilization #
Steam sterilization is one of the most common methods of sterilization, because it is safe, economical and reliable for heat-sensitive and moisture sensitive items. The efficacy of steam sterilization depends on three factors: time, temperature and moisture. There are two types of steam sterilizers: gravity displacement and the prevacuum (prevac) systems.
In order for steam to properly sterilize items, the steam must be in contact with the items at a certain temperature and for a set length of time. This can only be achieved if all of the air is first removed from the sterilizer because the evacuation of air allows steam to permeate throughout the sterilizer. Inadequate air removal results in trapped air that mixes with the steam and reduces the ability of the steam to penetrate items and reach an adequate temperature. Air is removed by gravity or by a vacuum system.
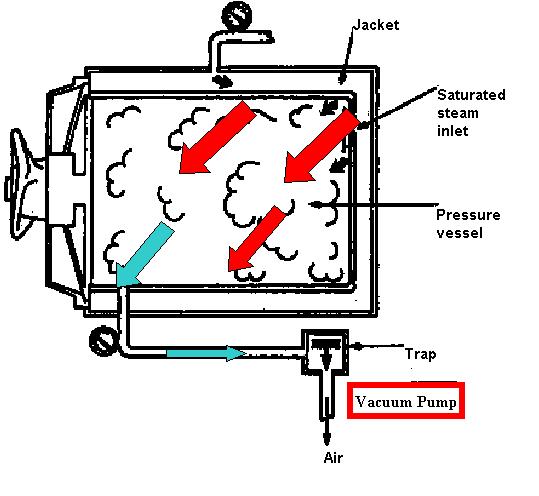
Gravity Displacement
Because steam is heavier, air is displaced downward and out through a drain in the bottom of the sterilization chamber. Once all of the air is removed, the sterilizer reaches a minimum temperature that enables the steam to provide the highest degree of microbial kill (i.e. spores). Sterilizers are commonly set at 132°C (270°F) although the actual microbial kill occurs at a slightly lower temperature. The higher temperature setting guarantees the eradication of microbes. The sterilizer must remain at this temperature for a fixed amount of time which can range from three to forty minutes (or more) depending on the item being sterilized. This is known as the exposure time. After this period of time, the sterilizer will exhaust (expel) the steam and remain at a temperature that will dry the items. Wrapped items will require twenty minutes of drying time. Unwrapped items do not require a drying time. Wrapped items must be cooled to room temperature prior to handling.
Gravity Displacement Sterilizer (steam is indicated in red and air in blue)
Prevacuum
This sterilizer uses a vacuum to remove all of the air prior to the introduction of the steam. Once all of the air is removed, the sterilizer reaches a minimum temperature which is 132°C (270°F). Exposure time for wrapped items in a prevac sterilizer is usually four minutes, but can be higher (e.g. eighteen minutes for some devices). After this period of time, the sterilizer will exhaust (expel) the steam and remain at a temperature that will dry the items. Wrapped items will require twenty minutes of drying time. Unwrapped items do not require a drying time. Wrapped items must be cooled to room temperature prior to handling.
Prevacuum Sterilizer (steam is indicated in red and air in blue)
How items are packaged and loaded into the sterilizer is just as important as the temperature and the length of exposure (see diagram). If items are not loaded into the sterilizer properly, steam may not penetrate through the sterilizer from the top to the bottom. Items should be placed on a vertical edge or sideways with lids removed (non-porous items) and in loose contact with each other. This placement allows for penetration of steam, prevents the trapping of air or water and excessive condensation.
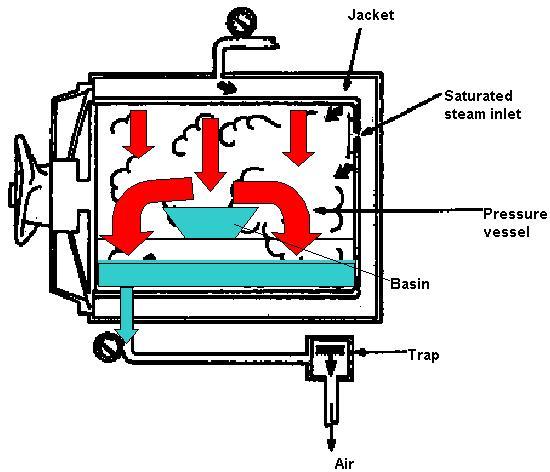
Basin is placed improperly – steam & air are trapped in the basin – steam cannot reach all surfaces

Basin is placed on side – no trapped air and steam is able to contact all surfaces
Low -Temperature Sterilization Methods #
The high temperature of steam sterilization renders items sterile. However, some devices cannot tolerate the high temperature, moisture or pressure of steam sterilization. A number of low-temperature sterilization methods (chemical sterilization) are available for these items. These low temperature methods can also be referred to as chemical sterilization. The basic principles of decontamination, assembly, packaging and loading are the same as those of steam sterilization. The sterilization cycle is slightly different in that a chemical is introduced in a variety of ways under lower temperatures. After the sterilization cycle, some low temperature methods may require a rinsing of the item or an aeration period to remove the chemical from the item. Monitoring requirements will be similar to those of steam sterilization.
A brief description of the sterilant/ sterilizer and the advantages and disadvantages of each method will be discussed. (More information is provided in the textbook).
Ethylene Oxide Gas (ETO) #
Sterilization using ETO gas is affected by several factors: time of exposure, gas concentration, temperature, humidity and penetration.
Advantages
- Versatile: can be used for heat-sensitive items or items that cannot tolerate saturated steam under pressure (i.e. endoscopes).
- Penetrates well
- Low cost per use (compared to other low temperature methods)
Disadvantages
- ETO is flammable and explosive
- Has been mixed with freon in the past
- Exposures may be toxic and carcinogenic
- Items must be completely dry; mixing with moisture creates ethylene glycol formation
- High installation costs; monitoring equipment to detect exposure of gas is necessary
- Leaves a residue which requires aeration; (up to eight to twelve hours with a mechanical aerator and seven days in ambient air)
- Long cycle time (up to fourteen hours including aeration); hospitals may only be able to do one to two loads per day
- Items cannot be released on short notice as sterilization or aeration cycles cannot be interrupted
- Not all hospitals have this type of sterilizer
Hydrogen Peroxide Gas Plasma (Sterrad) #
Hydrogen peroxide vapour and “plasma” (hydrogen peroxide vapour that has been charged using radiofrequency energy) provide microbial kill. At the end of the cycle the hydrogen peroxide breaks down into water vapour and oxygen. Following the cycle, the items are dry and no toxic by-products are produced. As a result, aeration is not required.
Advantages
- Fast: twenty-eight to seventy-five minutes depending on the model of the sterilizer and the chosen cycle
- Safe: hydrogen peroxide is converted to water
- Versatile: sterilizes a variety of items
- Devices can be sterilized, wrapped and stored
Disadvantages
- Not compatible with cellulose which absorbs the vapour and causes the cycle to abort
- Not all plastics (trays) are compatible
- Items must be completely dry
Items with a long, narrow lumen require a “booster” which is an attachment that provides an extra dose of hydrogen peroxide to the lumen. It is important to ensure that the booster is still in place when the item is delivered onto the sterile field. If the booster is dislodged, the lumen of the item must be considered unsterile. The booster attachment must be removed and discarded prior to using the item.
Booster attached to lumen tip
Liquid Paracetic Acid 3% (Steris I) #
Paracetic acid is a biocidal oxidizer that is effective even in the presence of highly organic matter. It is mixed with anti-corrosive additives to minimize its corrosive effect on metals.
Advantages
- Fast (30-40 minute cycle)
- Safe
Disadvantages
- For immersible items only
- Items can only be sterilized (unwrapped) for “just in time” sterilization (i.e. items cannot be stored)
- Water temperature, pressure and tubidity can affect the cycle time
- Some models have the capacity to sterilize only one item at a time
- Relatively high cost per use
Ozone (TSO3) #
When oxygen is exposed to an intense electrical field, atomic oxygen (O) is created. Atomic oxygen combines with oxygen molecules (O2) to create O3 or ozone. At the end of the sterilization cycle, ozone quickly reverts back to oxygen. Atomic oxygen (O) is created leaving no residue.
Advantages
- Easy to use
- Cost-effective
Disadvantages
- Strong oxidizer with certain material incompatibilities (in some plastics and rubbers)
- Limied to lumen sizes that can be sterilized
- Limied to packaging materials that are compatible
Other Sterilization Methods #
Dry Heat: used only when other methods of sterilization cannot be used (i.e. for glassware or powders). Dry heat is rarely used and is never used for surgical instruments.
Liquid Chemical Sterilants (LCS) – Examples of liquid chemical sterilants include glutaraldehyde 2% and hydrogen peroxide 6-7%. These liquid chemicals require extended contact time (six to twelve hours) to achieve sterilization. Items must be completely rinsed with sterile distilled water after soaking. These chemicals are rarely used as sterilants due to the required extended contact time and because it is difficult to maintain sterility through the rinsing process. Liquid chemical sterilants can be used as high-level disinfectants when used for a shorter contact time. Glutaradehyde is not used as commonly as it once was due to its toxic odour, respiratory effects and skin irritation.
Monitoring of Sterilization Process #
Instruments must be washed thoroughly prior to the sterilization process. Surgical instruments are considered to be critical items as they are in contact with sterile tissue. Because items are wrapped in a sterile manner or removed from an autoclave does not necessarily mean that they are actually sterile. All types of sterilizers must be monitored for efficacy on a continuous basis. There are three types of monitoring devices: mechanical/digital, chemical and biological. Each monitoring method provides specific information and the collective results of all types of tests must be taken into account before assuming that an item is sterile. Although it is not necessary to perform a biological test with each load, it is necessary to check the mechanical/ digital printout after each cycle. It is also necessary to use a chemical indicator on the inside and outside of each package that is sterilized. Each monitoring test will be discussed.
Mechanical/Digital Printouts #

Depending on the type or age of the sterilizer, a mechanical or a digital display will show the time and temperature settings of the cycle for each load. At the end of each cycle this data is recorded on a printout. Each printout should verify that the exact temperature was reached and maintained for the set amount of time (Phase II or exposure time). It should also indicate that the temperature was lowered (i.e. in a steam sterilizer) when the steam was exhausted from the sterilizer. A Prevac steam sterilizer will also provide a printout of the time that the air was purged. ETO sterilizers will mark the amount of aeration time (if a mechanical aerator is used).
It is the responsibility of the operator to ensure that all the parameters have been met, prior to removing any item for use. If the parameters have not been met, the items must be rewrapped (if they were wrapped) and the cycle repeated. If there are any further failures, the sterilizer must be shut down for maintenance. Most facilities will require the operator to sign the printout as a verification that the parameters have been checked and met. This ensures that items removed from the autoclave can be considered sterile (assuming that the chemical indicator has also been checked).
Chemical Indicators #
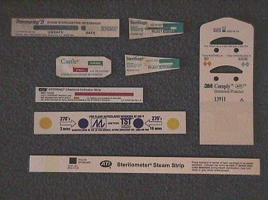
Internal Indicators External Indicators
Chemical indicators are used to monitor the physical parameters of the sterilization process. An internal and external indicator must be placed on every item. An internal chemical indicator should be placed inside the sterile package in the least accessible place to the sterilant. An external chemical indicator should be present on the outside of every package or container. The chemical indicator must always be checked for colour change (or a pass) prior to opening any sterile item.
There are six classes of chemical indicators:
Class 1: Process indicators include tape or packaging printed with ink that changes colour. These indicators are – usually applied to the outside of a package (external indicators). Process indicators change colour when exposed to the sterilant and are used to differentiate unprocessed packages from processed ones. The process indicator must be specific to the type of sterilant used. Some packages (i.e. steripeel packages) can be used for two types of sterilants – ETO and steam.
Class 2: Special tests (i.e. air removal)
The most common special test for air removal is the Bowie Dick test for prevac steam sterilizers. This test should be done daily prior to the first sterilization cycle of the day.
Class 3: Single parameter chemical indicators measure washer temperatures (some internal indicators)
Class 4: Multi-parameter chemical indicators react to two or more parameters (i.e. time and temperature).
Class 5: The integrator chemical indicator reacts to all critical parameters in the sterilization process (i.e. time, temperature & presence of steam). It also provides some biological testing correlation
Class 6: Emulator chemical indicators react to all critical parameters for a specified cycle (i.e. a specific temperature for a specific time).
A facility will utilize a variety of classes of indicators to ensure that all parameters standards are met. Classifications of chemical indicators are primarily relevant for internal indicators. The type of indicator chosen will depend on how the facility monitors each parameter of the sterilization process.
Biological Indicators #
A biological test demonstrates that the sterilizer is able to achieve the highest level of microbial kill possible. A biological indicator test is done on a daily basis for each sterilizer. It should also be done for each load that contains implantable devices and after any major repairs. Each type of sterilizer has a specific biological test which tests for a known spore that is particularly resistant to the type of sterilant used in the sterilizer. Examples of microbes used in biological testing include:
- G. Stearothermophilus: tested in steam & gas plasma sterilizers
- Bacillus atrophaeus: tested in for ETO & paracetic acid sterilizers
The test results from a standard biological indicator (BI) are usually not available until after an incubation period of forty-eight hours. Some biological indicators incorporate an enzyme detection system and results can be read within hours. Other types of biological indicators are based on enzymatic action which can also be read within hours. Biological testing is the most reliable and effective method of ensuring that a sterilizer is performing in a reliable fashion. These tests are usually performed by the SPD staff who ensure that the vials are incubated and that the results are logged.
Commercially-Wrapped Items #
Items that are commercially manufactured are wrapped and sterilized in large quantities and in slightly different ways (i.e. gamma radiation) than the usual hospital practices. The storage and event-related sterility issues are the same with commercially wrapped items as they are with hospital-processed items.
It is common practice for the only indicator of sterility of a commercially-wrapped item to be the word, “sterile” written on the outside of the package. It is important for staff members to follow the manufacturer’s directions on how to open the package and transfer the item aseptically to the sterile field to prevent contamination.
Flash Sterilization #
Occasionally an item will fall on the floor or become contaminated during a surgical procedure. The best aseptic practice is to obtain a sterile replacement item or to wait for the item to be reprocessed in the sterile processing department. Every patient deserves the same level of quality control in maintaining sterility in the perioperative setting. Occasionally, a contaminated item may be the only one available which is problematic in the evento of an emergency situation, when the surgery cannot be delayed. In these instances, the item may be sterilized in the OR suite using a process referred to as “flash sterilization” which primarily involves the use of steam sterilizers.
Other names for flash sterilization are:
- “Emergency sterilization” as defined by the Canadian Standards Association (CSA)
- “Sterilization of items for immediate use” as defined by the Association of the Advancement of Medical Instrumentation (AAMI)
- “Just-in-time sterilization”
- “Sterilization by the unwrapped method”
CSA & AAMI Criteria for Flash Sterilization:
- Urgent need
- Direct delivery to sterile field
- Proper preparation
- Implants should not be flashed
The ORNAC and AORN standards and recommendations also state that:
- Work practices allow proper preparation
- Work area provides direct delivery of sterilized items to point-of-use
- Sterilizer function is monitored (mechanical/ digital, chemical, biological)
- Procedures are described, followed, and audited
- Implants should not be flashed. (Implants that are flashed should be quarantined and only used when the results of the biological indicator are known).
Rationale for Limiting Flash Sterilization #
- Preparation problems (time, proper areas for cleaning)
- Aseptic delivery difficult
- Monitoring often omitted
- Operator error
Flash sterilization that is performed in the OR suite should not be any different than the sterilization process in the SPD department. The perioperative nurse is required to know all of the steps of the sterilization process in order to achieve the level of sterility that is obtained in the highly-monitored SPD area (Note: Some hospital protocols require that flash sterilization only be done by SPD staff). The sterile outcome depends on all of the required steps being performed in order and performed correctly.
The basic steps are reviewed as follows:
- Preparation: All organic matter is removed from the item in a designated decontamination area. (Staff members must wear PPE). All items are opened and disassembled in a manner that will allow proper steam sterilization. A validated packaging method must be used for any packaged itmes (i.e. FlashPak) that require flash sterilization. A chemical indicator must be placed next to the item.
- Sterilization: The appropriate time and temperature settings are used depending on whether the sterilizer is a gravity displacement or prevacuum type of sterilizer. The item in the sterilizer should be noted on the printout in case there is a system failure, allowing the item to be traced. The patient’s name and OR theatre should also be recorded on the printout.

- Delivery: A mask must be worn and sterility must be maintained when removing any items in open containers from the autoclave. Despite the hot temperature, the closed container of the FlashPak makes the transfer of items from the autoclave to the sterile field easier (assuming that the valves are closed). The staff member must use sterile gloves and towers when removing unwrapped items which are subsequently placed in a sterile container (such as a basin). Unwrapped items should not be carried long distances outside of the controlled environment of the OR theatres. Sterility must be maintained when the item is transfered to the scrub nurse.
- Monitoring: Time and temperature parameters must be verified. The chemical indicator must change (pass). Any problems with the autoclave should be reported. Bowie Dick tests must be done daily on all OR suite prevac autoclaves and biological tests must be done daily on all autoclaves. All results must be logged.
The most common flash sterilization errors include:
- Wrong time
- Wrong temperature
- No integrator/ indicator
- Integrator not read
- Printout/ mechanical errors – not noticed or reported
- Incomplete record (inadequate quality assurance): time & temperature, load contents, patient name, biological & chemical indicator results
Watch the following video on the performance of flash sterilization:
Note: The following information may not be apparent in the video:
- The soap used for cleaning is an enzymatic solution/ detergent
- When the cleaning process is complete, nurses must change their gloves.
Disinfection Methods #
There are three levels of disinfection: high (HLD), intermediate (ILD) and low (LLD). The degree to which each level of disinfection eliminates pathogens is outlined in the following table:
The process of disinfection will eliminate most pathogens except for bacterial spores and prions. The disinfection process involves the use of chemicals, (usually in a liquid form), in which items are soaked. The term “disinfectants” describes chemicals that are used to kill micro-organisms on inanimate objects. The term “antiseptics” is an antimicrobial substance used on body surfaces or living tissue. A “germicide” can be a disinfectant or an antiseptic. The use of antiseptics is discussed in the module on “Skin Preparation”.
The process of disinfection is based on the same basic principles of preparation for sterilization as follows:
- Items must be cleaned of all bioburden
- Items must be disassembled to allow complete contact of all parts by the solution
- Items must be dry
- Trapped air bubbles must be removed before timing begins
- Items must be subjected to the correct disinfectant and time parameters
- Items must be handled appropriately after the disinfection process
The selection criteria for a disinfectant are:
- Efficacy: Sterilization efficacy refers to the capability of a level of sterilization to produce sterility which depends on how a device is classified for use (see table). Only semi-critical and non-critical items may be processed by disinfection methods.
- Safety: The method of disinfection must be safe for patients, staff, the environment and the item itself. It must not interfere with the functionality of the item (i.e. use only surfactant-free high-level disinfection for lensed instruments/ scopes).
- In-Use Characteristics: Selection characteristics of the disinfectant include ease of use, lack of side effects (i.e. odour), stability and durability, and cost (per processed item).
In-Use Issues
- Staff protection: There are three levels of protection that should be considered for the safety of the staff:
- Provide the least toxic product with the fewest side effects.
- Provide ventilation systems, (fume hoods) and/ or use methods of containment in the form of automated systems (i.e. Steris system).
- Provide staff with PPE to wear when handling disinfectants and items processed with disinfectants. The form of PPE should be appropriate for the risk of exposure (e.g. respirator masks for airborne risks, gloves and gowns for skin irritation risks, goggles for eye splash risk and full face shields for prevention of mucous membrane contact).
- Device preparation includes the following:
- Items must be adequately cleaned with no detergent residue;
- Items must be completely dry prior to immersion
- All valves open
- Items must be completely disassembled
Brushing of lumens while cleaning with enzymatic solution
- Expiry date: Many chemicals are reusable, but have limited periods of effectiveness, especially if they require reconstitution from a powder or tablet form, or require dilution prior to use. Reusable solutions must be tested each day for minimal effective concentration (MEC test kits).
- In-use dilution: Minimal Effective Concentration (MEC) solutions are effective to a specific dilution level. Items must be dry to avoid further dilution. When reconstituting or mixing solutions it is important to avoid overdilution.
- Solution contact: All surfaces of the item must be immersed and all channels fully opened. The contact time of the solution must be sufficient for the desired microbial kill (Some HLD’s can suffice as sterilants if the contact time is sufficient, although the required time would not be feasible for everyday use.)
- Rinsing: Thorough rinsing of items is necessary after contact with solutions to remove chemical residue (AORN recommends a triple rinse). Sterile, filtered or potable (tap) water may be used for rinsing, depending on the intended use of the item.
High-Level Disinfectants #
- Glutaraldehyde 2%: Occupational Health & Safety issues with vapours have been noted. Many hospitals have replaced glutaraldehyde 2% with a Steris system or OPAs. It takes at least twenty minutes to disinfect items; items soaked for ten hours can be considered sterile. Glutaraldehyde 2% leaves a residue and needs to be thoroughly rinsed.
- Ortho-phthalaldehyde 0.55% (OPA): OPA has a minimal odor and takes only ten minutes to disinfect items at room temperature. It stains protein gray and cannot be used for urologic instruments in patients with a history of bladder cancer. (Frequent scoping may cause allergic reactions.)
- Hydrogen Peroxide 6-10%: Hydrogen peroxide has no odour, takes ten minutes to disinfect items and six hours to sterilize items. It is corrosive to certain metals and can damage rubber and plastics. Hydrogen peroxide is not widely used.
- Hot Water Pasteurization: Water temperature must be 160°F for thirty minutes. Hot water at this temperature will melt heat-sensitive items (i.e. anesthetic machine rebreathing bags, anesthetic masks).
Intermediate-Level Disinfectants #
- Alcohols: Isopropyl alcohol 70-90% is flammable and easily evaporates which means that contact time cannot be controlled and may not be long enough for effective disinfection. Alcohol can be added to antiseptics or used for wiping down medication vials.
- Phenolics: Phenolics are used for environmental cleaning. Phenolic solutions are assimilated into porous materials and have toxic effects which can result in depigmentation and hyperbilirubinemia in newborns. (They are not recommended for for use in nurseries.)
- Chlorines (Halogen) : Hypochlorites are available in solids or liquid form (sodium hypochlorite or liquid household bleach). A 1:10 solution is recommended. Chlorines have an expiry date and are used to wipe non-sensitive equipment surfaces. Chlorines can be corrosive
- Iodines (Halogen): Iodophors are a water-soluble combination of iodine and a solubilizing agent that creates a sustained release of iodine. Iodines are used as skin antiseptics
Low-Level Disinfectants #
- Hydrogen Peroxide 3%: Hydrogen peroxide is effective for cleaning work surfaces.
- Quaternary ammonium compounds (QUATS): QUATS have a low-level toxicity and the efficacy of theses solutions is reduced by many environmental factors. They are commonly used for non-critical surfaces such as walls and floors,
- Moist heat: Moist heat is commonly used as a washer disinfector.
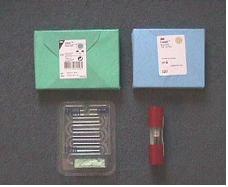
Reprocessing/ Reuse of Single Use Items #
Many items used during a surgical procedure are deemed to be single-use only by the manufacturer. Although this is necessary for many items (i.e. catheter bags) some items can be reused or reprocessed (e.g. calf compressors that were opened but never used or certain ESU tips). Every hospital will have a policy for items considered acceptable for reuse. Policies and guidelines for reprocessing or reusing products are determined by the hospital, risk management departments and government and regulating bodies.
The level of regulation for the reprocessing and reuse of products in the hospital is to ensure that the hospital can reproduce the same level of quality, safety and effectiveness of a product as when it was first manufactured. Reuse Committee to determine which items can be reprocessed or reused.
The decisions of a Reuse Committee will be based on the following:
- Cost/ benefit analysis of reprocessing
- Ability to conduct quality control
- Maintaining the integrity and functionality of the product be maintained
- Proper decontamination of the product prior to sterilization
- Guarantee of sterility
- Cost of device failure
- Inspection program to ensure functionality
It is important for nurses to know which items can be reprocessed in the facility in which they are employed to prevent items from being inadvertently discarded.
Surgical Instrumentation #
Learning Objectives #
At the end of the session the nurse will be able to:
- Identify and describe the classifications of instruments
- Identify specific indications for instrument use.
- Demonstrate how various instruments are passed.
- Identify the different power tools and indications for use.
- Identify nursing responsibilities for the cleaning and maintenance of surgical instruments.
There are many specialized instruments in addition to the instruments identified in this unit. Specific instruments will be introduced as part of the surgical specialty training during the full-time clinical portion of the Program.
2. Individual hospitals will determine which groups of instruments are assembled into standardized “sets”. Each set includes instruments required for a specific operations (i.e. small bone sets used for minor orthopedic surgeries). Review the “Major Set” which is used for most abdominal surgeries (laparotomy).
Note: Due to various reasons (manufacturer names, history, hospital and staff preferences), hospitals may use different names for the same instruments as indicated in the following table.
Crile forceps: UBC = kelly, LGH & RGH = small kelly, VGH = crile
Artery forcep: LGH = large kelly, VGH, UBC & RGH = artery
Kocher forceps: UBC, LGH = kocher, VGH & RGH = oschner
- VGH Major Set (with pictures)
- LGH – Major Laparotomy Instruments Set
- UBC Major Set
- RGH – Major Abdominal Set
- SPH Major General Set
3. Each instrument is passed to the surgeon in a manner that will allow the surgeon to use it without having to readjust his/her grip. View the video clip below and pay particular attention to the following points:
- Passing a scalpel: hand-to-hand
- Passing a scalpel: hands-free
- Passing scissors
- Passing a clamp: a Crile
- Passing a retractor: Parker Mott, Kelly
- Loading and passing a sponge stick
- Loading and passing a peanut
- Passing a needle driver: hands- free
- Passing a needle driver: hand-to-hand for both left and right handed surgeons
Sharps – Scalpel Handles #
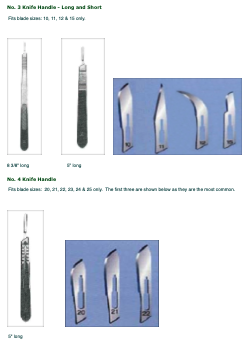
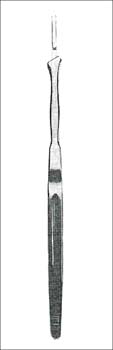
Scalpel handles hold a disposable blade that is used to dissect tissue. Scalpels are most commonly used for the initial skin incision although they are also used for cutting thicker tissue. Scalpel handles come in a variety of lengths to accommodate deep cavities or larger patients. Specific blades that are used for different dissection purposes fit onto each of the handles. Some are angled at one end to access areas that are difficult to reach. Shorter versions of the handle may feature an engraved ruler along the shaft which may be used as a measuring device as well as a scalpel.
Common names for scalpels include: knife, BP handle, scalpel, blade handle.
No. 3 Knife Handle – Long and Short #
Fits blade sizes: 10, 11, 12 & 15 only.
 #
#
No. 7 Knife Handle #
Fits blade sizes: 10, 11, 12 & 15 only. The No. 7 knife handle is most commonly used with the smaller size 15 blade as the handle is slender – making it easier and safer to manipulate when doing internal dissection.
6 3/8″ long
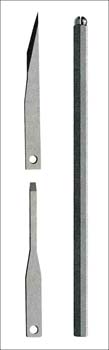
Beaver Blade Handle #
There are several types and lengths of beaver blade handles (most commonly ranging from 3″-7″). Most of these handles have a knurled end that opens which allows a wide variety of blades (identified by numbers) to be inserted into the slit and then tightened into place. The blades are usually slender (~5 millimeters wide) and come in a variety of lengths, depending on their purpose. Surgical specialties that most frequently use the Beaver blade include neurosurgery, ophthalmology, ENT and orthopedics (mostly arthroscopic). The sample handle below is shown with a #61 (top) blade and a #65 (bottom) blade.
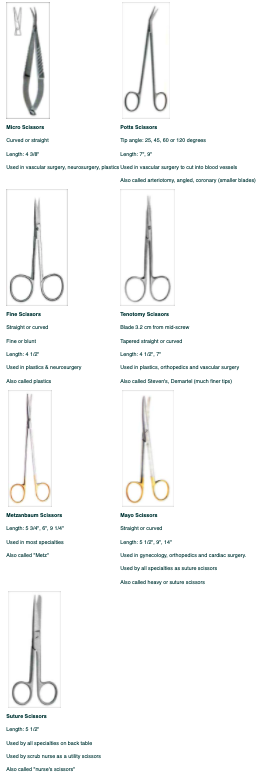
Sharps – Scissors #
Scissors are used to dissect tissue or cut sutures. Scissors come in a variety of lengths and types to accommodate deep cavities, larger patients and specific purposes. They may be curved, straight or angled. Scissors are easily damaged and dulled and therefore should only be used for the intended purpose. Below are examples of commonly-used scissors (most delicate to heaviest).
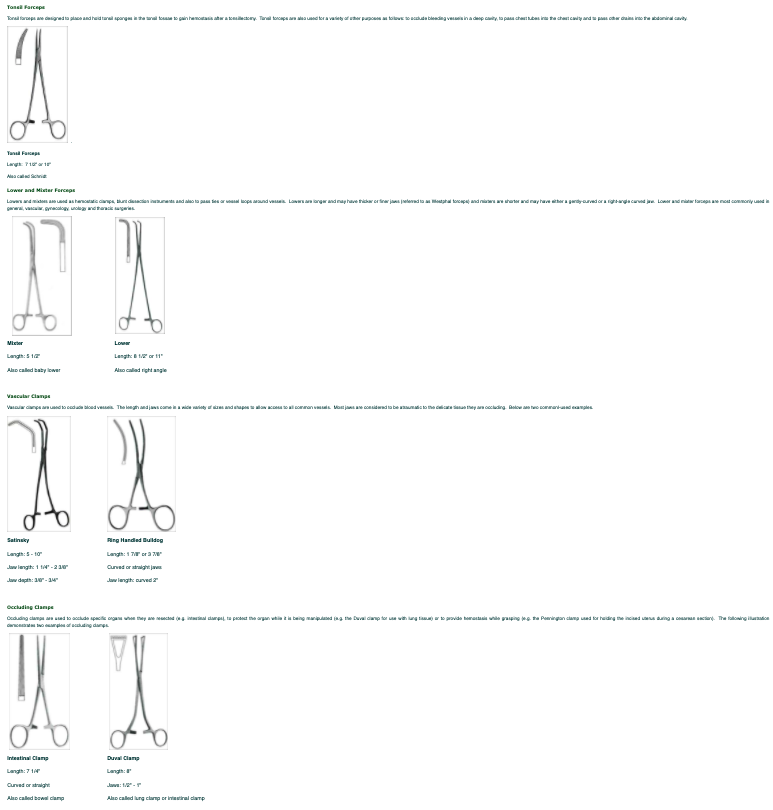
Clamps – Holding and Occluding #
Clamps are used to occlude vessels or organs. They are most commonly used to provide hemostasis through the occlusion of blood vessels. Most instruments come in a variety of lengths to accommodate deep cavities or larger patients. Clamps have a variety of jaw sizes to accommodate various tissue thicknesses. Clamps also have different jaw angles to enhance accessability for the surgeon. The jaws have different occluding surfaces (teeth) specific to the type of tissue on which the clamp is being used. These occluding surfaces are considered traumatic or atraumatic to tissue; they can have longitudinal, horizontal or transverse teeth. All clamps have the following characteristics:
- Angled or straight jaws
- Jaws that have either longitudinal, horizontal or transverse teeth
- A box lock that opens and closes it
- A shank: lengths vary
- A ring handle – used to grasp the instrument and open it
- A ratchet – used to lock the clamp in place
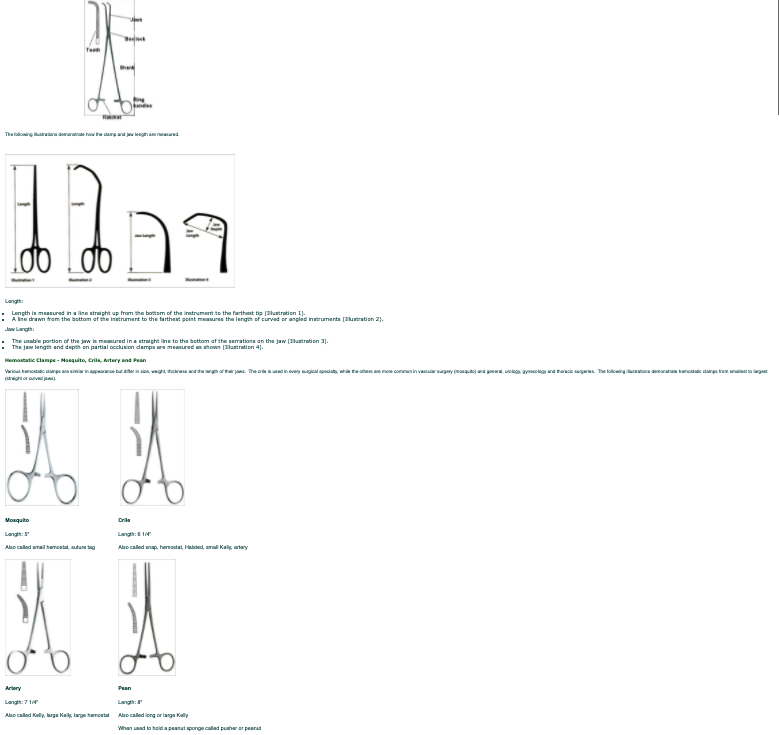
The following illustration demonstrates the relative sizes of the different clamps. It is easy to differentiate clamps when they are grouped together and it is much more difficult to differentiate them when they are observed individually. The clamps are identified from left to right as follows: pean, artery, crile and a mosquito. It is important to remember that the artery and crile are known by a variety of names depending upon the hospital in which they are used.
~ 1 1/2 times smaller than actual size

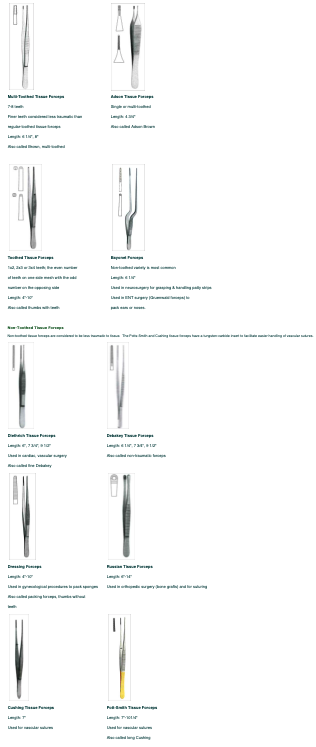
Grasping/ Holding – Tissue Forceps #
Tissue forceps are used to grasp or hold tissue, vessels or organs. Tissue forceps are commonly used to hold tissue while another instrument is used to dissect around the area, to grasp needles while suturing and to pass ties around vessels. Most tissue forceps come in a variety of lengths to accommodate deep cavities or larger patients. The jaws also have different serrations facilitate the grasping abilities of various types of tissue. The tips may be toothed or non-toothed. Tissue forceps are sometimes referred to as thumbs, tissues or forceps. Examples of commonly used tissue forceps will be described.
Toothed Tissue Forceps #
Toothed forceps are considered to be traumatic, but provide excellent holding ability. They are used for holding tissue especially when suturing the tissue closed.
 #
#
Grasping/ Holding – Forceps
Grasping/ holding forceps are used to grasp or hold tissue or organs. Grasping forceps are commonly used to hold the tissue while another instrument is used to dissect the tissue. Most grasping/ holding forceps come in a variety of lengths to accommodate deep cavities or larger patients. Grasping/holding forceps are available with a variety of jaw sizes, angles and serrations to accommodate various tissue thicknesses and to enable easier grasping of specific tissue. The jaw surfaces can be considered traumatic (may have teeth) or atraumatic to tissue and can be horizontal, longitudinal or transverse in design. The following diagrams demonstrate examples of grasping/ holding forceps.

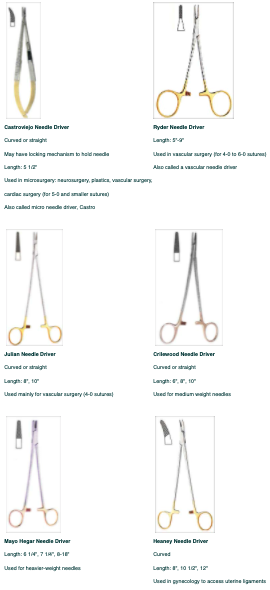
Needle Holders/ Drivers #
Needle drivers (also known as needle holders) are used to grasp sutures (needle with thread attached) that are passed through tissue to close it. Most needle drivers come in a variety of lengths to accommodate deep cavities or larger patients. The jaws also have different serrations than other instruments and may have a tungsten carbide surface to prevent the needle from slipping during use. The following are examples of commonly used needle drivers (from the most slender design to the heaviest jaws).
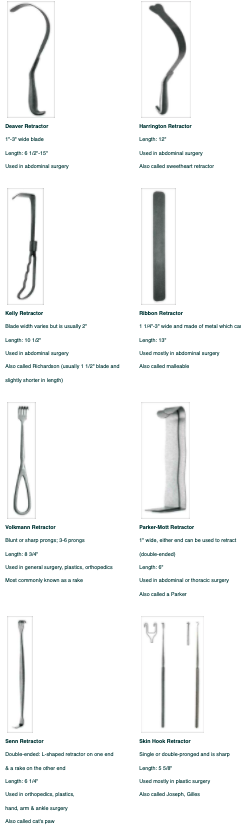
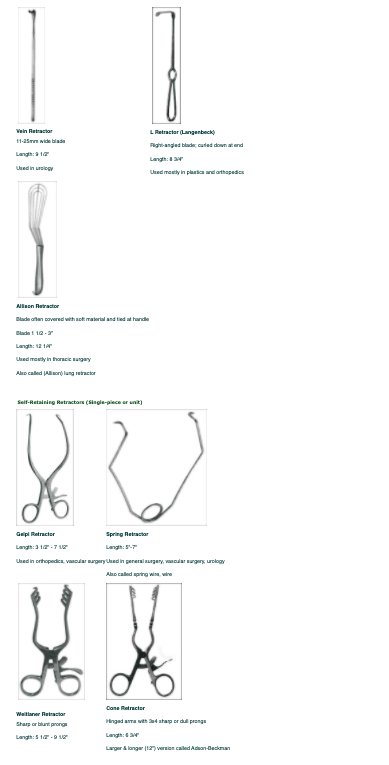
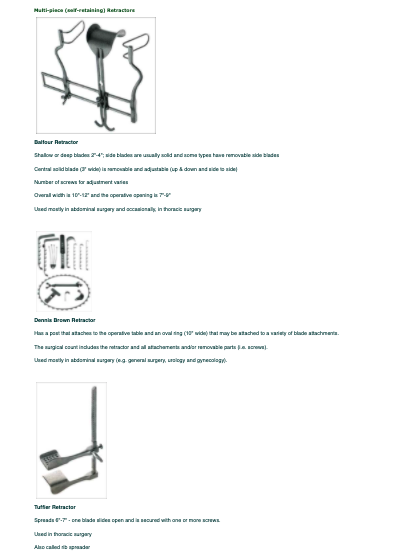
Retractors #
Retractors are used to retract vessels or organs, in order to expose the surgical field. Most retractors come in a variety of sizes as well as lengths or depths to accommodate deep cavities or larger patients. Retractors come in many different shapes and may be either blunt or sharp ends. There are single-piece retractors which are usually hand-held (by the surgical assistant) and multi-piece retractors which are generally self retaining. The advantage of self-retaining retractors is that the surgical team can have their hands free to work while maintaining adequate exposure of the surgical site. The following illustrations show are commonly-used examples of single-piece, hand-held and multiple-piece, self-retaining retractors:
Hand-held Retractors #
#
Miscellaneous Instruments #
There are a variety of miscellaneous instruments that do not fit into any distinct instrument category. Some of these instruments are used by many surgical services while others are specific to a particular surgical specialty. The suction tip is an example of a generally-used instrument and a rongeur is an example of an orthopedic specialty instrument. The surgical specialty instruments are designed for dissecting or resecting certain types of tissue (e.g. rongeurs are designed to cut bone). Surgical specialty instruments are also used to enable surgeons to identify specific structures (e.g. a nerve hook is used to feel around nerve roots to ensure that they are not being compressed). Some instruments are identical to the instruments that have been previously mentioned, but they have been adapted for a specific purpose (i.e. instruments used when employing a laser have a matte non-reflective coating applied to prevent an arc strike from the laser). Students will learn more about specialty instruments when rotating through each surgical specialty. When reviewing and observing the instruments, students should try to recognize the use and purpose of each instrument (i.e. cut, elevate, dissect). Most of the instruments utilized in laparoscopic or minimally invasive surgery (MIS) have tips that are similar to those described in the previous categories of instruments but with shafts and handles that are adapted for use through a variety of endoscopes (i.e. laparoscopic and arthroscopic instruments). Instruments that are used for minimally invasive surgery can be reviewed in the textbook and in your clinical labs/ settings.
The following illustrations include a few of the vast variety of miscellaneous instruments available.
Suction Tips #
#
#
Learning Objectives #
At the end of the session, the nurse will be able to:
- Describe the purpose of a surgical scrub.
- Describe the characteristics of the solutions used to perform a surgical scrub.
- Understand and apply the principles used in a surgical scrub.
- Demonstrate the surgical scrub using the brush-stroke method.
- List the steps in an alcohol rub surgical scrub.
The surgical hand scrub ensures that all members of the sterile team have reduced the bacteria count on their skin to a minimum. In the event of an inadvertent glove or gown failure, staff members who have completed the surgical hand scrub are less likely to become a source of infection to the patient. Understanding the principles behind a surgical hand scrub is as important as mastering the technique.
During the full-time clinical portion of the Program, students will learn the brush-stroke method of the surgical scrub. At the midpoint of the program (after students have mastered the brush-stroke method) the alcohol-rub method of the surgical scrub will be taught.
Following review of the surgical scrub procedure and scrub solutions, watch the following video:
Gowning and Gloving #
Learning Objectives #
At the end of the session, the nurse will be able to:
- Describe and demonstrate gowning and gloving of self.
- Describe and demonstrate gowning and gloving another team member.
- Understand and demonstrate the eight principles of aseptic technique while gowned and gloved.
- Demonstrate aseptic removal of the gown and gloves.
A sterile gown and gloves provide a protective barrier between the scrubbed person’s unsterile skin and clothes and the sterile environment. The gown and gloves also protect the scrubbed person from the patient’s blood and body fluids. Donning a gown and gloves requires practice in order to ensure that sterility is maintained.
Surgical Counts #
#
Learning Objectives #
At the end of the session, the student will be able to:
- List the criteria followed for the implementation and documentation of surgical counts for sponges, small items and instruments
- Understand the ORNAC Standards and hospital policies relating to surgical counts.
- Describe the documentation required for surgical counts.
- Describe the documentation and procedure required for incorrect counts.
All items used on the sterile field during the surgical procedure must be visualized by both the scrub nurse and the circulating nurse. All items must be documented by the circulating nurse to ensure that items are not inadvertently left inside a patient. This process is called a surgical count. The surgical count process outlines strict criteria which must be followed. The criteria for the surgical count include a description of what to count, when to count, who should count, and how to document the count. Patient safety is always a major concern for perioperative nurses and is of critical importance when doing the surgical count. Perioperative nurses must use utmost diligence during the surgical count process and the documentation of the items used on the sterile field. The surgical count must be accurate and free of error to protect the patient.
Download the Regional Count Policy and Procedure. Although ORNAC standards must be followed, the documentation criteria is often site-specific. It is important that students know the Count Policy of the facility where they are practicing, as this policy will be used on a daily basis. as you will be using it on a daily basis and your documentation must be consistent with the policy for legal reasons. You might want to download a copy of the Count Record (from #3 below) to refer to as you read the count policy.
2. At the end of a surgical procedure, a clearly written count record tells a story of the operation including:
- Items that were present at the initial count-in
- Items that were introduced after the initial count was done (indicated by the initials of the nurse above the added item on the record)
- Items that were counted off the sterile field (item is crossed off) and the time the item was counted off (i.e. before or after a closing count was done)
- How many (and what type) of closing counts were performed (consistent with the procedure)
- Count status (correct or incorrect) for each layer counted (Correct counts are indicated by a check mark for each layer of closure. Incorrect counts are noted on the Operative Record, an X-ray is taken and an incident report completed.)
If all of the above points cannot be safely addressed by the perioperative nurse when reviewing the finalized count sheet, it can be assumed that other people (i.e. a lawyer/expert witness) who may review the count sheet in the future would also have difficulty understanding what may have happened.
Students should review the attached document to see an example of what a completed count sheet should look like. Example_of_Count_Sheet_Documentation.
3. Download a copy of the Count Record for the hospital where you will be practicing and learn the content and location of the items listed.
- LGH Count Record
- RH Count Record and RH Instrument Count Record
- VGH & UBC Count Record
- St. Paul’s Hospital Count Sheet
- Children’s Hospital Count Sheet
4. Watch the video clip of a scrub nurse counting sponges and small items. Using your downloaded Count Record, act as the circulating nurse and record the items being counted in accordance with your understanding of your hospital’s policy. If the scrub nurse citing the counted items too quickly for you to visualize and record, it is important to request that the scrub nurse pause, repeat or slow down. Pause the video during the following exercise if necessary.
Surgical Count Guidelines #
Surgical Counts are one of the most important responsibilities of the perioperative nurse. Surgical counts are performed to prevent potential patient injury due to a retained foreign object in the body. Surgical counts are done for all procedures where there is a possibility of a sponge or instrument being inadvertently retained in the patient.
Both instruments and sharps occasionally get caught in the laundry or are thrown into the garbage by mistake. Surgical counts also prevent the loss of instruments in this manner and prevent possible injury to staff.
Who can count?
Surgical Counts are the responsibility of both the scrub and circulating nurses. The following guidelines for the count process and the count record (which is a legal document) are recognized by ORNAC and provincial hospital authorities. The surgical count must be completed by two people, one of whom must be a registered nurse (in either the scrub or the circulating role). The other person participating in the surgical count can be a registered nurse, a licensed practical nurse or a physician (surgeon or resident). Two licensed practical nurses cannot count together and a licensed practical nurse cannot count with a physician.
Both the scrub and circulating nurse should always be aware of all counted items and both nurses must be involved in all parts of the count. The scrub and circulating nurses must concurrently observe and audibly count each item, according to ORNAC and hospital standards.
There are two types of counts and the type of surgery will dictate the extent of the count to be performed.
A Full Count requires that sponges, sharps, miscellaneous items, and instruments be counted. Full counts are done during surgical procedures when a body cavity is entered or when there is the potential that a body cavity could be entered (e.g. inguinal hernia repair).
A Partial Count is defined as a count of sponges, sharps and miscellaneous items. This count is performed for procedures where there is no chance that a body cavity could be entered. A partial count is also done at specific times during the operation (e.g. at the closure of the skin layer).
Superficial Procedures
With the exception of very few cases, there is always a chance that an item could become lost in the surgical incision. Each individual facility will have a policy that defines and lists superficial procedures. Students must be familiar with individual hospital policies (Learning Activity #2).
The standards for surgical counts have been set by The Operating Room Nurses Association of Canada (ORNAC) as described below.
Counts must be done at the following times throughout the surgical procedure:
- Prior to the start of surgery
- At the first layer of closure (closure of a cavity such as peritoneum)
- At skin closure
- Additional counts shall be done prior to the closure of a cavity within a cavity (i.e. the closure of the uterus during a cesarean section)
- If possible, the same personnel should remain pr esent throughout a surgical procedure. When this is not possible, a “changeover count” must be done during the permanent relief of the scrub and/or circulating nurses. The policies of individual facilities will determine which items are counted during a “changeover count. A full count of sponges, sharps, miscellaneous items and instruments should be done when a different nurse provides permanent relief for the scrub nurse.
Standards for Surgical Counts #
- Radiopaque materials must be used exclusively during surgery.
- Interruptions during the count increases the potential for error. If an interruption occurs during the count, it must be resumed at the last recorded item.
- No item (instruments, garbage, laundry) may leave the operating theatre once a count is initiated until the final count is complete and correct.
- The result of the counts must be announced audibly to the surgeon. The surgeon should verbally acknowledge that they have heard the result of the count.
- Items are to remain together until the initial count is done and should not be placed on the mayo stand prior to counting.
- The sequence of the surgical count is: 1. sponges (beginning with laparotomy sponges and followed by all other types of sponges) 2. sharps 3. miscellaneous items (moving in an orderly fashion from one side of the sterile field to the other) 4. instruments.
- Items must be immediately recorded as they are counted by the people who are actually doing the surgical count.
Sponges
- Sponges used for surgery must be radiopaque.
- Sponges must be separated and counted twice at the initial count and as dispensed. (Most facilities always count the sponges twice.)
- Radiopaque sponges must not be used as dressings. Can you think of a reason why?
- Packages that have an incorrect number of sponges should be removed from the operating theatre and not added to the count sheet.
- Sponges are initially counted at the beginning of the surgery and at every layer of closure.
- Dressings are not dispensed onto the sterile field until all sponge counts have been completed (i.e. after the skin count has been completed).
Sharps and Miscellaneous Items
- A broken needle must be accounted for in its entirety.
- Used sharps must be contained in a puncture resistant container.
- The scrub nurse must keep a continuous count of the needles used during the procedure.
- Sharps and miscellaneous items are counted initially and at every layer of closure.
- All nurses involved in the count must be aware of which miscellaneous items require counting (All the items that are on the sterile field and used in the surgical wound should be counted).
- The transfer of sharps should be practiced in a hands-free manner, using a neutral zone.
Instruments
- Instrument sets should be standardized.
- Any broken or disassembled instruments must be accounted for in their entirety.
- Instruments are counted initially and, again only at the first layer of closure of the body cavity.
Incorrect Counts
The following steps hould be taken in the event of a surgical count discrepency.
- Always notify the surgeon immediately.
- Recount the item(s) in question.
- Search for the item on the floor, in the garbage, in the laundry, under the OR table, under the feet of the sterile team or even in an improbable spot.
- The surgeon should order an x-ray and the results must be documented. (What would you do if the surgeon refuses to have an xray taken?).
- Report the incident as per the protocol of the hospital and report all actions to the appropriate supervisor.
- Record the incorrect count and document actions taken on the Operative Record, according to the hospital policies.
Documentation for Counts
- The Count Record document must be included in the patient’s permanent record as a legal part of the chart.
- All individuals involved in the count must sign the Count Record with their names and their professional designations.
- It is imperative that all the documentation on the Count Record is clear and legible, including the number of times that items are counted.
- Incorrect entries on the Count Record will be managed according to individual hospital policies and procedures.
It is the responsibility of every staff member to follow all hospital policies regarding surgical counts.