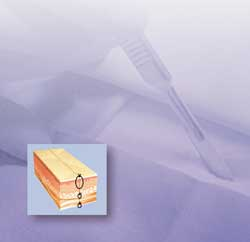
Skip to content
Educational Resources
  • Dashboard
  • Dashboard

Clinical Competencies

22
  • ECG Interpretation
  • Advanced Cardiac Life Support – Basic Airway Management For Operating Room Nurses
  • Introduction to History Taking Skills
  • Examination of the Heart
  • Examination of the Pelvis
  • Examination of the Thorax and Lungs
  • Examination of the Rectum
  • Examination of the Abdomen
  • Conscious Sedation and analgesia competencies
    • Introduction To Harvey Cardiopulmonary Simulator
    • Standards Of Practice
    • Patient Assessment
    • Difficult Airway
    • Drug Pharmacology
    • Introduction, Goals And Indications For Administration Of Sedation
    • Managing Complications
  • CanMEDS Framework Competencies for Medical Students
    • Collaborator
    • Communicator
    • Health Advocate
    • Leader
    • Medical Expert
    • Professional
    • Scholar

Procedural Competencies

39
  • Airway management
  • IV access
  • Local anesthesia/field block
  • Suturing of Lacerations
  • Pap Smear
  • Nasogastric tube placement
  • Venipuncture
  • Abscess incision and drainage
  • Urethral catheterization
  • Oxygen administration devices
  • Thoracentesis
  • Lumbar puncture
  • Anoscopy
  • Arterial line placement
  • Central venous catheter placement
  • Intramuscular Injection
  • Pericardiocentesis
  • Emergency Resuscitation Principles
  • Circulation Assessment & CPR
  • Rectal Examination
  • Electrocautery
  • Epidurals
  • Intraosseous Infusion
  • Ultrasound-guided Central Line Insertion
  • Simulation Debriefing
  • Wound Treatment
  • Introduction, Goals And Indications For Administration Of Sedation
  • Central Vein Catheterization Landmark Technique
  • Chest tube placement and management
  • Spontaneous vaginal delivery
  • Types of Surgical Knots
  • Tying Technique
  • Principles of Asceptic Technique
  • General Principles
  • Laparoscopic Equipment
  • Handling Laparoscopic Instruments
  • Basic Laparoscopic Techniques
  • Managing Complications
  • Tracheostomy

Nursing Competencies

85
  • Wound Management
    • Wound Prevention
    • Wound Assessment
    • Wound Treatment
  • Advanced Clinical Nursing Management (Pre Code & Code)
    • Cardiac Failure
    • Renal Failure
    • Tracheostomy Care
    • Suctioning In Respiratory Care
    • Fluid And Electrolytes
    • Basic Airway Management For Operating Room Nurses
    • Medical-Surgical Nursing Comprehensive Scenario
    • Pre Operative Assessment
    • Neurological Trauma
    • Bipap & CPAP
    • Respiratory Failure
    • Shock
    • Respiratory Assessment
    • Oxygen Therapy
  • COPD and its Management
    • Acute Exacerbations
    • End-of-Life Care
    • Definition, Prevalence, Signs & Symptoms
    • Risk Factors And Pathophysiology
    • Diagnosis And Severity
    • Management Of Stable COPD
    • Patient Self-Management Education
  • Procedural Sedation education for registered nurses
    • Introduction To Laerdal SimMan
    • Standards Of Practice
    • Patient Assessment
    • Difficult Airway
    • Drug Pharmacology
    • ECG Interpretation
    • Introduction, Goals And Indications For Administration Of Sedation
    • Managing Complications
  • Introduction to Perioperative Nursing
    • Introduction To The Perioperative Nursing Program
    • Role Of The Perioperative Nurse
    • Preoperative Care
    • Intraoperative Care – Part 1
    • Intraoperative Care – Part 2
    • Full Time Clinical Component
    • Perioperative Anatomy & Medical Terminology
    • General Surgery
    • Perioperative Safety
  • Physical Assessment
    • Physical Examination Of The Airway
    • How To Take Blood Pressure Reading
    • Acute Bronchospasm
    • Acute Respiratory Failure
    • Cardiac
    • Pulmonary Embolism
    • Taking A Temperature
  • Procedural Sedation and Analgesia Education
    • Standards Of Practice
    • Patient Assessment
    • Difficult Airway
    • Drug Pharmacology
    • ECG Interpretation
    • Introduction, Goals And Indications For Administration Of Sedation
    • Managing Complications
  • Safe Blood Transfusion
    • Safe Blood Transfusion I
    • Safe Blood Transfusion II
  • Community Home Infusion
    • Teaching Home IV Self-Administration
    • Teaching Community Intravenous: Gravity
  • Collaborative Framework
    • Respiratory Assessment
    • Tracheostomy Care
    • Oxygen Therapy
    • Suctioning In Respiratory Care
  • Fundamental Perioperative Skills for LPN
    • Introduction To The Perioperative Skills for LPN
    • Role Of The LPN Perioperative Nurse
    • LPN Perioperative Care
    • LPN Perioperative Safety
    • LPN Intraoperative Care
  • Pain Management
    • Classification & Physiology Of Pain
    • Pain Assessment
    • Non-pharmacological Approaches For Pain Management
  • Rheumatoid Arthritis Hand
    • Ulnar Drift Deformity In Rheumatoid Arthritis
    • Boutonniere Deformity In Rheumatoid Arthritis
  • Total Joint Arthroplasty Outcome Measures
    • Thirty Second Chair Stand Test (30 Sec-CST)
    • Stair Climb Test (SCT)
    • Ten Metre Walk Test
    • Timed Up & Go (TUG) Test
    • Functional Reach Test (FRT)
    • Single Leg Stance (SLS) Test
    • Six Minute Walk Test (6MWT)
    • Visual Analogue Scale (VAS): Pain
    • Numeric Pain Rating Scale (NPRS)
    • Hip Disability And Osteoarthritis Outcome Score (HOOS)
    • Knee Injury And Osteoarthritis Outcome Score (KOOS)
    • Lower Extremity Functional Scale (LEFS)

Midwifery Competencies

34
  • Midwifery Emergency Skills Program
    • Post Partum Haemorrhage
    • Shoulder Dystocia
    • Hypertensive Disorders Of Pregnancy
    • Contraception
    • Approach To Abortion
    • Antenatal Fetal Assessment
    • Postpartum Hemorrhage
    • Caring For Sexual Assault Survivors
    • Antepartum Bleeding
    • Fetal Well Being
    • Breech
    • Twins
    • Anaphylaxis
    • Cord Prolapse
    • Communication
    • RBC Alloimmunization
    • Upper Genital Tract Infection
    • Vulvovaginitis
    • Prenatal Screening And Diagnosis
    • Intrauterine Growth Restriction
    • Medical And Surgical Complications Of Pregnancy
    • Multifetal Pregnancy
    • Postpartum Care
    • Introduction And Preparation For The Physical Examination Of Female Genitalia
    • Management Of The Infertile Couple
    • Speculum Examination
    • Performing A Pap Smear
    • Evaluation Of A Patient With A Pelvic Organ Prolapse
    • Bimanual Examination
    • Pelvirectal Examination
    • Pregnancy Hypertension
    • The Perimenopause
    • Inspection And Palpation Of External Genitalia
  • Perinatal Health
    • SOGC Guidelines: Diagnosis, Evaluation And Management Of The Hypertensive Disorders Of Pregnancy

Physiotherapy Competencies

13
  • Clinical Competence Based Simulated Physiotherapy Learning
    • Intermittent Positive Pressure Breathing/BIRD
    • Manual Techniques: Assisted Cough
    • Pneumonia In Motor Neurone Disease
    • Aspiration Pneumonia In Trauma
    • Clinical Competence Skill Set- SCI Respiratory Assessment
    • Respiratory Anatomy And Physiology
    • Basic Oxygen Therapy
    • Basic Respiratory Assessment
    • Suctioning
    • Manual Techniques: Vibrations
    • Manual Techniques: Percussion
    • Manual Hyper-Inflation (MHI)
    • Clinical Competence Skill Set – Assisted Cough

Interprofessional Skills

33
  • Home Care
    • Teaching Home Tracheostomy Care
    • Teaching Home IV Self-Administration
  • Goals of Care & Advance Care Planning
    • Goals Of Care & Advance Care Planning
  • Sterilization and Disinfection
    • Infection Prevention Principles In MDRD
    • Medical Device Reprocessing – An Introduction
    • Infection Prevention
    • Disinfection
    • Decontamination Process
    • Sterilization 1
    • Sterilization 2
    • Sterilization IUSS (Flash)
    • Sterilization Table Top Steam
    • Sterile Storage And Distribution
  • Communication Skills in ACLS & ATLS
    • Introduction To Human Factors
    • The Nature Of Human Error
    • Inter-Professional Communication Skills During Implementation Of ACLS And ATLS Simulation Session
    • Introduction To METIMan
  • Communication Skills in a Simulation Session
    • Practicing Resuscitation And Communication Skills, In An Inter-Professional Simulation Session
    • Communication
    • Team Management
  • Mobile Medical Unit
    • VANOC 2010 Medical Services
    • Introduction To The Mobile Medical Unit – History And Planning-Dr. jack Taunton
    • Summary Of Whistler Polyclinic And Mobile Medical Unit- Dr Ross Brown
    • Mobile Medical Unit Orientation To Physical Lay Out And Patient Flow (Emergency, Critical Care/Pre/Post Operative/Operating Room)
    • Olympic/Paralympic (2010), MMU Blood Education Overview- Dr. Kate Chipperfield, MD
    • Transfusion Medicine Services
    • Trauma Evaluation And Management (TEAM)
    • Abdomen-Stab Wound Case
  • Medical Device Reprocessing
    • Introduction To Reprocessing
    • Decontamination Process
    • Disinfection
    • Infection Prevention
    • Sterilization

Introduction to Simulation

38
  • Introduction to Simulators and simulation Technology
    • Patient Simulation Sessions
    • Introduction To Laerdal SimMan 3G
    • Introduction To METI SurgicalSim
    • Introduction To Laerdal SimMan Essential
    • Introduction To METI Baby Simulator (BabySim)
    • Introduction To METI Emergency Care Simulator (ECS)
    • Introduction To METI Human Patient Simulator (HPS)
    • Introduction To METI Pediatric Simulator (PediaSim)
    • Introduction To METI Pelvic ExamSim
    • Introduction To Simbionix GI Mentor II
    • Introduction To Simbionix PERC Mentor
    • Introduction To Simbionix URO Mentor
    • Introduction To Surgical Techniques Work Benches
    • Introduction To VIST
    • Introduction To Harvey Cardiopulmonary Simulator
    • Introduction To Syndaver Surgical Patient
    • Introduction To Laerdal SimBaby
    • Introduction To Laerdal Sim Man 3G
    • Introduction To Laerdal SimMan
    • Introduction To METIMan
  • Fellowship Lectures
    • Stress and Human Performance by Eric David
    • Workload Management by Eric David
    • Communication by Eric David
    • Team Management by Eric David
    • Theoretical Basis of Simulation in Health Education by Dr. Qayumi
    • Developing a Sim Centre by Dr Qayumi
    • Curriculum Development by Dr. Qayumi
    • Introduction to Human Factors by Eric David
    • The Nature of Human Error by Eric David
    • Situational Awareness – The Cornerstone of Error Prevention by Eric David
    • Fatigue and Human Performance by Eric David
    • Advancements in Simulation Debriefing by Dr. Adam Cheng
  • Scientific Method and Applied Statistics
    • Introduction To Scientific Method
    • Scientific Methods EPA 8 Lecture 1
    • Scientific Methods EPA 8 Lecture 2
    • Scientific Methods EPA 8 Lecture 3
    • Scientific Methods EPA 8 Lecture 4
    • Applied Statistical Tutorial

Surgical Competencies

7
  • Basic Surgical Techniques Competencies
    • Ch 1 – Introduction to Basic Surgical Instruments
    • Ch 2 – Handling of Surgical Instruments
    • Ch 3 – Knot Tying Techniques
    • Ch 5 – Aseptic Techniques And Operating Room Conduct
    • Ch 6 – Basic Surgical Procedures
    • Ch 4 – Wound Management Techniques
    • Ch 7 – Laparoscopic Surgical Techniques

Casting and Splinting

9
  • Cast Application by Cyberpatient Team
  • A step-by-step guide for casting and splinting by Dr Jeff Nash
    • 1 – Orthopedics Immobilization Techniques- An Introduction
    • 2 – Orthopedics Immobilization Techniques- Volar Wrist Splint
    • 3 – Orthopedics Immobilization Techniques- Long Arm Cast and Thumb Spica
    • 4 – Orthopedics Immobilization Techniques- PosteriorArm Splint(Black Slab)
    • 5 – Orthopedics Immobilization Techniques- Ulnar Gutter Splint
    • 6- Orthopedics Immobilization Techniques- Short Leg Cast
    • 7- Orthopedics Immobilization Techniques- Cylinder (Stove) Leg Cast
    • 8 – Orthopedics Immobilization Techniques- Posterior Short Leg Splint (Black Slab)

CyberPatient Experts Series

75
  • Approach to Imaging and Understanding of Different Imaging Modalities - Dr. Savvas Nicolaou
    • Approach to chest X-ray imaging and acute chest pain
    • Approach to the interpretation of the abdominal radiograph and approach to imaging of the acute abdomen.
    • Approach to brain imaging
  • Diagnostic and Procedural Imaging
    • Radiology
      • Radiology Of The Spine
      • RADIOLOGY IN PMP
      • MSK Imaging
      • Abdominal Imaging Anatomy
      • Metabolic Bone Disease Imaging
      • Radiology Of The C Spine
      • Overview – Thoracic Imaging
      • Bone Tumor Radiology
      • Practical Emergency Radiology
      • MRI Of The Knee
      • Radiological Modalities
      • Basic Approaches To Chest Radiology
      • Gout, Arthritis & Fractures
      • Approaches To Chest XRAY In Heart Disease
      • Introduction To Neuroimaging
      • Thoracic Imaging – Radiological Anatomy Of The Chest
      • Anatomy Of The Pelvis And Skull
      • ACR Appropriateness Criteria
    • Pulmonary Radiology
      • Respiratory
    • Ultrasound
      • Musculoskeletal Radiology
      • ACR TIRADS
    • Ultrasound Guided Nerve Block PEM Course
      • Bier Block Course
      • Adverse Reactions & Complications Of Peripheral Nerve Blocks
      • Physics Of Ultrasound
    • Ultrasound Guided Regional Anesthesia
      • Ultrasound Guided Blockade Of The Ilioinguinal And Iliohypogastrics Nerves
      • Physics Of Ultrasound
    • Ultrasound-Guided Emergency Medicine Procedures, Advanced Course (UGEMP-Advanced)
      • Ultrasound Guided Abscess Diagnosis And Drainage
      • Ultrasound Guided Arthrocentesis
      • Ultrasound-Guided Lumbar Puncture
      • Ultrasound Guided Paracentesis
      • Ultrasound Guided Foreign Body Identification And Removal
  • Learning in Healthcare Education Series - Dr. Karim Qayumi
    • Curriculum Development
    • Gamification in Education
    • Fundamental Theories Behind Education
    • Exploring Competency-based Education
    • Post-Series Q+A
  • Laboratory Medicine
    • Thyroid Laboratory Testing Lectures- Dr. Sophia L. Wang, MD
    • Adrenal Hypertension Lectures- Dr.Daniel Holmes, MD
    • Scientific Basis Of Lipid Disorders Lectures- Dr. Daniel Holmes, MD
    • Immunoglobulins Lectures- Dr. William E. Schreiber, MD
    • Autoantibody Testing In SARDS Lectures- Dr. Micheal C. Nimmo, MD
    • Complete Blood Count (CBC) Interpretations Lectures-Dr. Tyler Smith MD
    • Introduction To Coagulation-Dr. Tyler Smith MD
    • Transfusion Medicine Basics-Dr. Kate Chipperfield MD
    • Transport For Microbiology Labs-Michael Payne
    • Introduction To Mycology- Michael Payne
    • Laboratory Diagnosis Of Viral Infections- Dr. Christopher Lowe, MD, FRCPC
    • Evaluation Of Acid Based Status lectures – Dr. William E. Schreiber, MD
    • Disturbances In Plasma Sodium Lectures- Dr. Daniel T. Holmes, MD
    • Lab Testing In Diabetes Lectures- Dr. Sophia L. Wang, MD
  • Pharmacology and Therapeutics
    • Gastrointestinal Pharmacology Lectures- Dr. Andrew Horne, MD
    • Endocrine Pharmacology- Dr. David Miller, MD
    • Anticancer Pharmacology- Dr. Jennifer Shabbits, MD
    • Pharmacology Of Antimicrobial Agents- Dr. David Godin
    • Pharmacology Of Antiepileptics- Dr. Andrew Horne
    • Quantitative Pharmacokinetics Lectures- Dr. David Godin, MD
    • Pharmacology Of The Autonomic Nervous Systems- Lectures Dr. Micheal Walker, MD
    • Cardiac Pharmacology Lectures- Dr.Michael Walker, MD
    • Diuretics Lectures- Dr. David Godin, MD
    • Pharmacology Of Local Anaesthetics Lectures- Dr. David Godin, M
    • Pharmacology Of Inhaled Anaesthetics Lecture- Dr. Peter T. Choi, MD
    • Pharmacology Of Antidepressants- Dr. Dean Elb
    • Pharmacology And Anxiety- Dr. R. Randhawa MD
    • Pharmacology Of Antipsychotics-Dr. Ric M. Procyshyn
    • Variability In Response To Drugs-Dr. David Godin
    • Fundamental Concepts Lectures- Dr. David Godin, MD
  • Surgical and Medical Ethics Series - Dr. Alberto Ferreres
    • Medical Ethics and Bioethics 101
    • Patient-physician Relationship and Communication
    • How to Deliver Bad News
    • Medical Futility
    • The Surgical Informed Consent Process
    • Surgical Ethics: Principles and Practice
  • Home
  • Docs
  • Surgical Competencies
  • Basic Surgical Techniques Competencies
  • Ch 2 – Handling of Surgical Instruments
View Categories

Ch 2 – Handling of Surgical Instruments

14 min read

Description #

This unit is intended for training of undergraduate, clerkship, and the first year of the core residency program in order to learn the practical aspects and techniques for holding and handling surgical instruments.

Learning Objectives #

At the end of this unit, students should be able:

1) Operating the Scalpel

2) Operating Scissors

3) Operating a Needle Holder

4) Operating Tissue Forceps

5) Operating Clamps

Overview #

The use of surgical instruments for specific tasks may require skills that positively affect the outcome of a surgical procedure.

These skills include holding, handling, and maneuvering surgical instruments in such a way that makes the performance of the surgical procedure safer, easier, smoother, and faster.

It is important to mention that there are no specific rules and regulations for the holding and handling of surgical instruments.

Individual surgeons may develop their own style of operating. Therefore, it is feasible to select specific maneuvers from different operators and form a style that one is most comfortable with.

The specific aim of this chapter is to introduce the most commonly used (classic) methods for holding, handling and maneuvering surgical instruments during operating procedures.

Contents #

Operating the Scalpel                                  

Handling a Scalpel

Holding a Scalpel

Incision Techniques

Operating Scissors

Holding Scissors

Using Scissors

Operating a Needle Holder

Holding Needle Holders

Loading a Needle Holder 

Operating Tissue Forceps

Holding Tissue Forceps

Using Tissue Forceps 

Operating Clamps

Holding a Surgical Clamp

Using a Surgical Clamp 

Operating the Scalpel #

Handling a Scalpel

A scalpel is a sharp instrument and therefore it is important to use extreme caution when handling. In terms of handling sharp objects in the operating room, treat every patient as though they have a blood-borne transmissible disease.

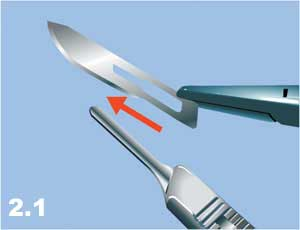
a) Loading. Loading and unloading of the blade must be done with a hemostatic clamp or needle driver by grasping the body of the blade and sliding the blade onto the hub of the handle (Figure 2.1).

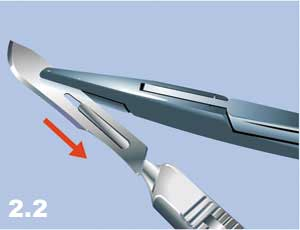
b) Unloading. To unload the scalpel, grasp the proximal end of the blade with a hemostatic clamp, push the blade slightly upward to unlock the body of the blade, and separate the blade from the handle by sliding the blade upward (Figure 2.2).

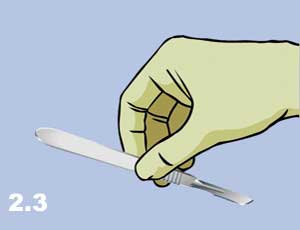
c) Giving. To give the scalpel to another person, the scalpel should be grasped with the sharp edge of the blade downward, the head toward the person who is giving the scalpel and the handle toward the person who is receiving the scalpel (Figure 2.3).

d) Receiving. To receive the scalpel, grasp the handle and move the scalpel down and then toward yourself (Figure 2.4).

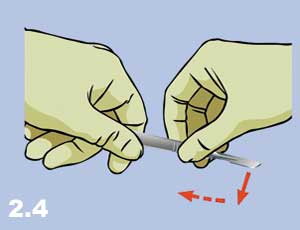
NB: A scalpel is a sharp instrument, hence: The scalpel must not be loaded and unloaded manually – use instruments. The scalpel must never be passed to others with the sharp end toward the receiver as it may injure the receiving individual. When receiving the scalpel, do not pull the scalpel as it may cut the fingers of the other person.

Holding a Scalpel 

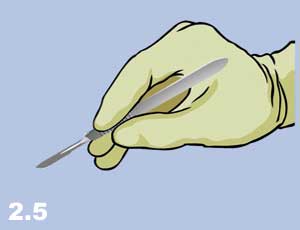
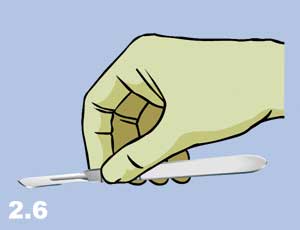
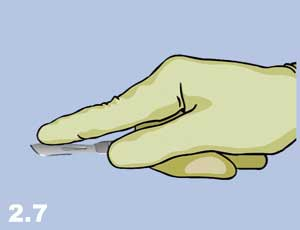
The most important principle to remember when holding a scalpel is to have full control of the instrument and at the same time, to have freedom of movement. There are three common ways to hold a scalpel:

a) The Pencil Grip (Figure 2.5). This grip is used to perform small, precise incisions often with a #15 blade. With this grip, the cutting direction can be changed 360° by moving the hand and wrist (with little upper arm movement).

b) The Fingertip Grip (Figure 2.6). This grip is used to make long, straight, or curved incisions. This technique provides a great deal of maneuverability due to the flexibility of the arm, wrist, and fingers. As a result, it is frequently used in surgery.

c) The Palm Grip (Figure 2.7). This is the strongest grip and used when a precise movement with a great deal of pressure is required. The hand and wrist are kept relatively fixed, and the scalpel is held parallel with the skin to maximize the cutting edge of the blade. This grip has very limited maneuverability.

Incision Techniques #

General Principles:

The most important principles for the use of the scalpel are as follows:

a) planning and measuring before cutting.

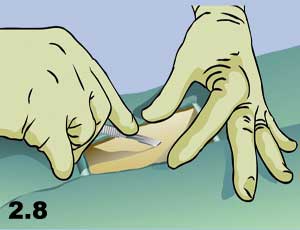
b) stabilizing the skin during an incision (Figure 2.8).

c) placing the knife perpendicular to the tissue plane and cutting straight and clean (Figure 2.9).

d) cutting the tissue layer by layer.

e) focusing your attention on the direction of the scalpel when cutting.

Methods:

The most common methods of incision with a scalpel are:

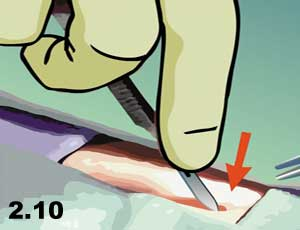
a) Press Cutting (Figure 2.10). The scalpel is pressed into the depth of the tissue with a straight movement, like stabbing.

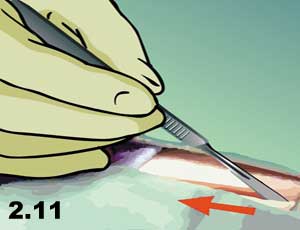
b) Slide Cutting (Figure 2.11). The sharp edge of the blade slides on the surface of the tissue with a specific pressure and depth.

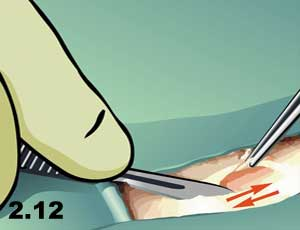
c) Sawing (Figure 2.12). The cutting is performed by sliding the sharp edge of the blade with push-pull movements, like sawing a log.

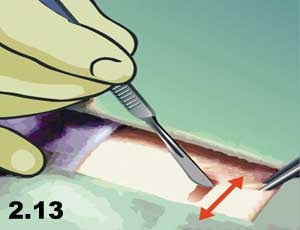
d) Scraping (Figure 2.13). The scalpel blade is held at an acute angle to the tissue surface to be scraped and used with a side-sliding motion on the surface of the tissue, similar to shaving whiskers with a straight razor blade.

Operating Scissors #

Holding Scissors

The most common ways to hold scissors are as follows:

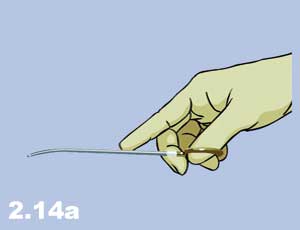
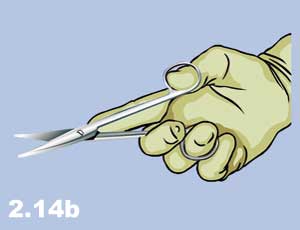
a) Thumb-Ring Finger Grip. The thumb and ring fingers are inserted into the scissor rings, the middle finger is rested in front and on top of the ring finger, and the index finger is placed on the shanks (Figure 2.14a and 2.14b). This is the most common grip for precise cutting of the tissue and for maximum control.

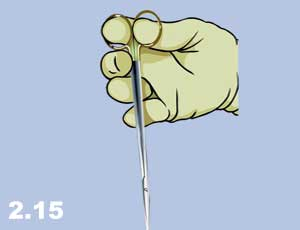
b) Thumb-Index Finger Grip. In this grip, the thumb and the index finger are placed into the rings and the body of the scissors is placed in the palm of the hand (Figure 2.15). This grip is used for direction control in reverse cutting or for deep body cavities such as the chest.

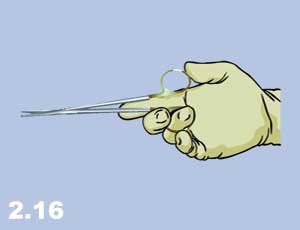
c) One Finger Grip. The scissors are held by one finger in one ring (Figure 2.16) and no finger in the other ring. This method does not provide a good grip and is rarely used.

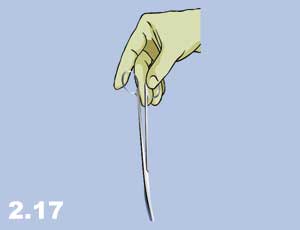
d) No Finger Grip. The scissors are held with no fingers in the rings (Figure 2.17) This grip is primarily for using right-handed scissors with the left hand and has very limited use.

Using Scissors

General Principles:

The most important principles for using scissors are:

a) Use the most comfortable grip that provides the best stability for direction control.

b) Do not push the fingers far into the ring. Use only the tips of the fingers to operate the scissors and use the tips of the scissors for cutting.

c) Control hemostasis before cutting.

d) Always measure and think before cutting.

e) When cutting sutures, secure a good position in order to see both the suture to be divided and the tips of the scissors. This will prevent cutting other structures.

f) When bringing scissors into the surgical field or approaching a suture to be cut, keep the tips closed, open and cut, then retrieve. Do not “dive-bomb” into the field with the jaws wide open.

g) Ensure that the suture is cut before withdrawing the scissors otherwise traction may be put on an incompletely cut suture which may disrupt the vessel being ligated.

h) Squeeze the blades of the scissors together so that the sharp edges “grind” together as they cut (especially for thick sutures such as “0” or larger).

Movement:

Three types of movements can be made with scissors: closing, torque, and shearing. With these three forces, it is possible to chew-cut, crush-cut, or push-cut the tissue. Scissors can also be used for blunt dissection.

Operating a Needle Holder #

Holding Needle Holders

Four types of grips are commonly used for needle holders:

a) Thumb-Ring-Finger Grip (Figure 2.18) is the same as described for scissors.

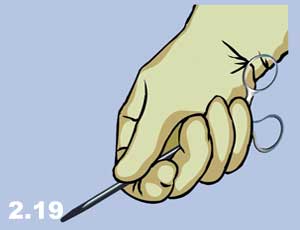
b) Palm Grip (Figure 2.19) is the strongest grip used in places where it is difficult to advance the needle.

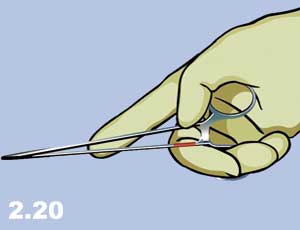
c) Ring-Finger Grip (Figure 2.20) is when the needle holder is in the palm of the hand with only the ring finger in one of the rings.

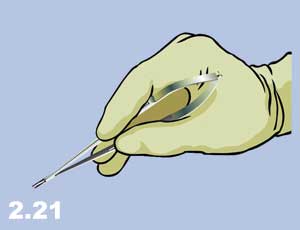
d) Pencil Grip (Figure 2.21) is used with Castrovajo type needle holders

Loading a Needle Holder with a Needle #

The relationship of the needle and the needle holder jaw is important to mention in this chapter due to frequent problems, such as bending the needle, which can happen when the needle is held by the needle holder too far back near the tail. Excessive torque on the needle, instead of driving the needle with pronation and supination of the wrist, results in the bending and breaking of the needle.

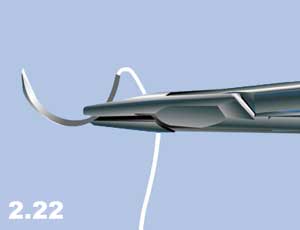
In special circumstances, the needle holder can be placed close to the point at the front of the needle, in the middle of the needle body or close to the tail of the needle, as required. However, one of the most commonly used methods is to visually divide the needle into three parts and place the jaw of the needle holder onto the border between the middle third and the tail of the needle (Figure 2.22) This position leaves sufficient length for the needle to pass through the thickness of the tissue while preventing it from bending and deformation. The tail of the needle is the weakest part of the needle.

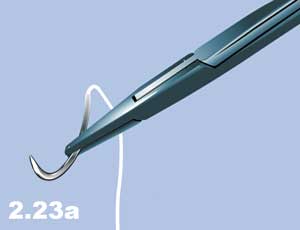
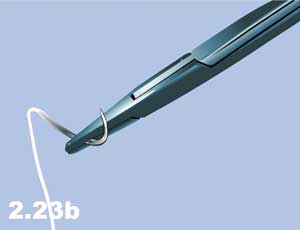
Needles can be placed with different angles in relation to the needle holder, i.e. perpendicular to the holder (right angle, Figure 2.22) or at a wide (Figure 2.23a) or sharp (Figure 2.23b) angle “hooking the needle”.

NB: The angle of the needle with respect to the needle holder should be chosen in such a way to make the needle perpendicular to the line of sewing. In other words, the angle of the needle should be related to the position of the operator.

General Principles #

The most important principles in operating a needle holder are:

a) Avoidance of Stuttering. Stuttering describes the non-productive repetition of steps that needed to be done only once. This occurs most often before the needle is in the tissue.

b) Avoidance of Stammering. Stammering is described as an interruption during a step that could be done with one motion and usually occurs after the needle is inserted into the tissue.

c) A forehand stitch should be started from the far side of the wound and sewn toward oneself (Figure 2.24).

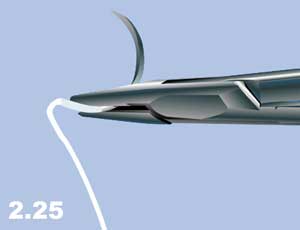
d) A backhand stitch starts from the near side and finishes at the far side; the needle is loaded backward (Figure 2.25). 

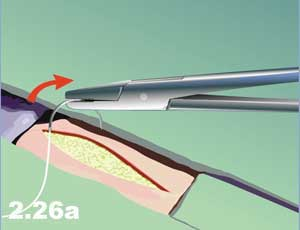
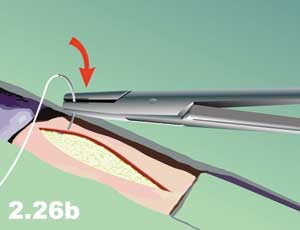
e) The needle should be placed perpendicular to the tissue plane. The driving force is always in the direction of the segment of a needle within the tissue. The rotating force must be non-stressful and done with the rotation of the wrist. (Figure 2.26a and b).

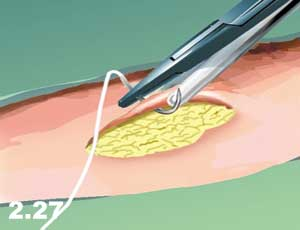
f) The far side of the wound should be grasped gently by forceps and everted outward to expose both the under layers and the needle entrance in the wound (Figure 2.27).

g) On the near side of the wound, the target layer is grasped by the forceps and the needle pushed through. In order to see the needle exit, grasp the upper layers and retract them away from oneself.

h) When sewing is complete, keep the sharp end of the needle backward and parallel to the needle holder (Figure 2.28).

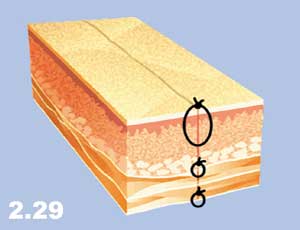
i) Tissue should be sewn layer by layer and each layer should be identified (Figure 2.29).

Operating Tissue Forceps #

Holding Tissue Forceps

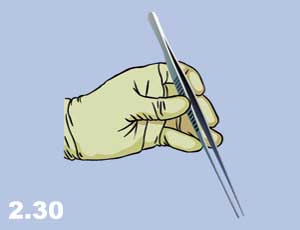
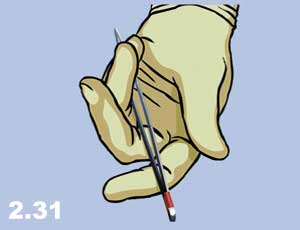
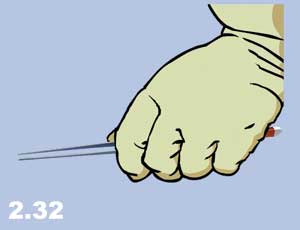
The best way to grip tissue forceps is to hold the forceps between the fingers in such a position that the thumb is on one blade and the index finger and third finger are on the opposite blade (Figure 2.30). This position, with the thumb against the index finger (metacarpophalangeal joint), gives the widest range of flexibility to maneuver the tissue forceps. When the tissue forceps are not in use, they should be held in the palm of the hand and secured with the little finger or ring finger (Figure 2.31). Figure 2.32 demonstrates an undesirable hold that restricts the maneuverability of the operator on all planes.

Using Tissue Forceps

Forceps are used for a variety of reasons in surgical procedures such as holding tissue during cutting, retracting for exposure, stabilizing during suturing, extracting needles, grasping vessels for cautery, passing ligatures around hemostats, packing sponges, or everting skin edges for clipping.

General Principles:

The most important principles for the proper handling of tissue forceps include:

a) Never keep inactive forceps in the palm of the hand as it restricts maneuverability.

b) When turning forceps from a passive position to an active position, hold the palm down as gravity aids the shift from a “hold” to a “use” position.

c) Do not keep elbows close to the body as this restricts mobility.

d) Do not crush and traumatize tissue with forceps.

Operating Clamps #

Holding a Surgical Clamp

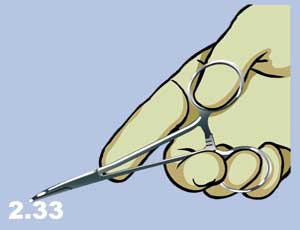
a) Thumb and Ring Finger. A surgical clamp is usually held like a needle holder or scissors with the thumb in one ring, the ring finger in the other ring, the third finger over the top of the ring and the index finger on the junction of the branches (Figure 2.33).

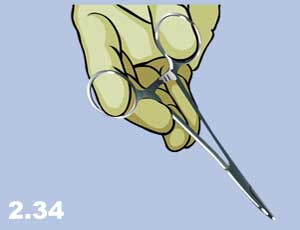
b) Thumb and Index Finger. The surgical clamp can also be held by entering the thumb into one ring, the index finger into the second ring, the middle and ring fingers on the back of the second ring, and holding the clamp in the palm of the hand (Figure 2.34).

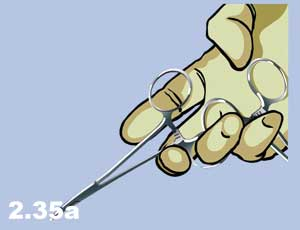
c) Multiple Holding. Sometimes multiple hemostatic clamps need to be applied. In this case, clamps are held in the palm and applied one by one (Figure 2.35a).

d) Classical Clamp Removal. For clamp removal, use the same grip as with the application of the clamp and remove by squeezing the ring and thumb fingers, and keeping the locking mechanism apart while opening the jaws. (Figure 2.35b).

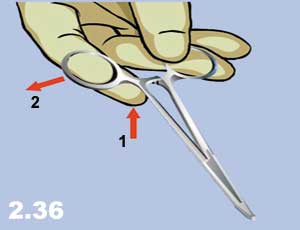
e) Other Techniques of Clamp Removal. Clamps can also be removed without having the fingers in the rings (Figure 2.36). In this technique, the left ring is pinched between the thumb and ring finger and the lock is disengaged by pressing the index finger beneath the opposite ring of the clamp.

Using a Surgical Clamp #

Using a Surgical Clamp 

Surgical clamps can be used in many situations including hemostasis, dissection, retraction, holding the tissue, passing the ligature, and occlusion of tubular structures such as blood vessels, bowel or bronchioles. There are two methods to apply a hemostatic clamp:

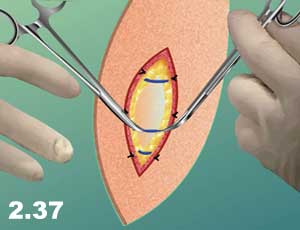
a) Apply on the dissected blood vessel before bleeding begins. In this case, two hemostatic clamps are applied proximal and distal to the target area and the vessel is cut between the clamps (Figure 2.37)

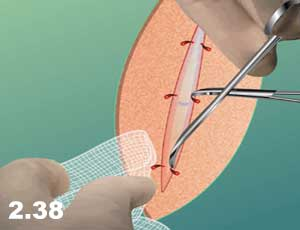
b) Trapping the bleeding vessel in the convexity of its jaw (Figure 2.38)

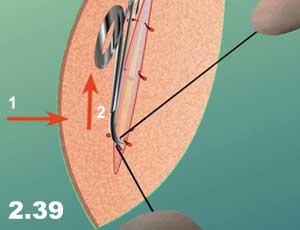
Ligation of a clamp takes several steps:

a) Hold the clamp upward and away from the tissue while the surgeon passes the ligature around the clamp (Figure 2.39) 

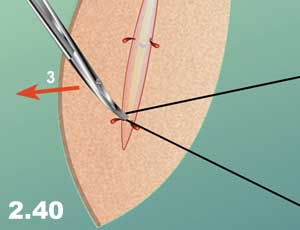
b) Lower the clamp parallel to the tissue to expose the tip (for surgeon to pass the ligature around to encircle completely (Figure 2.40) 

c) Tilt the clamp slightly on its side in order to expose the side where the surgeon is tying the knot.

d) Slowly release the clamp as the surgeon tightens down the knot so that tissue does not slip before it is secured in the ligature.

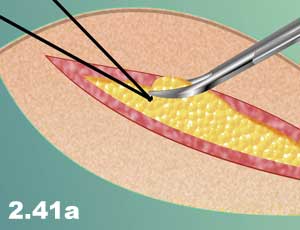
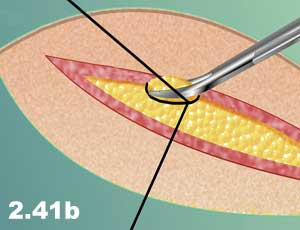
e) For additional security, one may suture under the clamp. Circle the first half of the clamp, and then the other half, before tying (Figure 2.41a and b).

General Principles:

The most important principles for the application and removal of surgical clamps are:

a) It is always a two-person job; it should not be done alone.

b) Before removing the clamp, make sure that the ligature is situated beneath the clamp.

c) Always remove the clamp slowly and with simultaneous tying of the ligature by a partner.

d) Never apply clamps blindly, clean the wound with sponges and/or suction in order to cause minimal trauma to the tissue.

Lecture on Demand

Ch 1 – Introduction to Basic Surgical InstrumentsCh 3 – Knot Tying Techniques
Table of Contents
  • Description
  • Learning Objectives
  • Overview
  • Contents
  • Operating the Scalpel
  • Incision Techniques
  • Operating Scissors
  • Operating a Needle Holder
    • Loading a Needle Holder with a Needle
  • General Principles
  • Operating Tissue Forceps
  • Operating Clamps
  • Using a Surgical Clamp
Educational Resources
  • Dashboard

© Copyright - CyberPatient 2024