Description #
Definition of disinfection. How medical devices are classified according to the level of disinfection or sterilization required to make them safe for use on patients. Review the various types of disinfecting chemicals. Workplace Hazardous Materials Information System and Material Safety Data Sheets. Basic tips for successful disinfection of medical devices. Specific information on successful high-level disinfection process and monitoring. Review Cross-Contamination issues in medical device reprocessing.
Learning Objectives #
- Define Disinfection
- Differentiate between disinfection and sterilization
- Identify medical devices according to the level of reprocessing necessary for them
- Identify appropriate disinfecting chemicals for various medical devices
- Identify important information on disinfectant container labeling
- Describe the steps necessary for successful high-level disinfection
- Describe the necessary monitoring procedures for high-level disinfection
- Define WHMIS and MSDS
- Describe steps to prevent Cross-Contamination of medical devices during reprocessing
Introduction to Disinfection #
Disinfection is a process that is distinct and separate from cleaning. Cleaning physically removes soil and many micro-organisms. Disinfection kills most remaining micro-organisms. The only method that kills all microorganisms is sterilization.
Some instruments and equipment we process require sterilization; some require high-level disinfection in a special machine, and some are only wiped with a disinfectant before use. How do we decide what items need sterilization or disinfection?
In 1972 Dr. Earle H Spaulding classified medical devices according to how they are used, and what type of tissue or body parts they come in contact with.
Spaulding’s Classifications
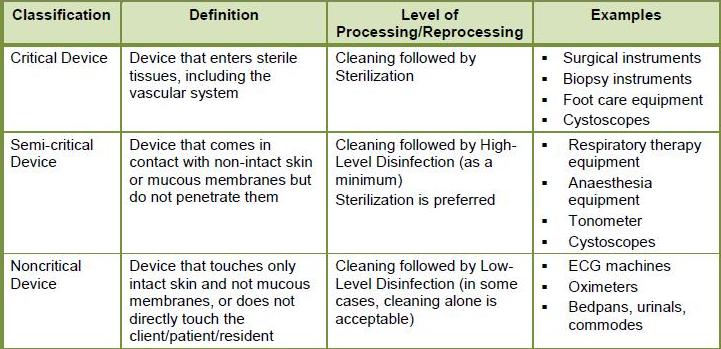
Critical items: come in contact with sterile areas of the body, such as the bloodstream. Examples would be surgical instruments, and intravenous catheters. Biopsy forceps that are used during flexible endoscopy procedures are considered critical items because they bite into tissue and contact the bloodstream. All critical items must be sterilized. Sterilization kills or inactivates all forms of micro-organisms
Examples of common sterilization methods in healthcare facilities include:
- steam,
- hydrogen peroxide gas plasma
- Ethylene Oxide gas (ETO or EO).
Semi-Critical items: do not penetrate skin but do contact mucous membranes such as the mouth and throat and the rectum and colon. Examples would be flexible endoscopes, laryngeal blades, and anaesthetic equipment. Sterilization is recommended but not mandatory. High-level disinfection is the minimum process required for these items. High-level disinfection kills or inactivates most forms of micro-organisms.
Examples of common High-level chemical disinfectants
Aldehydes:
· Glutaraldehyde compounds
· Ortho Phthalaldehyde
and
· Hydrogen Peroxide > 7%
· Accelerated Hydrogen Peroxide (AHP) 4%
NOTE: A hot water bath at specific temperature for a specific time will also achieve High Level Disinfection. This process is called Pasteurization and is performed with special machines in some large facilities. Pasteurization must be carefully monitored and recorded, and cannot be achieved without special equipment.
Non-Critical items: do not touch the patient or only contact intact skin. These items do not come in contact with mucous membranes or non-intact skin and have a low risk of transmission of infection. Examples are IV pumps, blood pressure cuffs, bedpans/urinals, environmental surfaces such as counter tops. These items may require washing with a detergent and are often disinfected with a Low-level disinfection process. Low-level disinfection reduces micro-organisms to a safe level. Some devices may require Intermediate-level disinfection which offers a slightly higher level of microorganism kill. The difference is that the equipment may come in contact with known or unknown chemically resistant organisms. Equipment that may require Intermediate –level disinfection are hydrotherapy tubs, and bedpans in high infection risk areas.
Examples of Intermediate-level disinfectants are:
Alcohols
· 70% isopropyl alcohol
Halogens
· Chlorine
· Iodine
Phenolics
Example of the most common Chemical Low-level disinfectant
· QUATS – Quaternary Ammonium Compound
NOTE: Washer Disinfectors Hospitals and some other large facilities will most often have machines commonly called Washer/Disinfectors. These machines wash devices with a detergent, rinse them and then provide a Thermal Disinfection process. This is most often a form of Low-level Disinfection that uses hot water at a specific temperature for a specific time to achieve disinfection. Washer/Disinfectors must be monitored and maintained to ensure that they are reaching the required temperature for Thermal Disinfection
Know Your Disinfectants.
Any disinfecting method we use in reprocessing must be approved for use in a healthcare facility and for the item we are trying to disinfect. All chemical disinfectants have clear instructions for use that we must read and follow. Training in the proper use of disinfectants in their facility is vital for staff, and for patient safety. (WHMIS and MSDS information to come here…….)
Some of the things we need to consider and be aware of are:
1. There are different types of disinfectants:
· Disinfectants may be labelled Sporicidal, Tuberculocidal, Fungicidal, Viricidal and Bactericidal. These labels mean they kill different forms of micro-organisms. Antibiotic resistant organisms (AROs) do not change the requirements for level of disinfection.
· Sporicidal, Tuberculocidal, Fungicidal, Viricidal and Bactericidal disinfectants usually do not leave a film on items and are most often rinsed off after the required amount of time.
· Bacteriostatic disinfectants should not be rinsed off and are often hard to rinse off. They leave a protective film on a surface that continues to inhibit the growth of micro-organisms. They are meant to be used on surfaces such as table tops, counters, and other items that do not come in contact with skin or mucous membranes. These disinfectants will re-activate when they come in contact with moisture. This is very good protection for floors and counters, but very dangerous if used on, and left on, an instrument that contacts skin or mucous membranes. Body fluids will re-activate the chemical and cause tissue damage. Never use a disinfectant that is meant for counters and floors on devices that will have direct contact with patients unless you have specific manufacturer instructions that allow this.
· Some disinfectants will kill or inactivate only a few types of microorganisms – these are often called Low-level disinfectants meaning they provide a fairly low level of microorganism reduction. Others are able to kill or inactivate most types of microorganisms – these are the High-level disinfectants
2. There is important safety information on the disinfectant bottle or container that you must be aware of:
· With the exception of hot water/thermal processes, disinfectants are powerful chemicals. Any disinfectant used in healthcare settings must have a Material Safety Data Sheet (MSDS) that clearly states any safety or handling precautions that we must follow. The containers themselves have directions for use and safety warnings on their labels. Make sure you familiarize yourself with all safety and handling precautions for each chemical you use.
· Spill kits are required for some chemicals. Ensure that your facility has the correct spill kit for the chemicals you use and that the kit is large enough to take care of the largest spill you might encounter.
· Healthcare disinfectants are treated the same way as pharmaceutical drugs are in Canada and given a DIN when they are approved for use. A Drug Identification Number (DIN) is a computer-generated eight digit number assigned by Health Canada to a disinfectant or drug product prior to being marketed in Canada. It uniquely identifies all products sold in a dosage form in Canada that have been evaluated and authorized for sale. A DIN uniquely identifies the following product characteristics: manufacturer; product name; active ingredient(s); strength(s) of active ingredient. You will find DINs on the labels of approved disinfectants.
· Expiry dates can be found on the bottles and/or labels of disinfectants. These are the “Shelf life” expiry dates Some disinfectants will also have an “In Use Life” expiry date that indicates how long a disinfectant is viable after the bottle is opened. It is important to know how to locate these dates and to monitor and record them.
1.Ensure that you are using your disinfectants correctly:
· All items must be thoroughly cleaned before they can be disinfected. The presence of soil on an item will prevent the disinfectant from contacting all the surfaces of the item.
· Items should be dry before chemical disinfection. Excess water will dilute the disinfectant.
· Many disinfectants must be monitored for Minimum Effective Concentration (MEC). This is very important for High-level disinfectants. Chemical test strips are dipped into the disinfectant at regular intervals to check that the disinfectant is still “effective” – it is still able to kill microorganisms and has not been diluted or passed its expiry date. All chemical test strip monitoring must be recorded.
· Disinfectants must be used according to manufacturer’s instructions. If the disinfectant is to be diluted make sure you use the right proportions of chemical to water, and at the right temperature. More is not always better. Many disinfectants will not work properly if they are used in too strong or too weak a form, or if the temperature is not right.
· Make sure that the disinfectant contacts the item for the required amount of time. No matter what disinfectant you use it will have a recommended contact time. If that time recommendation is not followed then the item is not disinfected. This is especially important for 70% Isopropyl Alcohol. It commonly has a minimum contact time of 10 minutes, but often evaporates before that contact time is up.
· Make sure that the device you are disinfecting has been approved for the chemical you are using. Many materials such as plastic cannot be put into harsh chemicals. Consult your device manufacturer for information on appropriate disinfectants.
Procedures for High-level Disinfection #
High-level Disinfection (HLD)
Several types of automated processes for High-level disinfection are available in hospitals and other large facilities. They include Pasteurisation, and Automatic Endoscope Reprocessers (AER). These machines must be carefully monitored, tested and maintained according to manufacturer instructions.
Most small clinic settings or satellite areas will not have automated processes for High-level disinfection. Reprocessing staff in these areas must be familiar with procedures for manually disinfecting medical devices. Always consult Manufacturer’s Instructions for Use (MIFU) for the device, and for the disinfectant, to determine the best procedures for your facility. Familiarize yourself with Workplace Hazardous Materials Information System (WHMIS) precautions and Material Safety Data Sheet (MSDS) information for each chemical you use.
Manual High Level Disinfection is a complex process requiring staff education and training, careful preparation, monitoring, and documentation:
Preparation of High Level Disinfectant (HLD)
- PPE (personal protective equipment) should be used at all times when handling chemical disinfectants
- Follow disinfectant work instruction for correct dilution (concentration), contact time, temperature and compatibilities.
- Ensure that soak basins, measuring jugs or other items are clean and dry before use.
- Carefully pour disinfectant into soak basin avoiding splashing.
- If you only use a partial bottle of disinfectant to fill your soak basin check manufacturer’s information about length of time the solution is effective after the bottle has been opened and label the side of the bottle with the date that disinfectant must be discarded.
- Label the disinfectant soak basin with the type of disinfectant and any necessary safety warnings. Consult WHMIS manuals and MSDS for information.
- Label the disinfectant soak basin with manufacturer’s recommended date of expiry from the preparation date. This is the “In-Use” date. Commonly this date is 2 weeks (14 days) from the date of preparation.
- Check Minimum Effective Concentration (MEC) before use, at least daily, using manufacturer approved test strips
- Soak boats holding disinfectants must be covered with tight-fitting lids at all times. This prevents contamination, or evaporation, of the disinfectant and keeps harmful fumes from escaping.
Soaking devices in HLD
- PPE must be worn when working with HLD
- The device must be carefully cleaned and dried before placing in the HLD soak basin. Soil will prevent disinfection, and water will dilute the HLD solution.
- Devices must be completely covered by the disinfecting solution. Weigh down items that float.
- Lumens should have disinfectant injected using channel adapters if necessary, following manufacturer’s instructions.
- Lumens or crevices should be positioned in such a way that all air bubbles have been evacuated.
- Timers and thermometers should be used to ensure that a device remains in the solution for the required amount of time and temperature as specified by manufacturer’s instructions.
- During the contact period the solution must be covered and no other item added to the solution.
After full contact time:
1.Rinse medical device. Following disinfection, devices should be rinsed with filtered (0.2 micron filter) or sterile water. Ensure complete removal of the disinfectant through three (3) separate rinses with fresh sterile or bacteria free water each time. Devices with lumens should be flushed with a volume at least 3 times the volume of the lumen.
2.Dry medical device: Drain excess water. Dry device either mechanically (with medical or filtered air) passively (through air drying or HEPA-filtered drying cabinet).
3.Scopes with lumens must be air dried followed by a 70% isopropyl alcohol flush and repeat of air. Consult scope manufacturer instructions for this process.
4.Label equipment as High Level Disinfected. A process must be in place that differentiates reprocessed and soiled equipment.
5.Remove PPE and perform hand hygiene.
Documentation of the HLD Process
To ensure patient safety careful and consistent documentation of each High-level (HLD) process is required.
Documentation must include:
- Medical device name or type.
- Serial Number (if applicable).
- Date and time of disinfection.
- Result of leak test (this applies to some flexible endoscopes only).
- Contact time of disinfection (timing device required).
- Temperature of disinfectant (if applicable, thermometer required if monitoring).
- Signature / initials of person doing reprocessing.
Careful and consistent documentation of monitoring MEC – (Minimum Effective Concentration) is also required. MEC testing of all HLD must be done at least daily prior to use, and every time a new bottle of disinfectant is opened, to ensure the disinfectant will work. Read and follow manufacturer’s instructions on approved method to test MEC.
Documentation of MEC monitoring must include:
- The disinfectant product name.
- Lot number of disinfectant (side of container).
- Expiry date as labeled on side of soak/storage container. Temperature (as required – thermometer would be needed).
- Date solution last changed.
- Due date solution must next be changed.
- Results of MEC testing – Pass or Fail
- Signature / initial of staff member completing preparation and documentation
We also need information on the test strips used:
- Name of test strip
- Lot number of test strips (side of container).
- Expiry date – unopened. Often called the manufacture expiry date
- In use expiry date – many test strips are only good for 90 days after opening the container – consult manufacturer instructions
- Quality control test results – many manufacturers require that the test strips be tested for viability each time a new container is opened. Please ensure you know the requirements for the test strips you use in your facility. If quality control testing is required it must also be documented.
Failure of an HLD process – Recall
High-level disinfection processes can be subject to failure of one type or another. If an HLD process fails for any reason the devices in that process must be “recalled” and reprocessed to ensure patient safety. If you are carefully documenting all devices that go through an HLD process in your facility you should be easily able to recall them if necessary.
Here are some guidelines for recalling HLD devices:
If you experience a failure of (MEC) Minimum Effective Concentration testing
- Remove from service all medical devices and equipment that were high level disinfected since the last documented pass result of the MEC test.
- Reprocess equipment in fresh, MEC tested solution prior to returning to service.
- Initiate your Facility Recall Procedure if any items reprocessed using the same high level disinfectant since the last documented pass result of the MEC test were used on a patient. This would involve determining risk to the patient, notifying the patient and initiating any treatment required.
- It is important to document all actions in a Recall:
- Detail the circumstances that prompted the recall order
- Detail what corrective action has been taken to prevent a recurrence
- State the total number of devices needed to be recalled and the number of devices actually obtained in the recall – in other words were you able to successfully recall all identified devices?
If you are notified that the disinfectant manufacturer is recalling defective stock:
- Identify through your monitoring records if you have used the recalled disinfectant. This is done by using the Lot numbers and expiry dates in your records.
- Remove from service all devices processed in the identified HLD and reprocess in fresh HLD not affected by the manufacturer recall. Initiate your Facility Recall Procedure if any items reprocessed using the identified HLD were used on a patient. This would involve determining risk to the patient, notifying the patient and initiating any treatment required.
- It is important to document all actions in a Recall: Detail the circumstances that prompted the recall order
- Detail what corrective action has been taken after the recall notification
- State the total number of devices needed to be recalled and the number of devices actually obtained in the recall – in other words were you able to successfully recall all identified devices?
- Detail the steps taken if any devices affected by the Recall were used on patients – according to your facility Recall policy.
Cross-Contamination Issues
High-level disinfection procedures in any facility must include careful handling of the disinfected item. The chemical HLD processes we use do not allow devices to be packaged or wrapped as is done with sterilized devices, therefore there is no protection for the device.
We must be very careful to avoid the transfer of contamination from soiled areas and devices to clean or disinfected devices. We call this Cross-Contamination. It happens when we touch a contaminated item and then touch a clean or disinfected one, or we place disinfected items on soiled surfaces. We must to learn to “see” microorganisms even when we can’t see them. Following standard infection control practices and using PPE (Personal Protective Equipment) can help us prevent cross-contamination, but we must take responsibility for everything we touch. We must always ask ourselves “Are my hands clean?” “What was the last thing I touched?” “Do I need to wash my hands or change my gloves?” You will learn more about cross-contamination in the Infection Control unit in this series, but here are some tips for preventing Cross-Contamination during HLD processes:
It is very important in a department that uses high-level disinfection processes for staff to be aware of the possibility of cross-contamination. Often the HLD process takes place in the same area area as cleaning does, and processed devices are subject to contamination if not handled correctly. The soil we encounter in reprocessing, such as blood and tissue, is often visible and easily removed. However, the most important contamination is invisible! Microorganisms cannot be seen so we must learn to anticipate where they might be.
Some guidelines for preventing cross-contamination of HLD processed devices:
- One-way work flow: work flows from dirty to clean and never back to a dirty area. Example: Dirty items are cleaned and placed on a clean counter. If we were to place that clean item back on a dirty counter we would re-contaminate it. If we remove an item from an HLD process and place it on a dirty area we have re-contaminated it.
- Remove all Decontamination PPE including gloves: We need to wear PPE while cleaning a device but we should not wear dirty PPE while removing a device from our HLD process.
- Careful hand hygiene: clean hands after removing gloves. You may put clean gloves on to remove devices from the HLD process.
- Wipe soak basin lids and the area around the soak basin with a low-level disinfectant: when you placed the device into the soak basin and closed the lid you were wearing dirty PPE and gloves. This means that the outside of the lid and the soak basin are contaminated. If you touch the contaminated lid and then touch the disinfected device you will re-contaminate it. Many HLD procedures call for the basin and lid to be wiped after the device is placed in the basin. If you are not sure if the basin has been wiped then wipe it just before removing the device.
You work hard to clean and disinfect important medical devices. Please be aware of the possibilities for Cross-Contamination in your facility and take steps to prevent it.