Description #
This unit is intended for training of undergraduate, clerkship and first year of the core residency program in order to give them the familiarity with Operating room conduct and to teach the general Principles of Aseptic Techniques.
Learning Objectives #
At the end of this unit, students should be familiar with:
1) General Principles of Aseptic Techniques:
a) prevention of contamination from air & contact
b) sterilization of surgical materials
c) scrubbing
d) gowning
e) gloving
f) prepping
g) draping
2) Operating Room Conduct
Overview #
Up until the second half of the 19th Century, the vast majority of surgical operations were complicated with wound infection, mainly due to the lack of knowledge about microbes. In 1867, Louis Pasteur discovered micro-organisms and described the presence of these microscopic beings in the fermentation process. A year later, Joseph Lister described the presence of microorganisms in infected wounds and proved that microbes are, in fact, the etiological sources of infected surgical wounds. He subsequently described a method that can destroy the microbes in the wound, called antisepsis (“anti” from the Latin prefix against and “sepsis”, infection).
Contents #
Principles of Asceptic Technique
Prevention of Contamination from Air
Prevention of Contamination from Contact
Sterilization of Surgical Materials
Maintaining Integrity of Sterilized Items
Body Substance Precautions
Scrubbing
Gowning Yourself (closed technique)
Gloving Yourself (closed technique)
Gowned by the Scrubbed Operating Room Nurse (open technique)
Gloving Done by the Scrub Nurse (open technique)
Removal of the Contaminated Gown and Glove
Prepping
Draping
Operating room conduct
Prevention of Contamination from Implantation
General Principles
Principles of Aseptic Technique #
The main objective of asepsis is to prevent the contamination of surgical wounds. For the realization of this purpose, three important principles should be taken into consideration:
Prevention of contamination from air
Prevention of contamination from contact
Prevention of contamination from implantation
Prevention of Contamination from Air #
Prevention of Contamination from Air
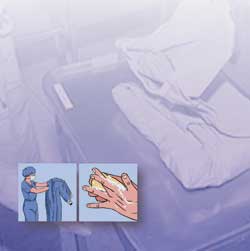
Prevention of air contamination is accomplished by donning surgical masks, hats, shoes, and special clothing before entering the restricted area, cleaning the operating room with antiseptics, and 20-25 air exchanges, etc. Additional measures for the prevention of air contamination include restriction of talking, moving, and entry of additional personnel into the operating room (OR). In order to reduce the talking and noise in the OR, a type of sign language may be used. The following signs are widely accepted:
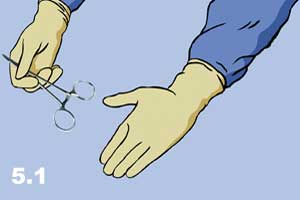
a) Asking for the hemostatic clamp. Extend the hand supinely (Figure 5.1). The palm must be open and upward, and the back of the hand toward the table
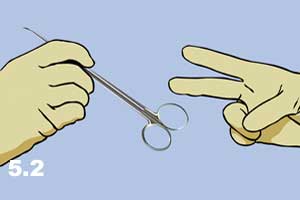
b) Asking for scissors. Extend the index and middle fingers and separate them like the branches of scissors while flexing the other fingers (Figure 5.2).
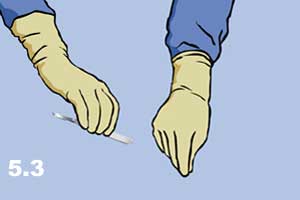
c) Asking for scalpel. Extend the hand and keep thumb, index and middle fingers together as in holding a pencil (Figure 5.3).
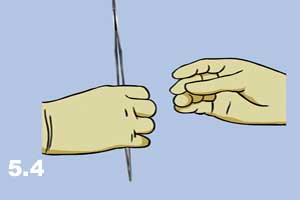
d) Asking for forceps. Extend the thumb and index finger parallel to each other while flexing the other three fingers (Figure 5.4).
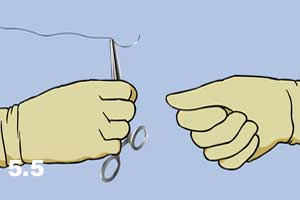
e) Asking for needle holder with a suture. Extend the hand with flexed finger and a motion from a pronation to supination (Figure 5.5).
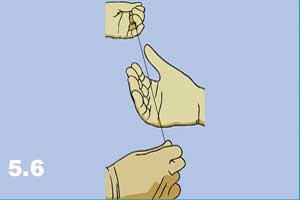
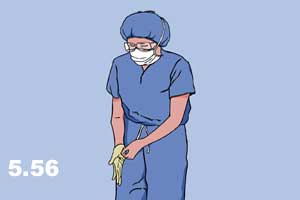
f) Asking for a tie. Extend hand with extended fingers in a way that the back of the hand is toward the scrub nurse (Figure 5.6).
Prevention of Contamination from Contact #
Prevention of Contamination from Contact
For prevention of contact contamination everything that comes in contact with, or that will surround the operating field, should be free of micro-organisms (sterile). Sterilization is a process which frees the material from bacteria, viruses, spores, and other micro-organisms. Surgeons, surgical assistants and nurses who are in direct contact with a surgical wound should scrub hands, don sterile gloves and proper sterile gowns, before approaching the operating field and wound contact. It is also extremely important to protect oneself from contamination by the patient.
Sterilization of Surgical Materials #
Sterilization of Surgical Materials
There are various methods used to sterilize equipment, instrumentation and surgical supplies. The choice of method depends on the nature of the item to be sterilized.
The three methods are:
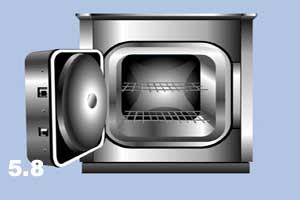
1. Thermal
- Steam under pressure. An autoclave is widely used for metal instrumentation (Figure 5.7 – 5.8)
- Hot air/Dry heat
- Non-ionizing radiation/microwave

2. Chemical
- Ethylene Oxide (commonly used with items that are sensitive to heat)
- Formaldehyde gas
- Hydrogen Peroxide plasma/vapor
- Ozone gas
- Glutaraldehyde activated solution
- Peracetic Acid solution
3. Ionizing Radiation
- Radiation (physical)
- Gamma radiation
There are several indicators for monitoring the sterilization process.
a) Mechanical Indicators
- Sterilizers have gauges, thermometers, recorders, and timers to monitor their function
b) Chemical Indicators
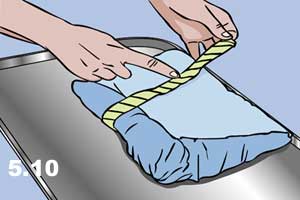
- These are placed inside or outside of a package and verify exposure to a sterilization process. i.e. tape, paper strips etc (Figure 5.9) If the tape does not have the desired result after sterilization (colour change) then it should not be used (Figure 5.10).

c) Biological Indicators
- These are usually live spores contained in small vials which are destroyed during sterilization.
Maintaining Integrity of Sterilized Items #
Maintaining Integrity of Sterilized Items
All sterile items should be kept on a dry, clean, covered shelf. Care should be taken not to over-crowd or bend these items. If an item (cloth or paper wrapped) falls on the floor it should be considered unsterile due to “strike through” (microorganisms entering the package on impact). If materials become wet they are also considered unsterile due to microorganisms entering via the moist pathway.
NB: There is no compromise when it comes to sterility.
Before opening a sterile package it must be inspected for:
- sterile indicator
- absence of holes
- integrity of seal
Opening a sterile item:
a) Package
- open away from oneself first (Figure 5.11).
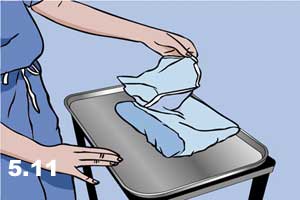
- open side flaps next
- towards oneself last
- hold back all unsterile portions when presenting to the scrubbed person (Figure 5.12).

b) Peel Back Wrapper
- the peel should be pulled back to expose the sterile item
Body Substance Precautions #
Body Substance Precautions
Every patient is considered a potentially contaminated source when blood or body fluids are involved. Although great care is taken to protect patients from staff source of contaminations, (hair, skin, respiratory etc.), the staff in turn must protect themselves from blood/fluid born pathogens.
The following protective barriers are used:
- Gloves, latex (Figure 5.13). Double gloving is recommended for procedures > 2 hours or when large amounts of blood are anticipated.
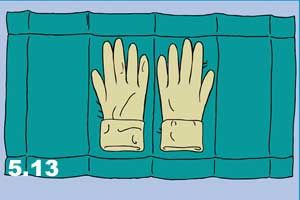
NB: Always wash hands after gloves are removed.
- Masks. Are used for protection from aerosols or droplets (Figure 5.14).
figure5.14.jpg
- Eyewear/Goggles or Face Shield. Are used to protect against aerosols, splashes, or droplets (Figure 5.15).

- Gowns. Made of fluid-resistant materials and used to protect from body substances. (Figure 5.15).
NB: Special care must be taken with all sharps.
- Always pass a knife/scalpel handle first and indicate to the scrub nurse that a scalpel or sharp is being handed back.
- Always use an instrument to attach or remove a blade.
- When finished stitching, always place the needle back on the needle driver and hand it back to the scrub nurse.
- Use the one-handed capping method or do not cap at all and place directly in a sharps container (Figure 5.16).

Scrubbing #
Scrubbing
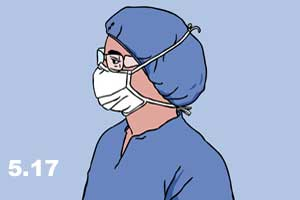
Procedure
- Before scrubbing, make sure a scrub cap is available. All of the hair must be completely covered. The mouth and nose must be comfortably covered with a mask (Figure 5.17).
- Wash both hands to about 2 inches above the elbows with soap and water.
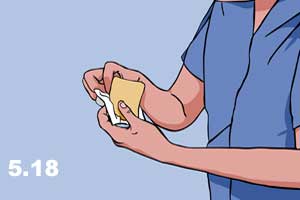
- Take a scrub sponge and/or brush, open the package, wet the sponge and start scrubbing (Figure 5.18)
- Clear fingernails under running water (Figure 5.19).
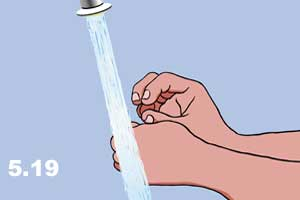
NB: Remember that from now on nothing should be touched that is not sterile.
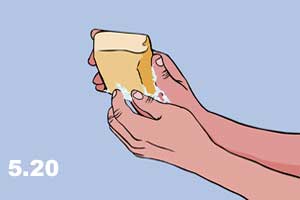
The order of scrubbing starts from
- the tip of the fingers (Figure 5.20)
- all sides of each finger (Figure 5.21).

- all planes of the hands (Figure 5.22).

- continue all planes up to the elbow (Figure 5.23).
- do not return to the hand once completed.
- 5 minutes for first scrub of the day and 3 minutes for subsequent scrubs.
Remember: hands first, then arms and elbows last for scrubbing and rinsing (Figure 5.24).
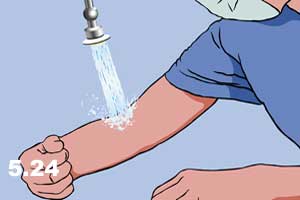
- When you are rinsing or scrubbing, the elbow should be bent upward so the water from the elbow does not go to the fingers and vice versa; the flow of water should be toward the elbow.
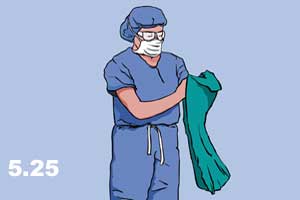
- To dry hands and arms, pick up a towel or wait until the towel is given to you. Keep hands and elbows away from body in an open space.
- with one side of towel, dry fingers first (Figure 5.25).
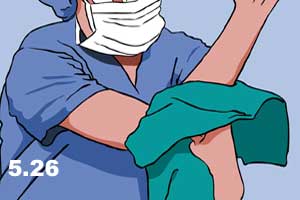
- then the arm up to the elbow (Figure 5.26)
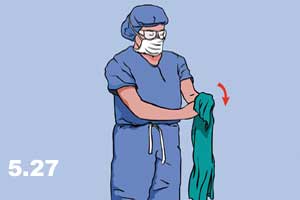
- flip the towel to the clean side (Figure 5.27).
- dry the other hand in the same fashion.
- throw the towel into the laundry basket.
Do not take the towel from the nurses back table. The towel will be handed to you. If the gown and towel is set up on a separate small table then the towel may be taken by oneself. Be careful not to drip on the sterile field.
Gowning Yourself (closed technique) #
Gowning Yourself (closed technique)
The procedure for putting on a sterile gown when gowning oneself:
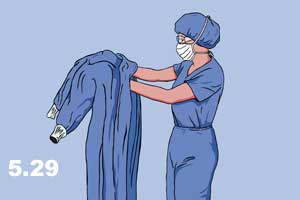
- Pick up the gown (from the small table) (Figure 5.28)
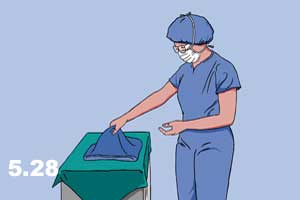
- find an open space
- unfold the gown until the armholes are found
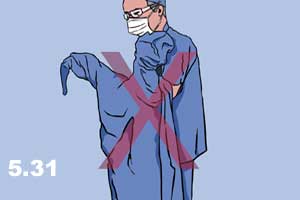
- Place both hands into the armholes and advance them to the sleeves (Figure 5.29). Do not take hands out of the sleeves (Figure 5.30). Ensure that the sleeves do not flip back and touch unscrubbed upper arm. Protect sleeves as the arms enter (Figure 5.31).

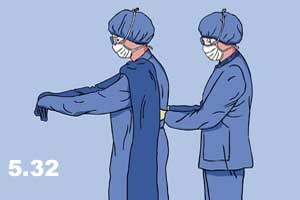
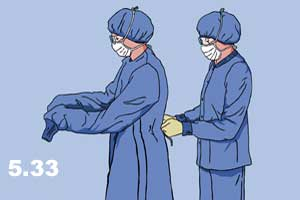
- Ask for help (from circulating nurse) to secure and adjust your gown (Figures 5.32 – 5.33).
When gowning oneself the gown will be opened on a separate table. Do NOT gown off the main set up (scrub nurses table).
Gloving Yourself (closed technique) #
Gloving Yourself (closed technique)
The procedure for putting on sterile gloves when gloving oneself:
- Take the glove.
- Open it in sterile environment (still having hands inside sleeves)
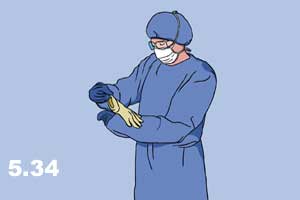
- For “closed” technique of gloving, do not pull hands through the sleeve. Grasp the right glove in the left hand and turn the right hand so that the palm is upward.
- Place the right glove on the palm in such a way that the thumb of the glove is against the thumb (thumb to thumb) and the fingers of the glove are toward the body. In other words, flip the glove over so that the fingers are now toward the elbow (Figure 5.34).
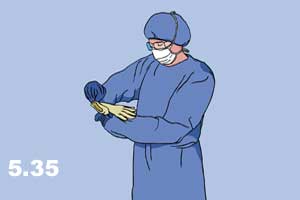
- Bring thumb under the cuff of the glove, hook the glove with thumb and grasp securely (Figure 5.35).
- Flip the glove over fingers (Figure 5.36).

- Grab the glove and the sleeve together. Work fingers into the glove and pull the glove upward. (Figure 5.37).
NB: Do not adjust the fingertips if fingers are not placed properly into the glove compartments.
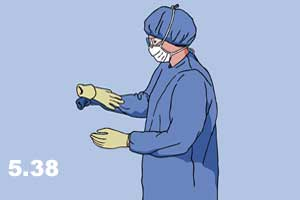
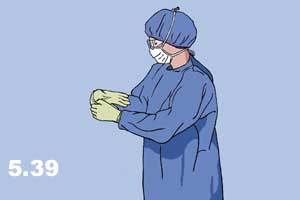
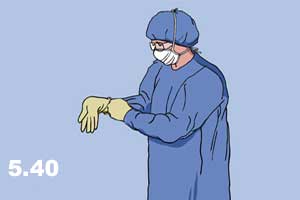
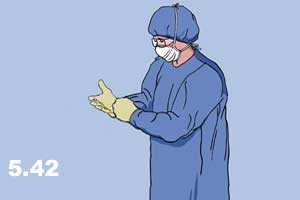
- Repeat the same maneuvers for left hand (Figures 5.38 – 5.41).

If gown is single tie, approach the sterile table.
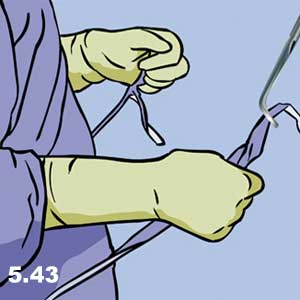
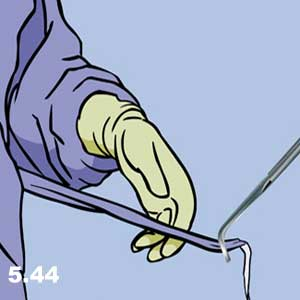
If gown is double tie:
- Untie the bow knot
- If another sterile person is not available, then a sterile clamp may be attached to the longest tie. The clamp is then passed to the unsterile person who will help you complete the turn.
- Turn your body around counterclockwise.
- Grab the right end back and tie the ends (Figures 5.43-5.44).
If there is another scrub (sterile) person, they may turn you. Hand the longer tie to the scrub person and turn around until the back of the gown is closed. Tie the ends together and let go. It is not permissable to touch these ends once they are dropped.
Gowned by the Scrub Nurse (open technique) #
Gowned by the Scrub Nurse (open technique)
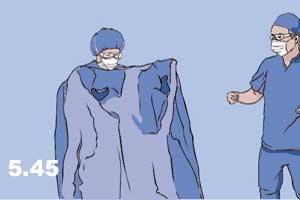
- After scrubbing and drying hands, the nurse will bring a gown fully expanded (Figure 5.45).
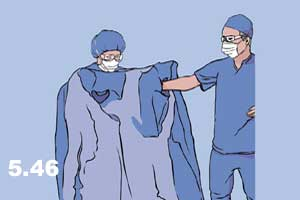
- Place hands into armholes (Figure 5.46).
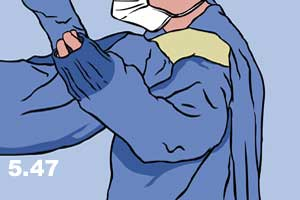
- Gently advance hands into sleeves. At this time, the nurse leaves the gown on the shoulders therefore the hands must be kept upward to prevent the gown from falling down (Figure 5.47)
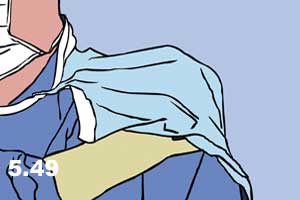
- The circulating nurse will grab the gown by placing a hand under the gown, thereby protecting his/her gloved hands, and grasping the gown from inside. When the nurse is pulling the gown over shoulders pull the sleeves over the hand. The circulating nurse is then able to tie the back ties.
- Figure 5.48 shows the improper position of the hand by the scrub nurse, and Figure 5.49 demonstrates the proper position of the hand by the scrub nurse.

NB: This is an open technique and therefore the hands are allowed to be pulled from the sleeves.
Gloving Done by the scrub Nurse (open technique) #
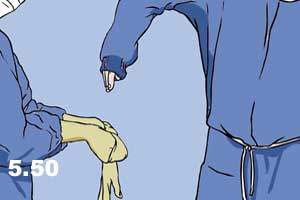
Gloving Done by the Scrub Nurse (open technique)
- The nurse opens the wrist portion of the glove (Figure 5.50).
- Place hand carefully into the glove compartment (Figure 5.51). Do not attempt to dive too low.
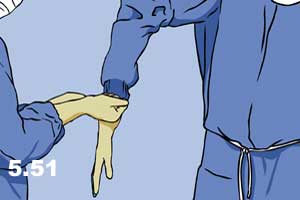
- Once the fingers are in the finger holes of the glove, slide hand further and the nurse at this time pulls the glove up.
- For the left hand, it is advisable to help the nurse by pulling out the nearest cuff portion with the gloved hand.
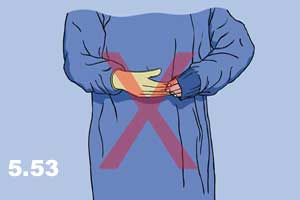
NB: Only when both gloves are done may the fingers be adjusted. (Figures 5.52-5.53).

Note: Some surgical procedures pose a greater risk of the possibility of a glove puncture (e.g. orthopedics, where sharp reamers are commonly handled). In these instances it is highly recommended to double glove. It is policy in some hospitalsto routinely double glove as added protection.
Removal of the Contaminated Gown and Glove #
Removal of the Contamindated Gown and Glove
If contamination has occurred, the following technique is used to prevent possible spread of contamination.
a) Removal by oneself:
- Open the back of gown.
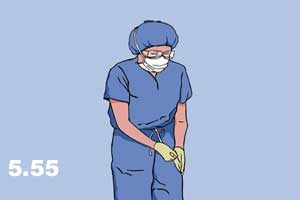
- Slide the gown over shoulders (Figure 5.54)

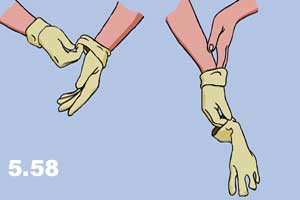
- To remove the gloves, grasp the wrist section of each glove with the opposite hand and pull simultaneously (Figures 5.55 – 5.58).

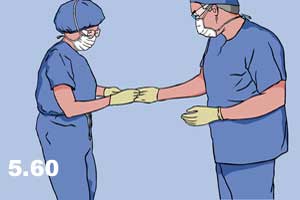
b) Removal with the help of circulating nurse
- The circulating nurse grabs the gown in front and pulls it toward him/herself (Figure 5.59).

- The gloves can be removed by the circulating nurse (Figure 5.60).
Prepping #
Prepping
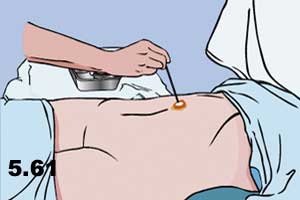
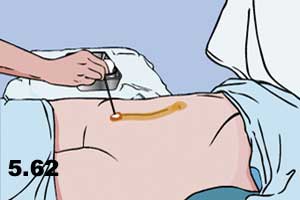
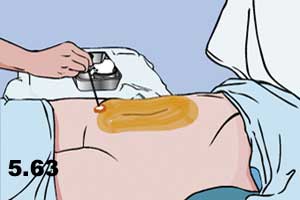
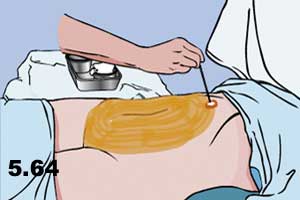
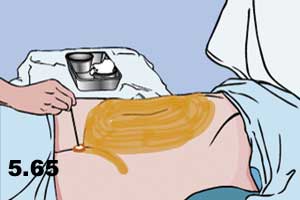
To prevent the contamination of wounds from microbes that exist in the skin of the patient, the area of the surgical wound is scrubbed with soap and water and then cleaned with antiseptic. This procedure is called prepping. Prepping is performed in an organized fashion drawing a circle or a square around the incision line. The umbilicus may be cleaned of debris by using swabs soaked in anteseptic solution. (Figure 5.61). The most important principle for prepping is to start cleaning from the center (line of incision) to the periphery. It is not allowed to bring the gauze from the periphery back to the center even though it is soaked with antiseptic. If there is a need to clean the center again, this is accomplished with the second coating using a new gauze with antiseptic and starting close to the center to the periphery again. The cleaning process can be repeated 2-3 times. Some solutions like proviodine solution must be on the skin for 60 seconds for full effectiveness (Figures 5.62-5.66).
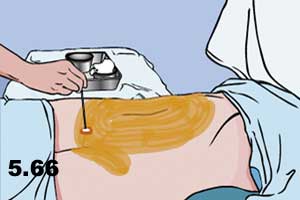
NB: Should the prep extend down to the bedline, the one should walk around the OR table, rather than leaning over and contaminating the prepped area.
Draping #
Draping
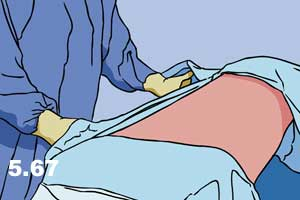
Sterile drapes are used to cover the areas that surround the operation field. Drapes should be placed on the patient without touching the non-sterile areas. The sterile drape should cover the side of the operator first (Figure 5.67) and then the other sides can be covered.
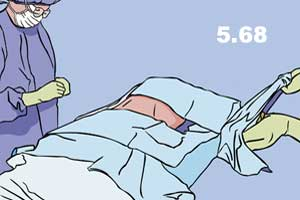
In order to avoid touching the non-sterile environment, one can fold the drapes for covering the opposite, up or down sides of the operating field (Figure 5.68).
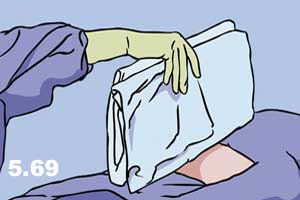
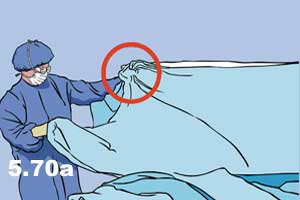
A large drape can be folded from the middle of the operating using the help of a surgical assistant or scrub nurse (Figure 5.69).
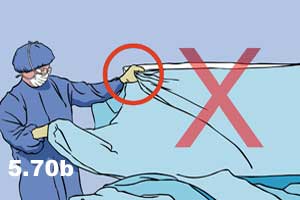
Care should be taken to protect the gloved hand by making a cuff with the drape around the sterile fingers (Figures 5.70a & 5.70b).
Once the sterile drape is in place it should not be adjusted. If minor adjustment is required, it should be from the centre toward the periphery, not from the periphery to the centre.
NB: Each hospital may have its own policies and procedures regarding sterile technique. Understanding the basic principles of asepsis will help one to adapt.
Operating room conduct #
Operating room conduct
When in the operating room:
- DO NOT come close to the sterile operating table, scrubbed surgeon, assistant or nurses while observing a procedure.
- DO NOT stand any closer than a foot away from the sterile field.
- DO NOT talk or distract the operating team.
- DO NOT try to be helpful to sterile team. Do not grab or touch things that are unfamiliar unless specifically asked to do so.
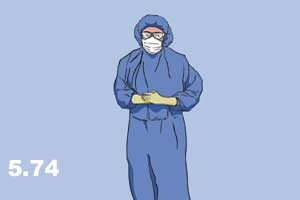
- DO NOT assume improper position (Figure 5.71 – 5.73) when scrubbed. Proper position is illustrated in Figure 5.74.


.
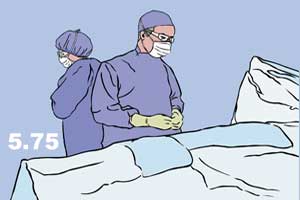
DO NOT change position face-to-back. Always change position back-to-back (Figure 5.75).
Prevention of Contamination from Implantation #
Prevention of Contamination from Implantation
For prevention of contamination with implantable materials, such as sutures and other bioprosthesis, special sterilizing techniques are used. The sterilization of implantable materials is very important. Due to the structure of materials and the length of time that material is implanted in the body of the patient, it is very complicated to achieve total sterility. Therefore, most of these materials are sterilized and packaged at the production site with specific sterilization techniques such as gamma radiation, gas sterilization, or other specific techniques Figures 5.76 (sutures), 5.77 (graft conduit) and 5.78 (porcine valve) demonstrate some examples of implantable materials that need extra sterilization caution (sutures, graft conduit, porcine valve).


General Principles #
The entire hospital environment must be protected from colonization of virulent strains of bacteria that have a profound effect in the outcome of surgical wounds. Hospital cross-infection is a term used for endemic, in-hospital strains of bacteria that are resistant to many antimicrobial drugs. These organisms include Staphylococcus aureus, Streptococcus, E. coli, Proteus vulgaris and Pseudomonas aeruginosa. Poor hospital management of aseptic precautions lead to higher incidences of wound infections, as well as pneumonitis and septicemia in infants and elderly patients. In order to avoid hospital cross-infection, rules must be strictly enforced in the surgical world of a hospital.
The hospital should have a Surgical Infection Control Program with a Hospital Infection Committee to set up and enforce the following general rules:
- All significant infections must be reported immediately.
- Infected wounds must be cultured and examined for antibiotic sensitivity.
- Isolation of patients with communicable infections.
- Implementation of aseptic techniques in the operating room.
- Post-operative care of infected open wounds by special dressings, etc.
- Hand washing before and after contact with patients.
- Personnel with acute, chronic and carrier bacterial status must be detected and excluded from patient contact during treatment, and replaced if it is difficult to fully cure the person.
- Every significant infection should be investigated for the possible detection of source.