Description #
This content unit explores the assessment of patients experiencing acute respiratory problems.
Learning Objectives #
- Describe techniques for completing a respiratory assessment.
- Understand the concepts of oxygen supply and demand.
- Undertake a comprehensive assessment of a patient with respiratory failure.
- Identify normal and abnormal clinical findings including physical assessment findings, lab and diagnostic results.
- Describe appropriate interventions for management of respiratory failure.
Introduction #
Inspection #
Inspection
Inspection of the respiratory system incorporates the patient’s head and neck, chest and abdomen, and extremities. However, to make this discussion as functional as possible, I will consider inspection in terms of face and extremities, chest size and shape, and respiratory effort.
Face
Observe the colour of the face generally, but especially the lips, tongue, and oral mucosa, looking for blue, gray or purple tones that would indicate central cyanosis. As noted earlier, central cyanosis is an indicator of hypoxemia. It should be treated seriously – if it is new finding or increasing in severity, consider this finding emergent. Some patients with chronic respiratory problems may have chronic low grade hypoxemia, in which case a degree of cyanosis may be ‘normal’ for them. This doesn’t mean we can ignore the presence of cyanosis in these patients – It still means that their arterial oxygen saturation is low. Instead we need to recognize two key facts here:
(1) that patients with chronic hypoxemia have very little ‘lee-way’ in which to accommodate problems – any further decrease in oxygen levels in these patients will have detrimental outcomes. For this reason this cyanosis in these patients should be treated as at least an urgent finding and they should be monitored closely.
(2) goals of interventions need to be set accordingly. For example, if we institute oxygen therapy on patients with chronic low grade hypoxemia, we would accept a lower SpO2 value as a ‘good result’ than in a patient with ‘normal lungs’.
Observe the patient’s face for diaphoresis. Respiratory insufficiency provokes a stress response in the body and this will result in diaphoresis in many people. Appearance of diaphoresis should be recognized as urgent and prompt further assessment to determine the cause. Finally, note the patient’s facial expression. Being unable to breathe adequately is an anxiety provoking situation and this will be reflected in the patient’s face. Often signs of anxiety in the face will precede other more obvious indicators of distress, so detecting these changes will support early intervention.
Extremities
When oxygen levels in the blood are low, central cyanosis is accompanied by peripheral cyanosis (Urden et al, 2002). Inspect the nailbeds (of hands and feet) for blue or purple discolouration. However, as we discussed in cardiovascular assessment, be aware that other factors such as peripheral vascular disease will also result in peripheral cyanosis. Be sure to consider the patient’s history in forming conclusions about peripheral cyanosis.
When patients are chronically hypoxemic, clubbing will often be present in the nailbeds. While clubbing is not an urgent finding in and of itself, it does provide valuable information regarding the chronic nature of an individual patient’s respiratory status.
Chest wall configuration
Assess the size and shape of the chest wall. Normally, the front to back or anteroposterior diameter (AP) is less than the side to side or lateral diameter (usually in a ratio of 1:2). An increase in AP diameter may indicate emphysema (Urden et al, 2002) and will trigger you to search for other assessment data to support or disallow this conclusion. Increased AP diameter can be a normal finding in the elderly (Stevens & Becker, 1988).
Examine the extent of chest movement during respiration. Do both sides of the chest appear to move equally? (palpation of chest excursion offers a more accurate assessment but observation is a great place to begin!). If chest movement is asymmetrical, consider the patient history for causes. Is there a history of trauma or surgery, such as pneumonectomy? What is the likelihood of pneumothorax? Note any skeletal malformations that influence chest excursion. Spinal curvature (kyphosis, scoliosis) and thoracic cage abnormalities (e.g. pectus excavatum – depression of the sternum creating a pit-shaped depression in the anterior chest) may interfere with respiratory function (Urden et al, 2002). Consider as well, the extent of chest excursion. Is the patient taking deep breaths? Are their breaths shallow? In the elderly, stiffening of the costal cartilage, often combined with increased abdominal girth and changes in posture, tend to limit chest excursion.
The urgency of these findings is directly determined by their effect on respiratory function at the time of assessment. For example, a patient with a severe spinal curvature may maintain normal respiratory function when their lungs are ‘healthy’. However, an episode of bronchitis that would leave you or me coughing and miserable, but otherwise OK, may be sufficient to tip the balance for this patient and create true respiratory insufficiency. Once again, we see how important it is to look at the whole patient, to consider any one piece of assessment data in context.
Respiratory effort
Assessment of respiratory effort includes observation of rate, depth and rhythm of respirations, as well as the degree of work occurring to maintain respiratory function. Normal breathing in an adult is regular, occurs at a rate of 12 – 20 breaths/minute and is effortless. If the respiratory rate is less than 8 breaths/minute, check for other changes in vital signs and/or decreased level of consciousness and be guided by the overall patient presentation in determining the significance of this finding. Because the adequacy of ventilation is determined by the combination of respiratory rate and the depth of each breath, we need to also assess whether the patient’s breaths are deep or shallow. Obviously, when a patient is breathing slowly but taking deep breaths, there is better ventilation than when a patient is taking slow and shallow breaths. When respiratory rate is increased, look further to assess for signs of laboured breathing (Stevens & Becker, 1988).
To assess the work of breathing, look for the use of accessory muscles. The use of muscles in the neck, shoulders and abdomen in breathing indicates increased respiratory effort. Intercostal, suprasternal, or supraclavicular indrawing and nasal flaring are all signs of increased work of breathing. Noting which accessory muscles are being used also provides clues to the origin of the patient’s problem. When inspiratory effort is particularly difficult (e.g. when the lungs are ‘stiff’ as the result of a severe pneumonia or pulmonary fibrosis) muscles that help expand the thoracic cage will be engaged – intercostal, neck, and shoulder muscles. When expiration is difficult (e.g. in emphysema or asthma) you will often notice that the patient uses their abdominal muscles to actively push the diaphragm up and help push air out of the lungs. Look also at the patient’s posture. Patients who are working hard at breathing will often lean forward, perhaps supporting themselves over a bed table, or with their hands on their thighs. Increased respiratory effort is an emergent finding. It is imperative that patients who are struggling to breathe are supported in their efforts as soon as possible: They are at high risk of becoming fatigued and experiencing respiratory failure or even a respiratory arrest.
In normal respiration, the patient’s rhythm of breathing is regular, with expiration being approximately twice as long as inspiration. Prolonged expiration may occur in obstructive pulmonary disease such as asthma and emphysema. Irregular respiratory rhythms may occur in association with neurological disorders or metabolic dysfunction (Stevens & Becker, 1988). There are a great variety of abnormal respiratory rhythm patterns that have been described (Cheyne-Stokes). However, rather than being concerned about memorizing specifics, be alert to any change in respiratory rhythm and treat it as urgent or emergent – depending once again on the severity of the disruption and the effect it is having on the patient’s vital signs and level of consciousness.
Finally, notice the presence of any coughing. Does the cough sound “wheezy” or “musical”. How long does it take the person to recover from an episode of coughing? Note whether or not it is productive and, if so, the nature of the sputum. It is mucoid? Purulent? Frothy and watery? Blood tinged or pinkish? New onset or an increase in abnormal appearing sputum requires prompt intervention. The level of urgency is determined by the overall status of the patient. e.g. New onset of frothy, pinkish sputum may indicate pulmonary edema and demands emergent action. A new onset of purulent sputum likely indicates a likely infection and requires urgent response, but is usually not life threatening.
Inspection with your ears!
Although not inspection in the sense of ‘seeing’, we can learn a lot about our patient’s respiratory status, by simply listening! Notice whether or not the patient is able to speak and breath. As respiratory insufficiency worsens, patients are less able to carry out conversation. They will speak a few words and then need to pause while they catch their breath. Their speech will become quieter as they are less able to generate strong air flow to support vocalization.
Listen as well, to your patient’s breathing: What do you hear when they breathe? Inadequacy in airway and in ventilation may present with various sounds. Significant air trapping and overdistention results in little or no breath sound. There might not even be a wheeze. Partial airway obstruction can present as snoring sounds (due to partial collapse of the oro-pharynx, or the displacement of the tongue into the oro-pharynx), or as stridor (resulting from narrowing of the upper airways e.g. swelling of vocal chords, or epiglottis). Noisy respirations, such as gurgling, indicate secretions in the airways or alveoli, while wheezing is associated with narrowing of the airways. Any of these situations will impair ventilation (the ability to get air in and out of the lungs) and require urgent or emergent intervention.
Palpation #
Palpation
Palpation, as a part of respiratory assessment, addresses three areas of information: position of the trachea, chest expansion, and evaluation for subcutaneous emphysema.
Trachea
The trachea should be midline. Assess tracheal position by placing your fingers in the suprasternal notch and sliding them upward. Deviation of the trachea to either side may indicate pneumothorax, severe disease process in one lung (e.g. pneumonia or atelectasis), severe unilateral pleural effusion. Deviation of the trachea should be considered an emergent finding (Urden et al, 2002).
Chest expansion
We assess chest expansion for both degree and symmetry. Expansion is most accurately assessed posteriorly, but when patient condition does not permit this it can be accomplished anteriorly. To assess chest expansion place your hands on the back of the patient’s chest when they are sitting upright. Position your thumbs at either side of the spine, pointing upward, with your fingers and hands on the lower posterior rib cage, at the level of the tenth rib. Ask the patient to take a few deep breaths. Expansion is considered normal when, during deep inhalation, your thumbs move 3-5 cm apart and movement is equilateral.
What else can you feel?
When air enters the pleural space a pneumothorax occurs. In some patients, the air does not remain solely in the pleural space, but actually moves into the tissues of the chest wall and, if severe enough, face, neck, arms and abdomen. This condition is known as subcutaneous emphysema. Assessing for subcutaneous emphysema is particularly important in patients with chest trauma, known or suspected pneumothorax, post thoracic surgery, or after central line insertion (which has an associated risk for pneumothorax). To detect subcutaneous emphysema, gently palpate the chest wall with the flat portion of your finger tips. If subcutaneous emphysema is present you will notice crepitus. This feeling is very similar to what you would experience if you were to press down on Rice Krispies lying under a thin cloth! It’s true! The appearance of subcutaneous emphysema as a new finding is cause for concern and requires prompt reporting to a physician. When assessing a patient who we know to have subcutaneous emphysema, an increase in the extent of the crepitus is concerning and also should be reported.
Communication #
What kind of areas might you explore with the patient in the process of ‘uncovering their story’? Urden et al (2002) suggest that exploring the following areas will provide good background to a patient’s respiratory status:
- What is their usual respiratory status and how does that compare to their present illness situation? Ask patients to describe their current experience (physical and emotional) for you. Make sure you include exploration of symptoms such as dyspnea, cough, exercise tolerance related to both fatigue and shortness of breath, orthopnea. Find out how they feel when they experience these symptoms. Ask the patient to describe the trends in these symptoms e.g. slightly worse? dramatically worse?
- Do they have other health problems (particularly that are impacting their respiratory system?)
- Is there any relevant information regarding family and social background? e.g. does their respiratory health inhibit their ability to work? to attend to ADL’s? to engage in recreation? Is their respiratory health impacted negatively by where they live or work? (environmental pollutants etc).
A word of caution here: It will be difficult for people who are acutely dyspneic to speak. Pace the conversation accordingly and remember that information can be collected over time.
Auscultation #
Make sure your patient is positioned in a manner that is as comfortable as possible for them, promotes effective lung expansion, and allows you to assess their chest anteriorly, posteriorly and laterally. This will mean different things in different situations. When possible, have the patient sit up (perhaps on the edge of the bed) with his or her chest exposed. If the patient is unable to support themselves in this position, place the head of the bed in high fowlers for anterior and lateral chest assessment, and then assist the patient to sit forward to allow you to listen to the posterior chest. For patients that are too ill to tolerate sitting upright, turning them from side to side will allow you to assess their posterior chest. As this may require someone else to assist the patient in turning, it is often most convenient to combine posterior chest auscultation with turning or repositioning a patient.
As with cardiac auscultation, one of the keys to respiratory auscultation is to develop a process that works for you and ensures that you listen to all aspects of the chest. Some people begin with the posterior chest, others begin anteriorly. Regardless of where ever you begin, there are some basic ‘rules’ that help ensure a systematic assessment. Hold the diaphragm of the stethoscope firmly against the chest wall – this will eliminate much of the environmental noise. Begin at the top of the chest and work toward the bottom. As you move down the chest, compare one side to the same area on the other side, allowing you to assess symmetry of breath sounds. Remember to include the area above the clavicles and the lateral chest (Stevens & Becker, 1988).
Anatomical Landmarks of the Lungs #
Understanding Breath Sounds #
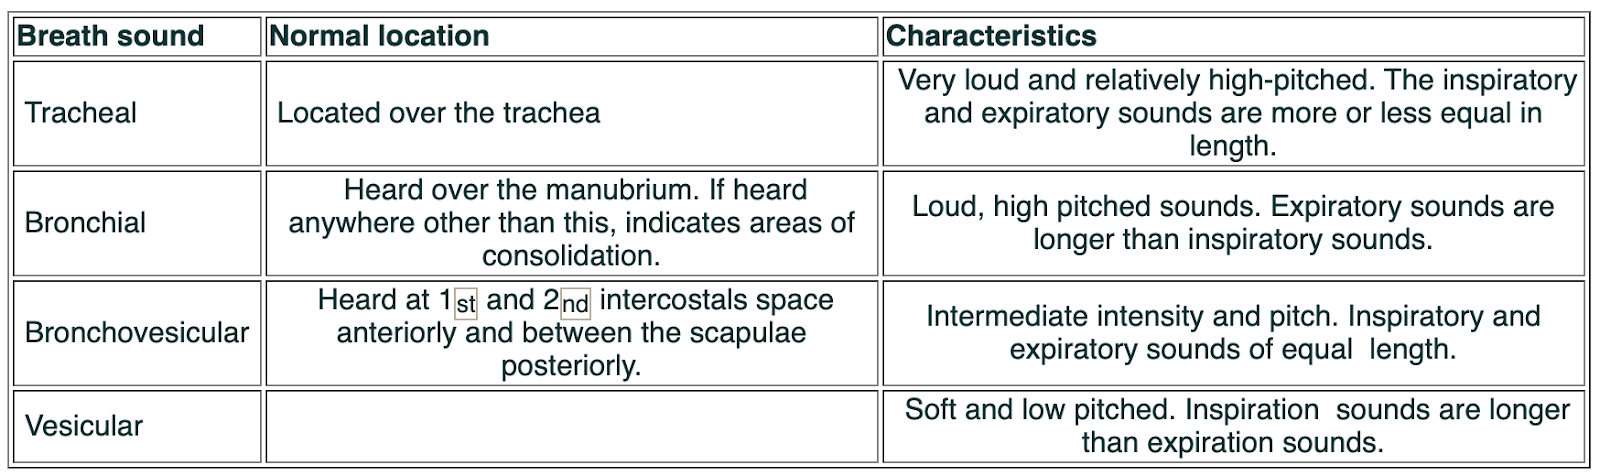
to effectively understand the information we gain through auscultation of breath sounds, we need to become familiar with normal and abnormal breath sounds. How comfortable do you feel with this area of assessment? Like all assessments, identifying breath sounds takes time and practice – If you are unsure, don’t be discouraged – It is a skill: It can be learned!
Normal sounds: Take some time to become familiar with both the nature of these normal sounds and where they usually occur. This is important, as finding bronchial breath sounds in areas where they are not normally located is an indication of pathophysiological processes within the lungs.
Abnormal breath sounds
There are three broad categories of abnormal breath sounds:
- Absent or diminished breath sounds
- Displaced bronchial breath sounds
- Adventitious breath sounds (Urden et al, 2002).
Diminished or absent breath sounds occur when there is little or no air flow into an area of the lung. Patients with emphysema have diminished breath sounds related to the low air flow that occurs as a result of their obstructive lung disease. Pleural effusion, which will impede the lung from expanding (as well as dampening transmission of sound), will result in diminished or absent breath sounds. In some patients, breath sounds are diminished in the lower lung fields as a result of shallow breathing. A pneumothorax or severe and widespread atelectasis will result in absent breath sounds as no air will enter the affected area of lung during inspiration. Diminished breath sounds can be general (shallow ventilations) or local (poor ventilation of an area affected by pathophysiology).
Displaced bronchial breath sounds are typical sounding bronchial breath sounds that are heard in an abnormal location, such as the peripheral lung fields (rather than centrally where they are normally located). Bronchial breath sounds in peripheral lung fields indicates the presence of fluid or exudates in the alveoli (Urden et al, 2002). Abnormal bronchial breath sounds may be heard in patients experiencing atelectasis with secretions, or pneumonia (where alveoli are filled with exudate).
Adventitous sounds include crackles and wheezes. Crackles (formerly known as rales) a “short, discrete popping sounds produced by fluid in the small airways or alveoli or by snapping open of closed airways during inspiration” (Urden et al, 2002, p. 525). They can be heard on inspiration or expiration. They may be further described as fine or coarse crackles: Fine crackles sound very similar to the noise you hear when you rub strands of your hair together close to your ear. They tend to indicate fluid that is in the interstitial layer of the alveoli and beginning to move into the alveoli and small airways. Coarse crackles, at their worst, may sound almost like gurgles. They are associated with fluid in the alveoli and airways and may clear to some extent when the patient coughs.
Wheezes are described by their sound: high pitched or low pitched. They are whistling sounds that are usually heard during expiration but may be heard on inspiration. Wheezes result from air moving through narrowed airways and so are commonly associated with bronchospasm (e.g. asthma) but may also occur when fluid or exudates create narrowed airways.
Pleural friction rubs
Although not a ‘lung’ sound, but definitely an abnormal respiratory finding, a pleural friction rub is a leathery, creaking sound that is audible on both inspiration and expiration. It occurs when the two layers of inflamed and irritated pleura rub together as the patient breathes. A rub will be heard best over the site of inflammation, but when the pleuritic inflammation is generalized, a friction rib is best heard over the lower anterolateral chest (Urden et al, 2002).
Interpreting abnormal breath sounds
We now have an understanding of what sounds constitute abnormal findings in the auscultatory component of respiratory assessment, but how do we interpret these findings? How do we know what is urgent or emergent? Assigning a degree of urgency to abnormal breath sounds requires several considerations: First, what is normal for this patient? Are they a known asthmatic who, even on a good day, has some mild bronchospasm? Or do they have emphysema and chronic bronchitis, with a chronically productive cough – which would most likely result in low airflow (diminished breath sounds), and coarse crackles (bronchitis and sputum)? Or are they a previously healthy individual who normally would have clear breath sounds, heard throughout all the lung fields? I am sure you get the point. We need to know what the baseline is for a patient, so we can actually know what is abnormal for them. Second, what is the trend of this individual’s breath sounds? For example, if the patient with COPD who normally has some scattered coarse crackles, presents with loud and gurgling crackles throughout his chest, we would be concerned as this indicates a deterioration in breath sounds. This urgent finding would require intervention. Similarly, if you hear a few end-inspiratory fine crackles during your morning assessment of a patient with cardiac failure and then discover that they have fine crackles audible to the mid-scapular level posteriorly during an early afternoon assessment, we would be concerned. This change represents a rapid deterioration in this patient’s condition and is urgent or perhaps even emergent. Third, what is the impact of this respiratory abnormality on this patient? Staying with the patient in cardiac failure for a moment – if, when we note the increased crackles in the afternoon assessment, the patient is diaphoretic, tachypneic, restless, and their pulse oximeter shows an arterial saturation of 89%, we should be concerned. The impaired gas exchange arising from the increased fluid that is evidenced as crackles is clearly having a significant negative impact on this patient: this is an emergent situation. If however, the patient is breathing easily, their colour is good, the pulse oximeter is reading 95%, and they are conversing freely, the situation is less urgent. The increase in crackles is still a cause for concern because it signals deterioration in the patient’s condition, but the current impact on the patient is less severe. This is an urgent situation, but not life threatening at this point. Finally, what does this finding mean? It is apparent that it is important to be able relate knowledge of pathophysiology to presenting patient responses. In other words, when we encounter an abnormal finding in a patient, we need to consider what is happening ‘underneath’ that is resulting in this detectable finding. This is a vital part of assigning an appropriate level of urgency to the situation. If you are not sure of the relevance of abnormal cues that you find during assessment, you need to find out. Ask a colleague, look up a text book, do an internet search. Be sure you understand what is happening with your patient.
There is one important point to highlight before we leave interpretation. Remember that breath sounds are created by air moving in or out of the lungs. That sounds obvious I know, but consider the converse. If the air isn’t moving in the airways there will not be any breath sounds. The relevance of this is made clear when we consider the patient with wheezes. Imagine that you hear moderate inspiratory and expiratory wheezes throughout a patient’s chest. The patient is obviously working hard getting air in and out of their lungs. An hour later you listen to their chest again and this time you find the wheezing has almost disappeared, and that the breath sounds are very quiet. Is it time to celebrate or is it time to run for help? As bronchospasm worsens, airflow is diminished. As airflow lessens, so too will detectable wheezing. To understand the full implication of the absence of wheezes in a formerly ‘wheezy patient’, we need to look at the overall picture of the patient – be sure that the absence of wheezes does not mean airway obstruction!
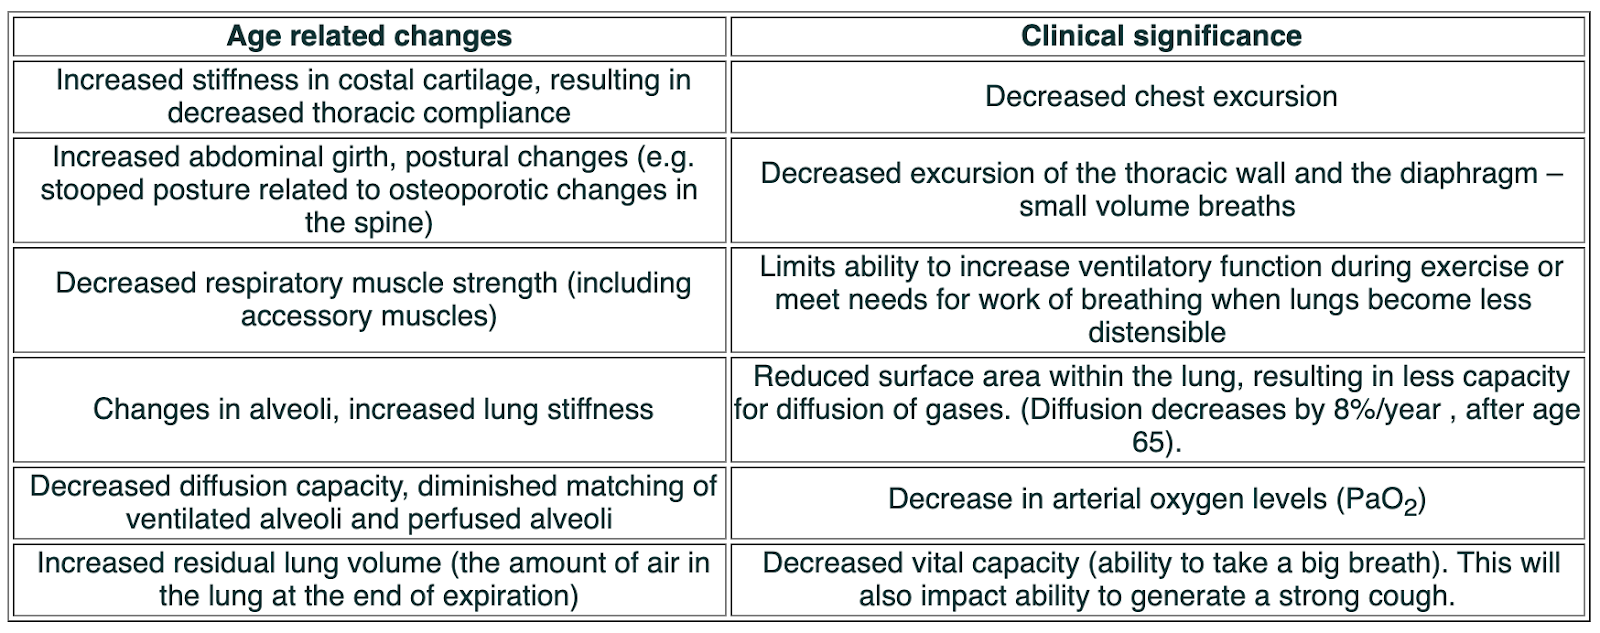
Age Related Changes #
There are age related physiological changes that occur that impact respiratory system function and have implications for assessment of elderly patients. The following table summarizes this information provided in Urden et al (2002).
Practicing a Respiratory Assessment #
Good respiratory assessment takes practice and associated requirements and challenges in this area will vary from one nursing unit to another. Here are three activities that I believe will help you become accomplished and confident in completing respiratory assessments and identifying breath sounds.
1. Select a willing friend and complete a full respiratory assessment, practicing the pieces that you might not usually include in your assessment process (e.g. perhaps checking chest expansion is new to you?). Once you feel comfortable, begin to incorporate these aspects into your assessment of patients on your nursing unit, aiming for a comprehensive respiratory assessment.
2. Many nurses feel unsure about correctly identifying breath sounds. Why not make an agreement with a colleague at work that you will become each others “breath sound buddies”? When you encounter abnormal breath sounds, have your buddy listen as well and compare your conclusions.
3. Here are some web sites that include normal and abnormal breath sounds. Go to at least one of these sites now and listen. Perhaps you could ‘bookmark’ these sites on a computer in your nursing unit?
http://www.med.ucla.edu/wilkes/inex.htm
click on ‘lungs’
- select respiratory
- select virtual stethoscope
- click on ‘go there’
- listen to breath sounds as desired!
Diagnostic Data #
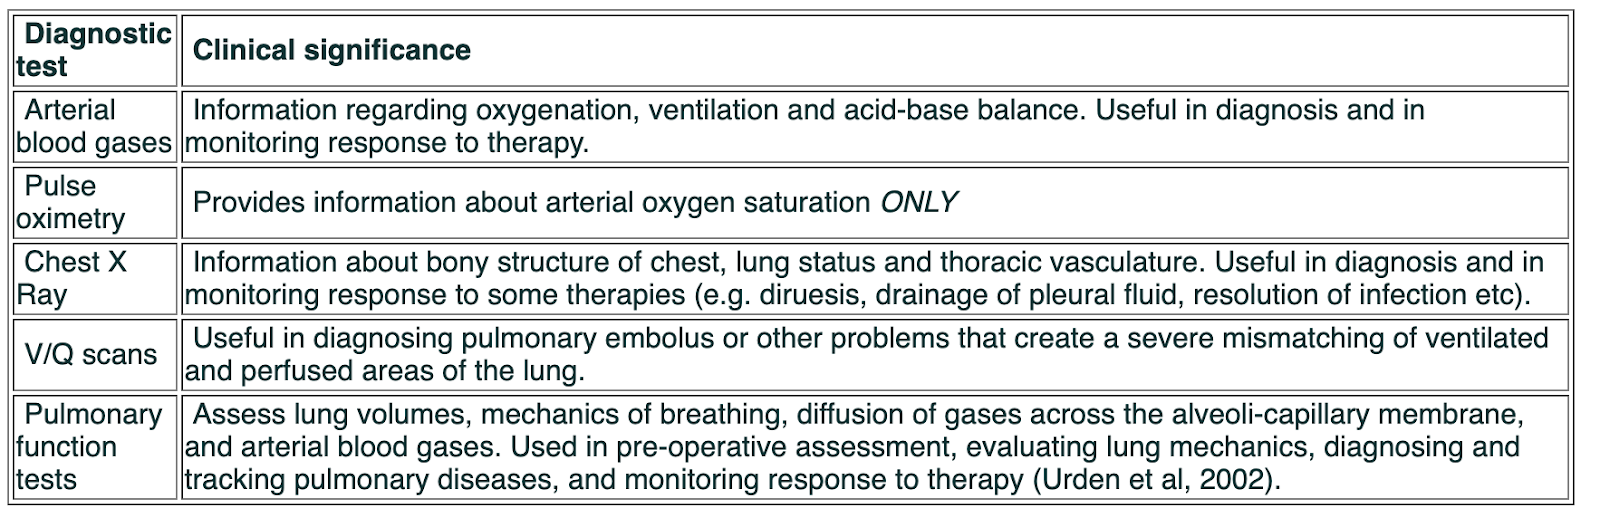
In completing this section, let’s consider other sources that will provide further information about patients’ respiratory status. This information is helpful in confirming what we find in physical assessment or, in some instances, may serve as a useful prompt for a focused physical assessment.
Further information about the patient’s respiratory status can be gained from laboratory, radiological and pulmonary function tests. The following table summarizes these. For more detailed information you are referred to a nursing textbook. We will explore pulse oximetry in more detail below.
Pulse oximetry
Use of pulse oximetry for noninvasive monitoring of arterial oxygen saturation has become common on medical-surgical units today. How well do you understand this monitoring device? Do you know how to set it up on a patient to maximize accuracy of the results? How confident are you in troubleshooting a pulse oximeter when it doesn’t work well?
Urden et al (2002) note that using a probe in an area that it was not designed for (e.g. using a finger probe on an earlobe), leads to inaccurate results. This is because, when the contact of the probe with the skin is not ‘tight’, external light can reach the photodetector, distorting the reading. Whenever possible, use the appropriate probe for the location you situate it in. Another common problem that creates inaccuracy in SpO2 readings, is placing the probe where the circulation is poor. In patients who are very vasoconstricted this can be difficult to avoid, but simple measures like keeping the hand covered (and therefore warmer) when a finger probe is being used, can help promote circulation and increase accuracy of the reading.
Keep in mind that pulse oximetry only provides information on oxygen levels – which are influenced primarily by the lungs ability to facilitate gas exchange. Poor ventilation (getting air in and out of the lungs) will result in some decrease in Sp02, but pulse oximetry is not a good tool for evaluating the effectiveness of a patient’s ventilation. Along with physical assessment of the patient’s ability to get air in and out of their lungs, PCO2 levels (obtained by arterial blood gas sampling) are the best indicators of ventilation effectiveness.
In the following situations a pulse oximeter may not be accurate:
Reduced peripheral pulsetile blood flow produced by peripheral vasoconstriction (e.g. hypovolaemia, cold, cardiac failure, severe hypotension, cardiac arrhythmias, or peripheral vascular disease. These result in an inadequate signal to for the device.
Venous congestion, may produce venous pulses which give low readings with ear probes. E.g. In fluid overload. When readings are lower than expected it may be worth repositioning the probe. In general, however, if the waveform on the flow trace is good, then the reading will be accurate.
Bright overhead lights may cause the oximeter to be inaccurate, as can diathermy in an OR.
Shivering may cause difficulties in picking up an adequate signal.
Pulse oximetry cannot distinguish between different forms of haemoglobin, and abnormal forms will result in inaccurate readings.
Nail varnish may cause falsely low readings, as can intravenous dyes. However units are not affected by jaundice, dark skin or anaemia.