Description #
The use of bedside ultrasound by clinicians to guide invasive emergency procedures has been proven to improve success and reduce complications, and is rapidly becoming established as the standard of care.
UGEMP-Advanced provides an opportunity for physicians to acquire and maintain the skills required to perform the following procedures using Ultrasound-guidance:
- Abcess drainage
- Subcutaneous Foreign Body localization and removal
- Arthrocentesis
- Lumbar Puncture
- Paracentesis
Learning Objectives #
At the end of the course, the student should be able to know the cognitive aspects and perform the psychomotor aspects of these procedures with the use of ultrasound guidance:
- Abcess drainage
- Subcutaneous Foreign Body localization and removal
- Arthrocentesis
- Lumbar Puncture
- Paracentesis
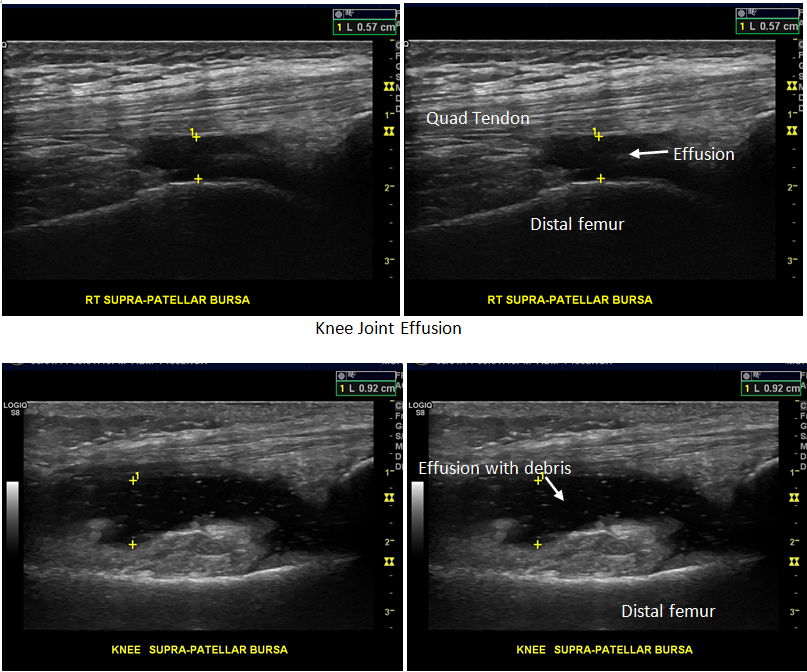
Ultrasound Guided Arthrocentesis #
Ultrasound Guided Arthrocentesis
Clinical evaluation of the red, hot, tender joint can be challenging and it is often necessary to obtain synovial fluid in order to differentiate septic arthritis from inflammatory arthritis (ie Gout), and cellulitis.
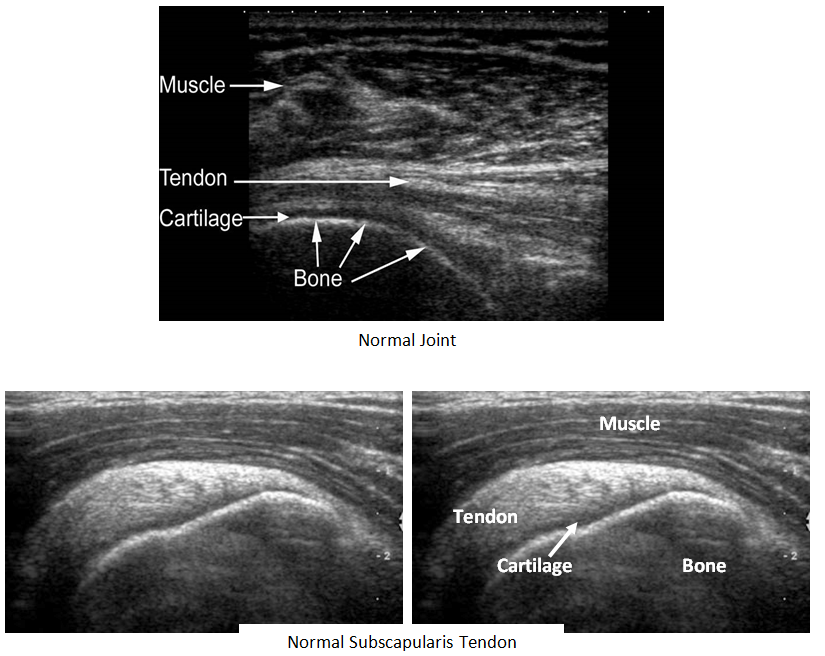
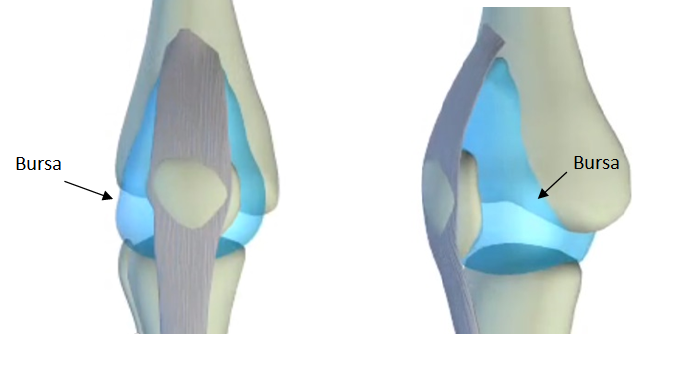
The normal joint space is lined by articular cartilage, a synovial membrane, and a joint capsule that is filled with a small amount of anechoic synovial fluid. The amount of synovial fluid will vary, depending on the joint you are assessing and the patient’s current condition (ie: young and healthy vs old and frail)
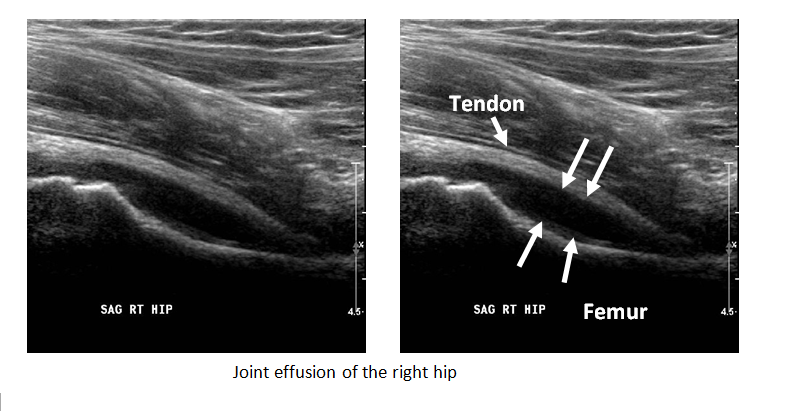
Intra-articular pus is usually liquid, and will appear as a black ‘collection’ at the joint space. Two caveats to this are
1) if your patient presents early (24-48h) after the onset of symptoms, it is possible that the effusion has not yet reached a volume that will be detectable on ultrasound.
2) If the patient presents late – 1-2weeks after the onset of symptoms, the pus may have progressed from a liquid-state into a semi-solid state and may no longer appear as black.
While ultrasound is great at identifying fluid, it cannot differentiate pus from hemorrhage or effusion. Complex effusions (inflammatory collections, septic fluid and hemarthroses) are typically noted by the presence of particulate debris that redistributes with compression and movement. If the patient has clinical findings such limited range of motion, elevated WBC, elevated SED rate or CRP, fever, or inability to bear weight (lower limb joints), aspiration may be needed to evaluate the fluid for a septic process. The only accurate way to determine the nature of the fluid will be to aspirate.
Arthrocentesis should be avoided in patients with cellulitis over the site of needle entry due to concerns about possibly seeding the joint space with bacteria. Prosthetic joints are especially susceptible to iatrogenic infection, and the procedure should be discussed with an orthopedic surgeon prior to proceeding
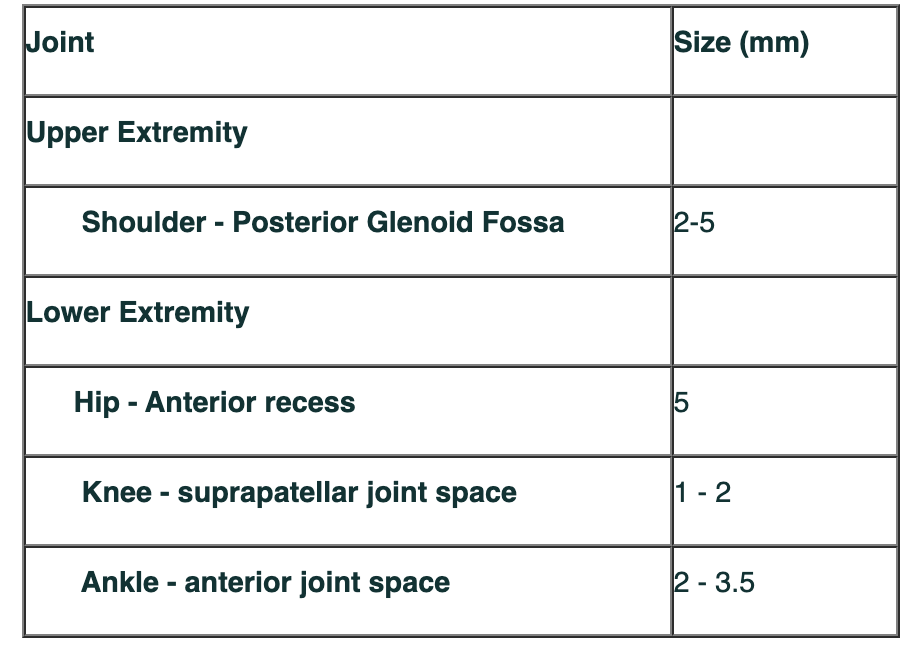
As a general guide, the normal amount of fluid for a joint space is typically
 #
#
Cartilage vs. Effusion
Probe Selection
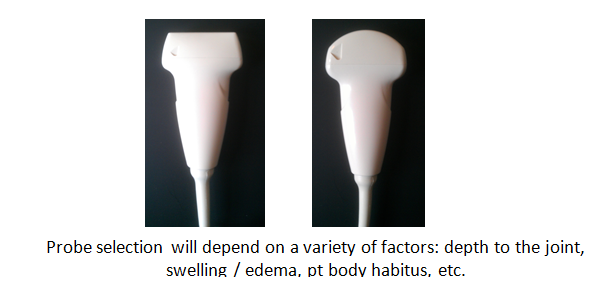
As most joints effusions will be at a superficial location, a linear probe (7-15MHz) is ideal. If excessive swelling or patient body habitus makes identifying the joint space difficult or impossible, switch to the curvilinear ( 2-5MHz )
Evaluate the joint of interest in two planes as sometimes an effusion is easier to see in one plane than on the other.
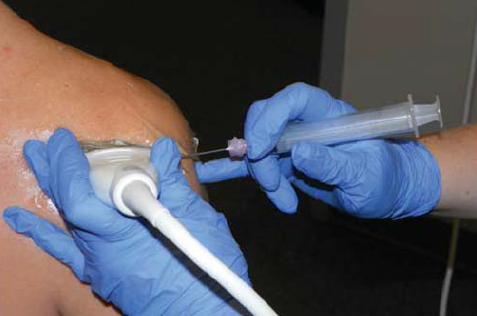
Joint aspiration can be performed under static or dynamic guidance. For static guidance, you will assess the area and determine whether there is an effusion that is amenable to aspiration. You will also be able to determine the needle path, depth, and assess for any critical structures in the area. Taking care to apply light probe pressure will help to ensure that you are not compressing/obliterating any veins from view on the ultrasound screen.
Static Guidance
Pros : Probe does not have to be sterile-prepped
Cons: procedure is still ‘blind’, so might still result in multiple attempts
1) Assess the joint space in 2 planes to determine presence / absence of a joint effusion
2) mark area of interest ( pen or needle cap )
3) perform procedure as normal
Dynamic Guidance
Pros: can ensure needle tracks correctly into joint space
Cons: beginners find it difficult to manipulate both needle and probe simultaneously, probe must undergo sterile prep
1) Assess the joint space in 2 planes to determine presence / absence of a joint effusion
2) mark area of interest ( pen or needle cap )
3) Sterile prep of area
4) sterile prep of probe
Compared to the static guided method, the dynamic guidance method has been shown to produce less procedural pain and improve success with a greater yield of fluid withdrawn,.
Equipment
a) Gauze
b) Skin Cleaning agent
c) 1% or 2% Lidocaine, 5cc syringe and small needle
d) sterile kit, including skin-marking pen
e) one or two 30cc syringe
f) 18g needle for aspiration
a. Shallow Joints (Knee, Elbow, Ankle) – accessed with 1 ½- inch needle
b. Deeper joints ( Hip, Shoulder) – may require 3 ½ to 5-inch needles
Tips and Tricks
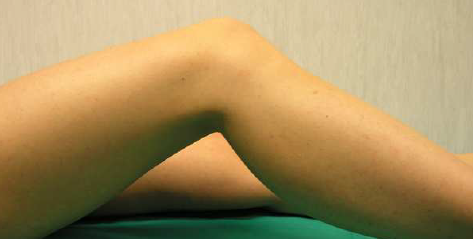
Knee
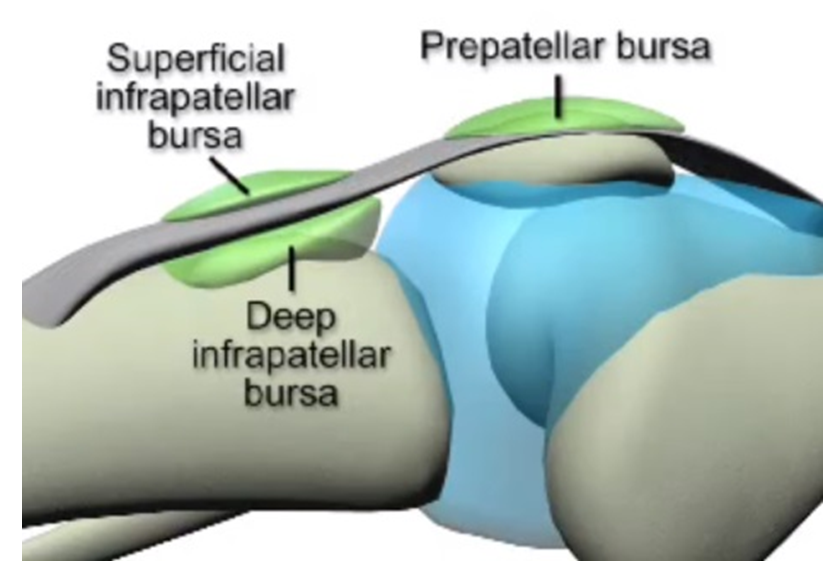
The supra-patellar bursa of the knee is best assessed while in a semi-flexed 15-200 position
The knee has the largest synovial cavity in the body, and is thus easy to perform an aspiration on. Either the medial or lateral side can be used for an entry point.
Move the probe to the lateral aspect of the knee and turn the probe into transverse. This will ensure that you avoid the quadriceps tendon. Insert the needle between the iliotibial band and the vastus lateralus.
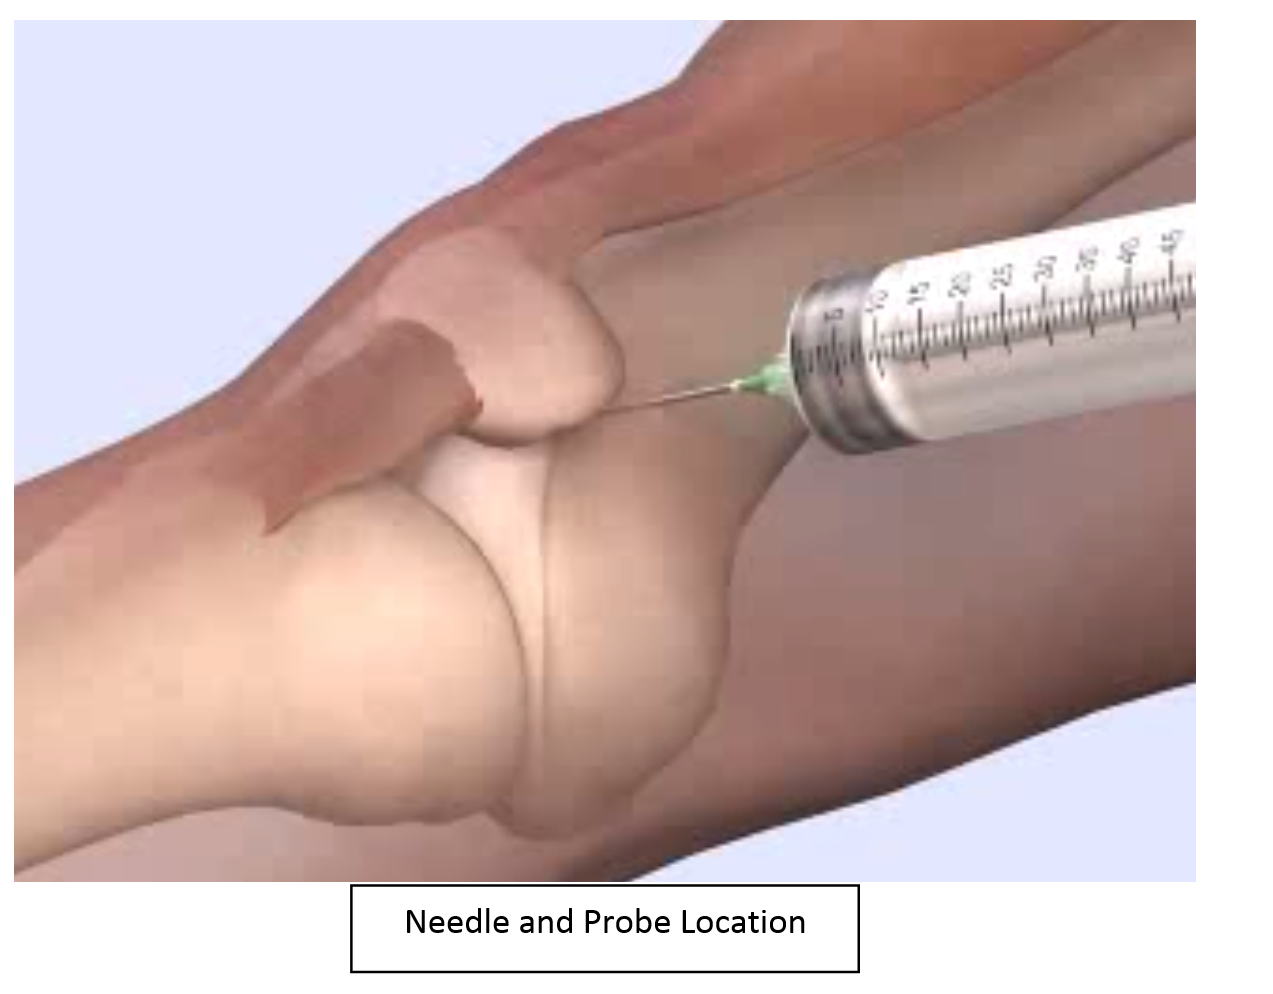
Move the probe to the lateral aspect of the knee and turn the probe into transverse. This will ensure that you avoid the quadriceps tendon. Insert the needle between the iliotibial band and the vastus lateralus.
Shoulder
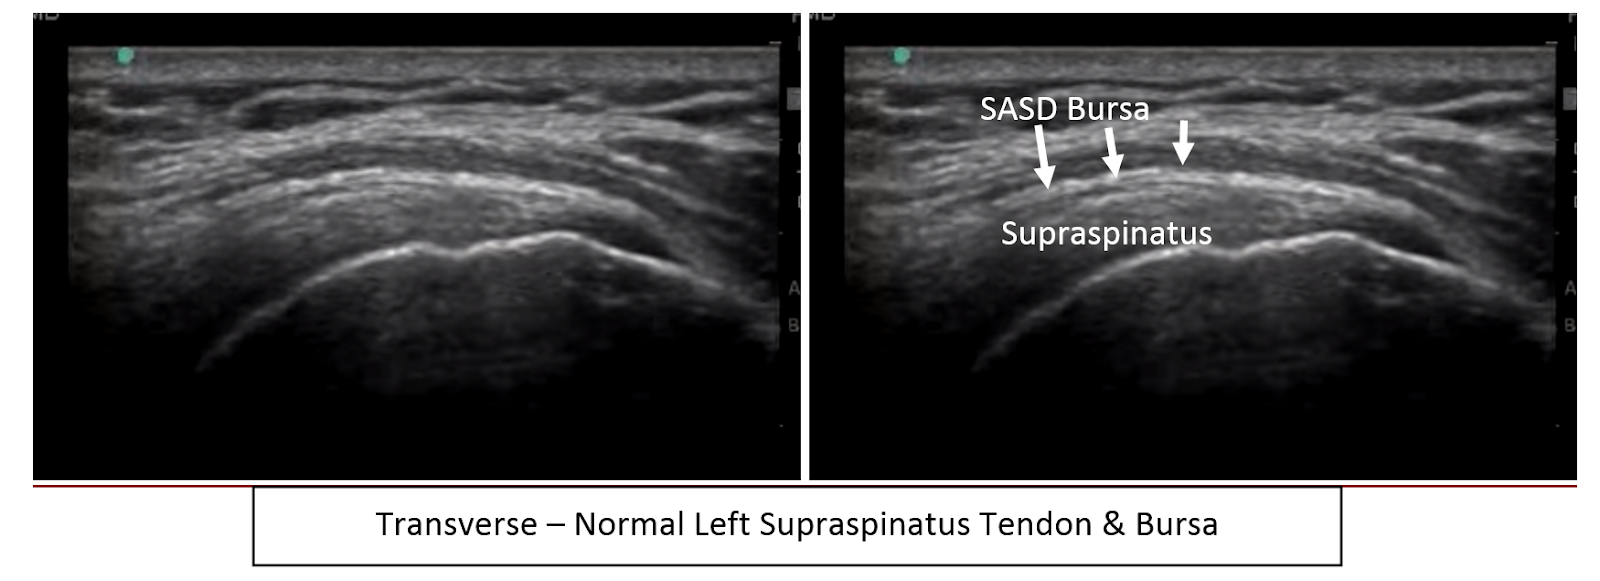
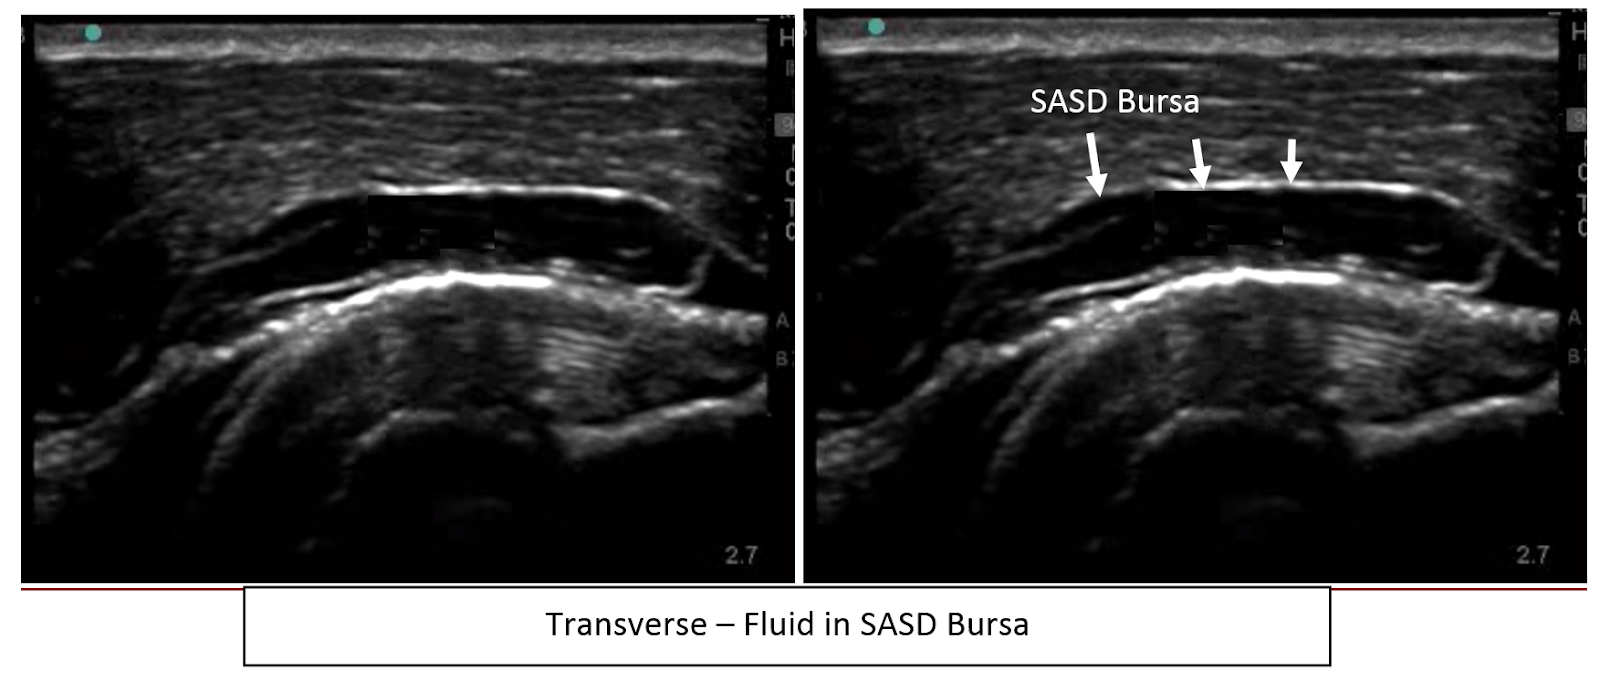
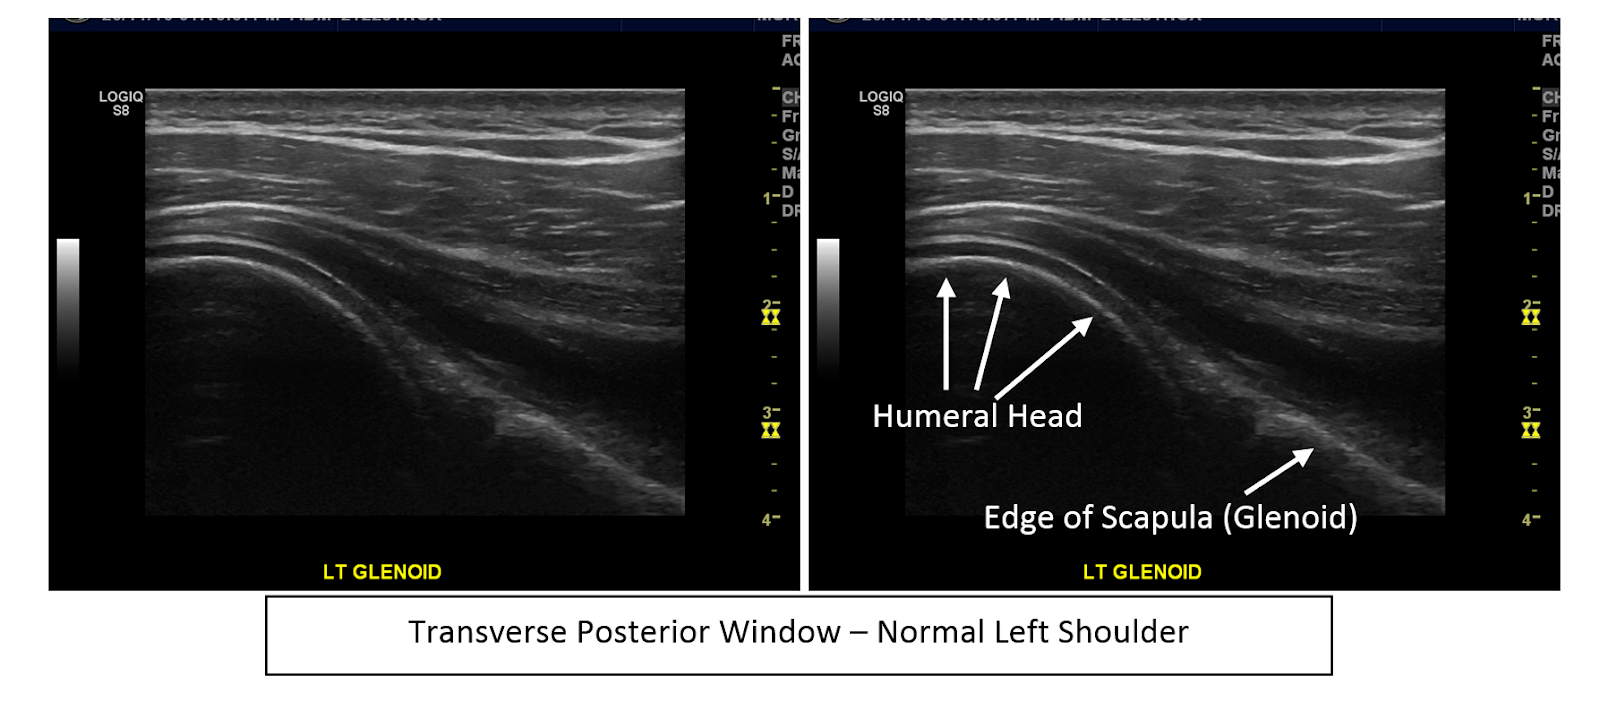
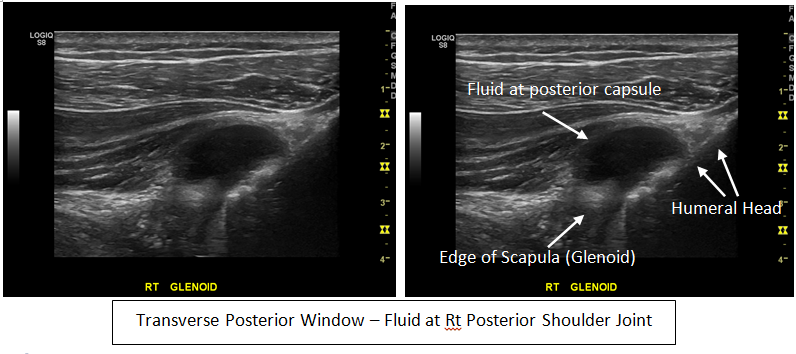
The shoulder can be entered just superior to the Supraspinatus. The probe will be in a transverse orientation. Have the patient put their hand on their hip or back pocket. Place the probe at the mid-shoulder to identify the Supraspinatus tendon. Slide the probe just superior to the tendon to identify the Subacromial-Subdeltoid (SASD) bursa. The probe should be in a transverse orientation with the needle approaching medially to avoid the neurovascular structures.
Alternatively, a posterior approach can be used. Have the patient place their hand on the contralateral shoulder. With the probe in a transverse orientation at posterior shoulder, assess the glenoid fossa for fluid. If required, have the patient pivot their arm (keeping the shoulder in place) until their hand is pointed up at the ceiling. This rotational maneuver can force fluid from the SASD Bursa posteriorly into the glenoid fossa, making the access easier.
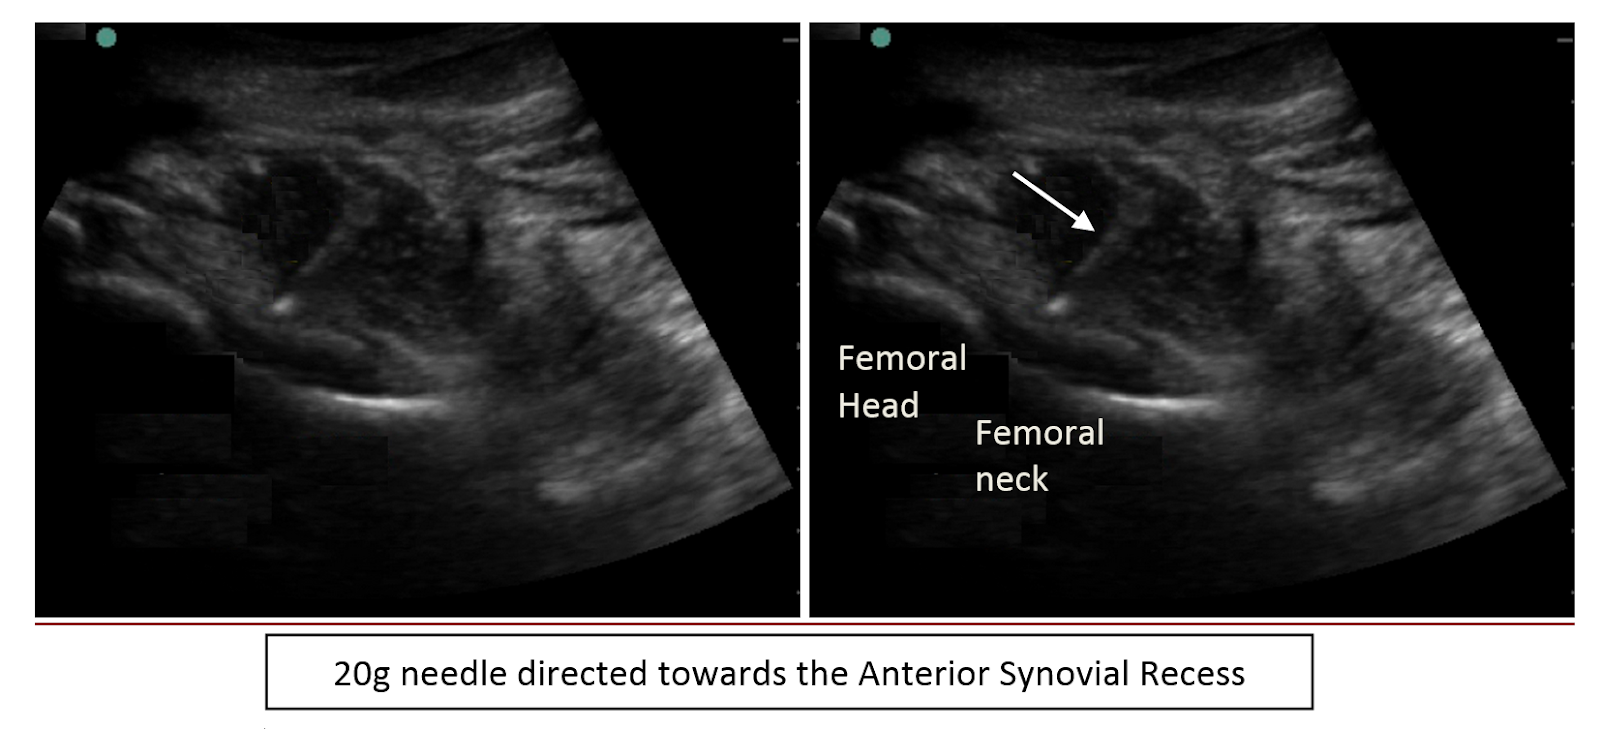
Hip
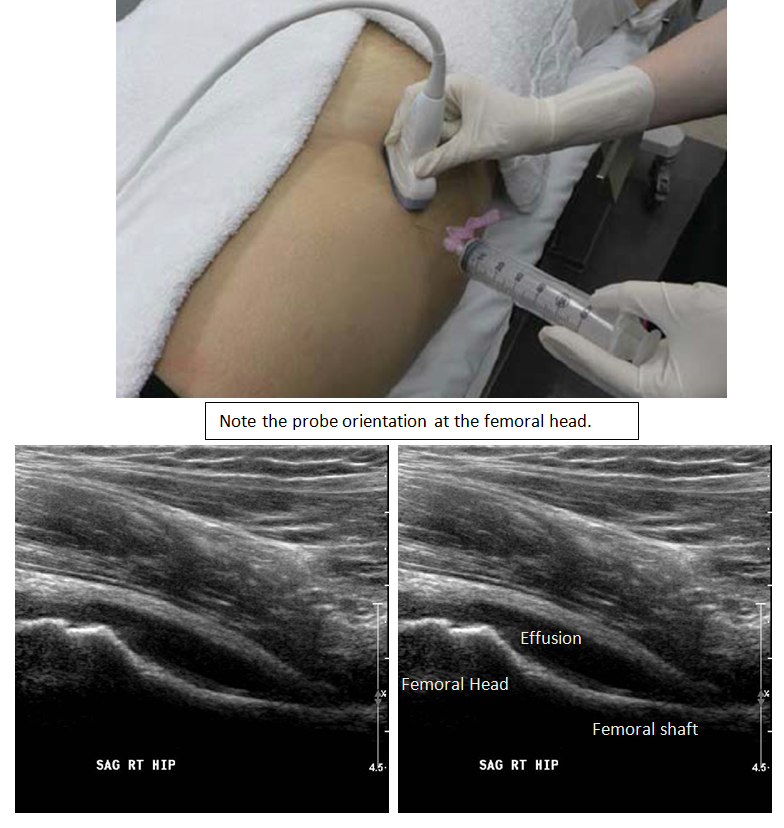
The patient should be supine with the hip in a neutral position. With the probe in transverse, identify the femur. Rotate the probe into longitudinal and slide cephald to the femoral head. Turn the probe until the probe notch points towards the patient’s umbilicus. This will help delineate the femoral head and neck. if an effusion is present, it will be at or near the femoral head, as this is the location of the bursal sac.
Recall that the cartilage is normally identifiable at the hip joint due to its thickness – and this cartilage is displayed as hypoechoic (black) under ultrasound – same as an effusion. If you are unsure whether the structure you have identified is physiological or pathological, ultrasound the contralateral side at the same location. Children may have especially prominent cartilage, and so it is recommended to always scan the contra-lateral side in children
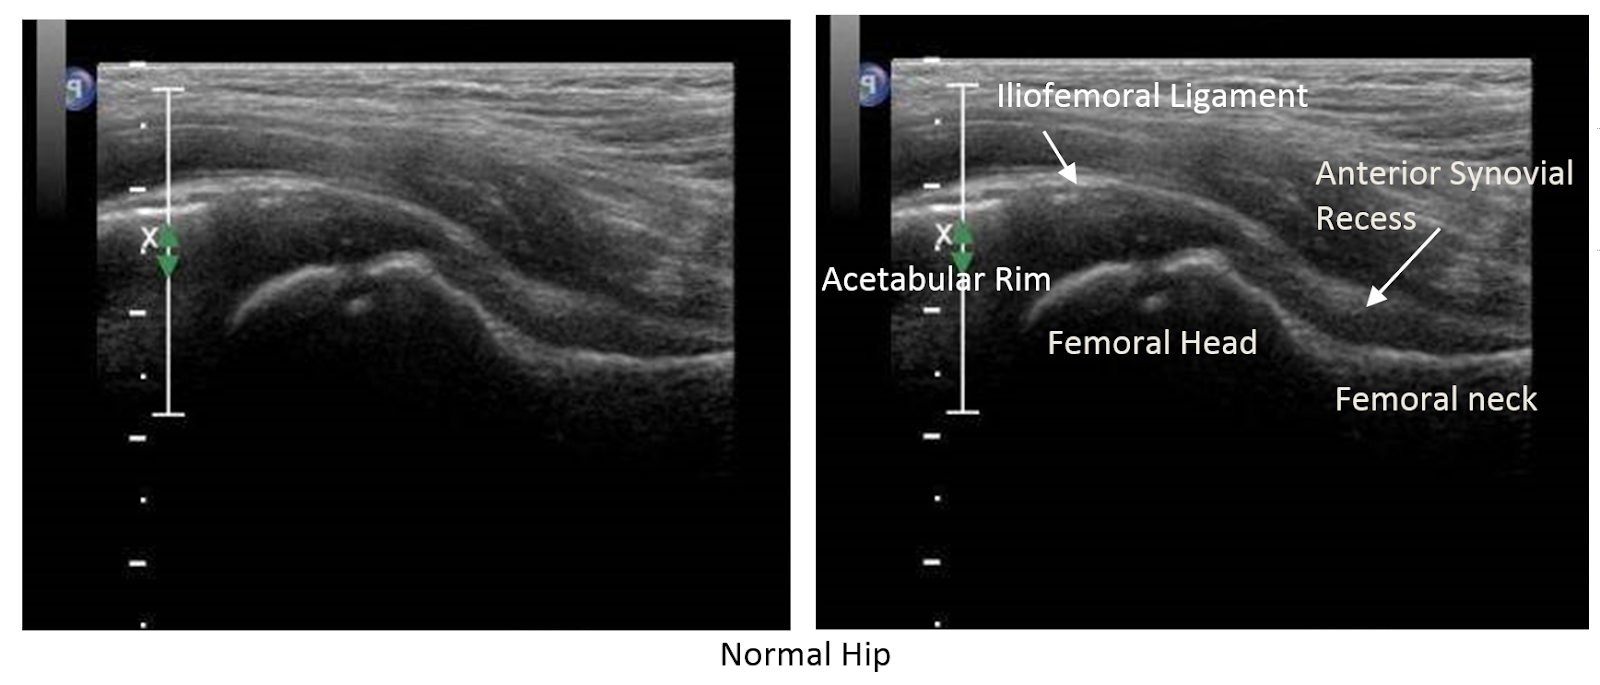
Use the Doppler mode to identify the femoral artery and vein. The approach from the distal and lateral position in order to avoid the arterial, venous and neurovascular structures that lie medially. Advance the needle in plane at an angle close to 45-degrees. The needle should be visualized entering the anterior joint recess
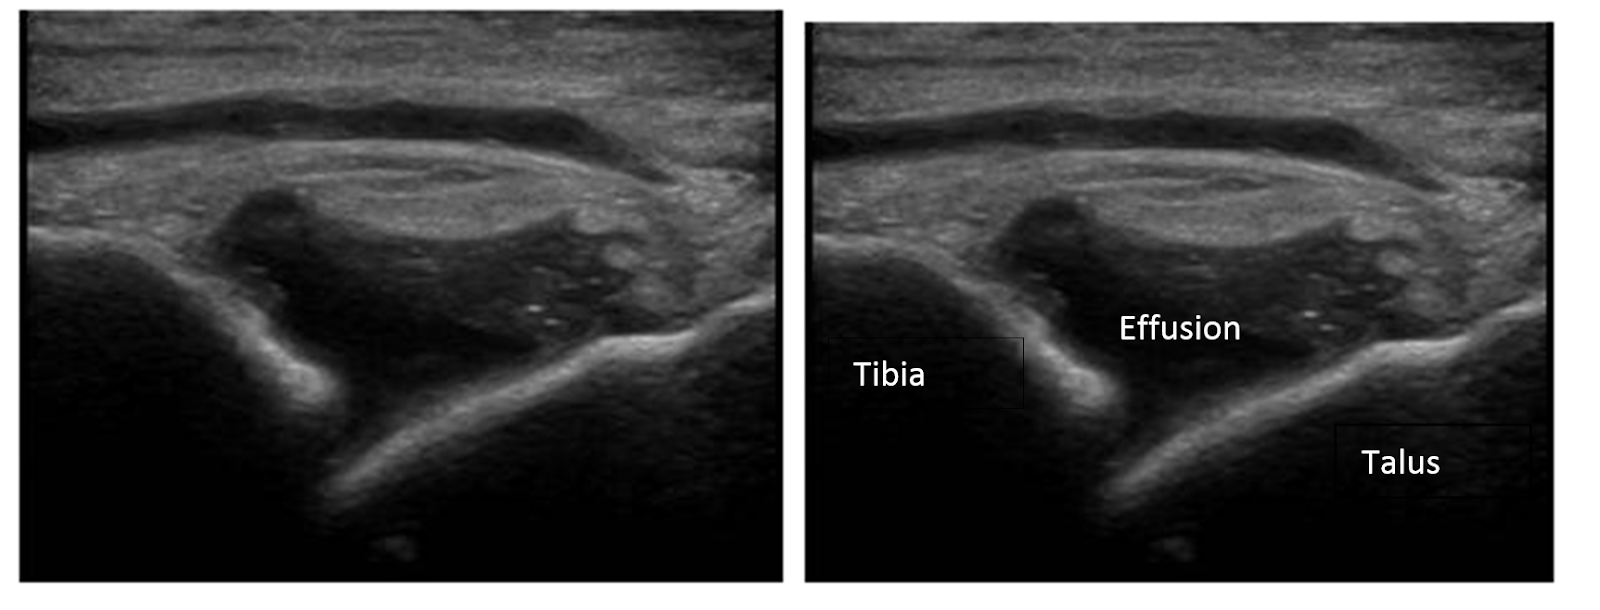
Ankle
Typically the anterior approach will yield the best window of the ankle joint. With the patient supine and the foot in slight dorsiflexion, scan the proximal to distal ankle joint. The point where the tibia articulates with the talus will be the site of maximal effusion.
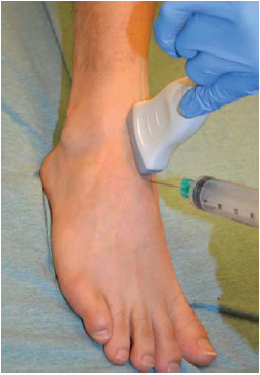
Before beginning the procedure, locate and mark the anterior tibial artery. Rotate the probe into a transverse orientation and identify the pulsing artery. If unsure, slide the probe cephalic – the artery (and vein) should remain as ‘circles’ on the screen. Always visualize the dorsalis pedis artery (which crosses from medial to lateral deep to the extensor hallucis longus tendon) and the peroneal nerve (which is deep to the peroneal artery) to avoid compromising these structures
The ankle can be approached with the needle either at the cephalad or caudal portion of the transducer, depending on operator preference.
Pitfalls
1) the anechoic appearance of cartilage can easily mimic that of a mild joint effusion. To minimize the chances or incorrectly identifying cartilage as an effusion, compare with the contra-lateral side.
2) Ultrasound can help to determine the most suitable location for an aspiration, but ensure that the following vital structures are not compromised
a. Medial hip joint : Femoral vessels
b. Poplitieal Fossa : politeal vessels
c. space between the anterior tibial and extensor hallucis longus tendon(location of dorsalis pedis artery and deep peroneal nerve)
d. medial elbow : ulnar nerve
3) Ultrasound for musculoskeletal assessment requires higher skill levels. The sonographer should be familiar with normal ultrasound findings. If in doubt, scan the contra-lateral side for confirmation of suspected findings. If you are still in doubt, scan a healthy colleague to re-confirm your impression of normal.
4) Ensure that you use appropriate anesthesia.
References
Socransky, S; Wiss, R. Point-of-Care Ultrasound for the Emergency Physician. Library and Archives Canada Cataloguing in Publication. 2012.
Fessell, D; et al. Using Sonography to Reveal and Aspirate Joint Effusions. Amr J. Radiol. 2000. Vol 174 (5). p1353-1362
Reviews- Physics & Probes #
Introduction to Ultrasound Probes
The ‘art’ of ultrasound is a continuous trade-off between penetration and resolution. The probe can be good at either penetration or resolution, but not both at the same time. Some probes are good at only penetration ( can penetrate very deep into the patient, but resolution is compromised) or only resolution ( the quality of the image is vastly superior, but you are only able to look at very superficial structures ), and some probe walk the line between penetration and resolution by making some compromises to both.
The trick to remember with ultrasound is that you are using sound waves to generate an image. These ultrasound waves are measured in Mega-Hertz ( MHz), with a lower frequency ( 2-5MHz) having good penetration but less-than-ideal resolution. The higher-frequency probes (10-15MHz) have much better resolution, but due to the heightened frequency, are unable to penetrate as far into the body. A good analogy to the ultrasound probes is to think about those ‘pimped-out’ cars where you can hear the stereos from 3 blocks away.
If you think about it, you’re not hearing the full range of the stereo, you are only hearing the base ( low frequency). The lower the frequency, the farther the sound wave can travel. In order to hear the high-end of the stereo, you would actually have to be sitting in the vehicle. This is because high-frequency sound wave cannot travel as far as can lower frequency.
Low Frequency -> travel farther -> “sounds terrible” = decreased resolution
High Frequency -> shorter travel distance -> “clearer sound” = increased resolution
Curvilinear ( 2-5MHz)
This probe is the work-horse of ultrasound. It is a low frequency probe that results in a relatively good amount of penetration. Since the probe is curved, the beam ‘fans’ out through the body, to produce a wide field-of-view. As indicated, this will result in a relative loss of resolution. As the probe is quite large, it is not ideal for fitting into small areas ( such as intercostally for cardiac views )
Phased Array ( 2 – 5 MHz) ( AKA – Cardiac Probe )
This probe also uses a low frequency, but due to the smaller size of the probe-head ( read: smaller ‘foot-print”), it is more useful for fitting into tighter locations, such as intercoastal windows when assessing the heart. The name is derived from the way the computer activates the crystals in the probe – it occurs through “sequential phasing”. Due to the way the crystals are arranged in the probe head, the ‘near field’ is quite small.
Orientation Markers
Every probe in the world will have and indicator marker on them. This marker will ALWAYS be directed towards the patients HEAD (when the probe is in a longidutinal orientation) OR towards the patients RIGHT (when rotated into a transverse orientation ). This marker corresponds to the indicator marker on the screen. If the probe is every orientated the other way, the image will be ‘backwards’ to convention. The probe marker will also become of critical importance in procedures as the needle will be advanced on the same side of the marker, and will therefore always enter from the left side