Skip to content
Educational Resources
  • Dashboard
  • Dashboard

Clinical Competencies

22
  • ECG Interpretation
  • Advanced Cardiac Life Support – Basic Airway Management For Operating Room Nurses
  • Introduction to History Taking Skills
  • Examination of the Abdomen
  • Examination of the Heart
  • Examination of the Pelvis
  • Examination of the Thorax and Lungs
  • Examination of the Rectum
  • Conscious Sedation and analgesia competencies
    • Introduction To Harvey Cardiopulmonary Simulator
    • Standards Of Practice
    • Patient Assessment
    • Difficult Airway
    • Drug Pharmacology
    • Introduction, Goals And Indications For Administration Of Sedation
    • Managing Complications
  • CanMEDS Framework Competencies for Medical Students
    • Collaborator
    • Communicator
    • Health Advocate
    • Leader
    • Medical Expert
    • Professional
    • Scholar

Procedural Competencies

40
  • Airway management
  • IV access
  • Local anesthesia/field block
  • Suturing of Lacerations
  • Pap Smear
  • Nasogastric tube placement
  • Venipuncture
  • Abscess incision and drainage
  • Urethral catheterization
  • Oxygen administration devices
  • Thoracentesis
  • Lumbar puncture
  • Anoscopy
  • Arterial line placement
  • Central venous catheter placement
  • Intramuscular Injection
  • Pericardiocentesis
  • Emergency Resuscitation Principles
  • Circulation Assessment & CPR
  • Rectal Examination
  • Electrocautery
  • Epidurals
  • Intraosseous Infusion
  • Ultrasound-guided Central Line Insertion
  • Simulation Debriefing
  • Wound Treatment
  • Introduction, Goals And Indications For Administration Of Sedation
  • Central Vein Catheterization Landmark Technique
  • Chest tube placement and management
  • Spontaneous vaginal delivery
  • Casting and Splinting
  • Types of Surgical Knots
  • Tying Technique
  • Principles of Asceptic Technique
  • General Principles
  • Laparoscopic Equipment
  • Handling Laparoscopic Instruments
  • Basic Laparoscopic Techniques
  • Managing Complications
  • Tracheostomy

Nursing Competencies

85
  • Wound Management
    • Wound Prevention
    • Wound Assessment
    • Wound Treatment
  • Advanced Clinical Nursing Management (Pre Code & Code)
    • Cardiac Failure
    • Renal Failure
    • Tracheostomy Care
    • Suctioning In Respiratory Care
    • Fluid And Electrolytes
    • Basic Airway Management For Operating Room Nurses
    • Medical-Surgical Nursing Comprehensive Scenario
    • Pre Operative Assessment
    • Neurological Trauma
    • Bipap & CPAP
    • Respiratory Failure
    • Shock
    • Respiratory Assessment
    • Oxygen Therapy
  • COPD and its Management
    • Acute Exacerbations
    • End-of-Life Care
    • Definition, Prevalence, Signs & Symptoms
    • Risk Factors And Pathophysiology
    • Diagnosis And Severity
    • Management Of Stable COPD
    • Patient Self-Management Education
  • Procedural Sedation education for registered nurses
    • Introduction To Laerdal SimMan
    • Standards Of Practice
    • Patient Assessment
    • Difficult Airway
    • Drug Pharmacology
    • ECG Interpretation
    • Introduction, Goals And Indications For Administration Of Sedation
    • Managing Complications
  • Introduction to Perioperative Nursing
    • Introduction To The Perioperative Nursing Program
    • Role Of The Perioperative Nurse
    • Preoperative Care
    • Intraoperative Care – Part 1
    • Intraoperative Care – Part 2
    • Full Time Clinical Component
    • Perioperative Anatomy & Medical Terminology
    • General Surgery
    • Perioperative Safety
  • Physical Assessment
    • Physical Examination Of The Airway
    • How To Take Blood Pressure Reading
    • Acute Bronchospasm
    • Acute Respiratory Failure
    • Cardiac
    • Pulmonary Embolism
    • Taking A Temperature
  • Procedural Sedation and Analgesia Education
    • Standards Of Practice
    • Patient Assessment
    • Difficult Airway
    • Drug Pharmacology
    • ECG Interpretation
    • Introduction, Goals And Indications For Administration Of Sedation
    • Managing Complications
  • Safe Blood Transfusion
    • Safe Blood Transfusion I
    • Safe Blood Transfusion II
  • Community Home Infusion
    • Teaching Home IV Self-Administration
    • Teaching Community Intravenous: Gravity
  • Collaborative Framework
    • Respiratory Assessment
    • Tracheostomy Care
    • Oxygen Therapy
    • Suctioning In Respiratory Care
  • Fundamental Perioperative Skills for LPN
    • Introduction To The Perioperative Skills for LPN
    • Role Of The LPN Perioperative Nurse
    • LPN Perioperative Care
    • LPN Perioperative Safety
    • LPN Intraoperative Care
  • Pain Management
    • Classification & Physiology Of Pain
    • Pain Assessment
    • Non-pharmacological Approaches For Pain Management
  • Rheumatoid Arthritis Hand
    • Ulnar Drift Deformity In Rheumatoid Arthritis
    • Boutonniere Deformity In Rheumatoid Arthritis
  • Total Joint Arthroplasty Outcome Measures
    • Thirty Second Chair Stand Test (30 Sec-CST)
    • Stair Climb Test (SCT)
    • Ten Metre Walk Test
    • Timed Up & Go (TUG) Test
    • Functional Reach Test (FRT)
    • Single Leg Stance (SLS) Test
    • Six Minute Walk Test (6MWT)
    • Visual Analogue Scale (VAS): Pain
    • Numeric Pain Rating Scale (NPRS)
    • Hip Disability And Osteoarthritis Outcome Score (HOOS)
    • Knee Injury And Osteoarthritis Outcome Score (KOOS)
    • Lower Extremity Functional Scale (LEFS)

Midwifery Competencies

34
  • Midwifery Emergency Skills Program
    • Post Partum Haemorrhage
    • Shoulder Dystocia
    • Hypertensive Disorders Of Pregnancy
    • Contraception
    • Approach To Abortion
    • Antenatal Fetal Assessment
    • Postpartum Hemorrhage
    • Caring For Sexual Assault Survivors
    • Antepartum Bleeding
    • Fetal Well Being
    • Breech
    • Twins
    • Anaphylaxis
    • Cord Prolapse
    • Communication
    • RBC Alloimmunization
    • Upper Genital Tract Infection
    • Vulvovaginitis
    • Prenatal Screening And Diagnosis
    • Intrauterine Growth Restriction
    • Medical And Surgical Complications Of Pregnancy
    • Multifetal Pregnancy
    • Postpartum Care
    • Introduction And Preparation For The Physical Examination Of Female Genitalia
    • Management Of The Infertile Couple
    • Speculum Examination
    • Performing A Pap Smear
    • Evaluation Of A Patient With A Pelvic Organ Prolapse
    • Bimanual Examination
    • Pelvirectal Examination
    • Pregnancy Hypertension
    • The Perimenopause
    • Inspection And Palpation Of External Genitalia
  • Perinatal Health
    • SOGC Guidelines: Diagnosis, Evaluation And Management Of The Hypertensive Disorders Of Pregnancy

Physiotherapy Competencies

13
  • Clinical Competence Based Simulated Physiotherapy Learning
    • Intermittent Positive Pressure Breathing/BIRD
    • Manual Techniques: Assisted Cough
    • Pneumonia In Motor Neurone Disease
    • Aspiration Pneumonia In Trauma
    • Clinical Competence Skill Set- SCI Respiratory Assessment
    • Respiratory Anatomy And Physiology
    • Basic Oxygen Therapy
    • Basic Respiratory Assessment
    • Suctioning
    • Manual Techniques: Vibrations
    • Manual Techniques: Percussion
    • Manual Hyper-Inflation (MHI)
    • Clinical Competence Skill Set – Assisted Cough

Interprofessional Skills

33
  • Home Care
    • Teaching Home Tracheostomy Care
    • Teaching Home IV Self-Administration
  • Goals of Care & Advance Care Planning
    • Goals Of Care & Advance Care Planning
  • Sterilization and Disinfection
    • Infection Prevention Principles In MDRD
    • Medical Device Reprocessing – An Introduction
    • Infection Prevention
    • Disinfection
    • Decontamination Process
    • Sterilization 1
    • Sterilization 2
    • Sterilization IUSS (Flash)
    • Sterilization Table Top Steam
    • Sterile Storage And Distribution
  • Communication Skills in ACLS & ATLS
    • Introduction To Human Factors
    • The Nature Of Human Error
    • Inter-Professional Communication Skills During Implementation Of ACLS And ATLS Simulation Session
    • Introduction To METIMan
  • Communication Skills in a Simulation Session
    • Practicing Resuscitation And Communication Skills, In An Inter-Professional Simulation Session
    • Communication
    • Team Management
  • Mobile Medical Unit
    • VANOC 2010 Medical Services
    • Introduction To The Mobile Medical Unit – History And Planning-Dr. jack Taunton
    • Summary Of Whistler Polyclinic And Mobile Medical Unit- Dr Ross Brown
    • Mobile Medical Unit Orientation To Physical Lay Out And Patient Flow (Emergency, Critical Care/Pre/Post Operative/Operating Room)
    • Olympic/Paralympic (2010), MMU Blood Education Overview- Dr. Kate Chipperfield, MD
    • Transfusion Medicine Services
    • Trauma Evaluation And Management (TEAM)
    • Abdomen-Stab Wound Case
  • Medical Device Reprocessing
    • Introduction To Reprocessing
    • Decontamination Process
    • Disinfection
    • Infection Prevention
    • Sterilization

Introduction to Simulation

38
  • Introduction to Simulators and simulation Technology
    • Patient Simulation Sessions
    • Introduction To Laerdal SimMan 3G
    • Introduction To METI SurgicalSim
    • Introduction To Laerdal SimMan Essential
    • Introduction To METI Baby Simulator (BabySim)
    • Introduction To METI Emergency Care Simulator (ECS)
    • Introduction To METI Human Patient Simulator (HPS)
    • Introduction To METI Pediatric Simulator (PediaSim)
    • Introduction To METI Pelvic ExamSim
    • Introduction To Simbionix GI Mentor II
    • Introduction To Simbionix PERC Mentor
    • Introduction To Simbionix URO Mentor
    • Introduction To Surgical Techniques Work Benches
    • Introduction To VIST
    • Introduction To Harvey Cardiopulmonary Simulator
    • Introduction To Syndaver Surgical Patient
    • Introduction To Laerdal SimBaby
    • Introduction To Laerdal Sim Man 3G
    • Introduction To Laerdal SimMan
    • Introduction To METIMan
  • Fellowship Lectures
    • Stress and Human Performance by Eric David
    • Workload Management by Eric David
    • Communication by Eric David
    • Team Management by Eric David
    • Theoretical Basis of Simulation in Health Education by Dr. Qayumi
    • Developing a Sim Centre by Dr Qayumi
    • Curriculum Development by Dr. Qayumi
    • Introduction to Human Factors by Eric David
    • The Nature of Human Error by Eric David
    • Situational Awareness – The Cornerstone of Error Prevention by Eric David
    • Fatigue and Human Performance by Eric David
    • Advancements in Simulation Debriefing by Dr. Adam Cheng
  • Scientific Method and Applied Statistics
    • Introduction To Scientific Method
    • Scientific Methods EPA 8 Lecture 1
    • Scientific Methods EPA 8 Lecture 2
    • Scientific Methods EPA 8 Lecture 3
    • Scientific Methods EPA 8 Lecture 4
    • Applied Statistical Tutorial

Surgical Competencies

7
  • Basic Surgical Techniques Competencies
    • Ch 1 – Introduction to Basic Surgical Instruments
    • Ch 2 – Handling of Surgical Instruments
    • Ch 3 – Knot Tying Techniques
    • Ch 5 – Aseptic Techniques And Operating Room Conduct
    • Ch 6 – Basic Surgical Procedures
    • Ch 4 – Wound Management Techniques
    • Ch 7 – Laparoscopic Surgical Techniques

CyberPatient Experts Series

75
  • Approach to Imaging and Understanding of Different Imaging Modalities - Dr. Savvas Nicolaou
    • Approach to chest X-ray imaging and acute chest pain
    • Approach to the interpretation of the abdominal radiograph and approach to imaging of the acute abdomen.
    • Approach to brain imaging
  • Diagnostic and Procedural Imaging
    • Radiology
      • Radiology Of The Spine
      • RADIOLOGY IN PMP
      • MSK Imaging
      • Abdominal Imaging Anatomy
      • Metabolic Bone Disease Imaging
      • Radiology Of The C Spine
      • Overview – Thoracic Imaging
      • Bone Tumor Radiology
      • Practical Emergency Radiology
      • MRI Of The Knee
      • Radiological Modalities
      • Basic Approaches To Chest Radiology
      • Gout, Arthritis & Fractures
      • Approaches To Chest XRAY In Heart Disease
      • Introduction To Neuroimaging
      • Thoracic Imaging – Radiological Anatomy Of The Chest
      • Anatomy Of The Pelvis And Skull
      • ACR Appropriateness Criteria
    • Pulmonary Radiology
      • Respiratory
    • Ultrasound
      • Musculoskeletal Radiology
      • ACR TIRADS
    • Ultrasound Guided Nerve Block PEM Course
      • Bier Block Course
      • Adverse Reactions & Complications Of Peripheral Nerve Blocks
      • Physics Of Ultrasound
    • Ultrasound Guided Regional Anesthesia
      • Ultrasound Guided Blockade Of The Ilioinguinal And Iliohypogastrics Nerves
      • Physics Of Ultrasound
    • Ultrasound-Guided Emergency Medicine Procedures, Advanced Course (UGEMP-Advanced)
      • Ultrasound Guided Abscess Diagnosis And Drainage
      • Ultrasound Guided Arthrocentesis
      • Ultrasound-Guided Lumbar Puncture
      • Ultrasound Guided Paracentesis
      • Ultrasound Guided Foreign Body Identification And Removal
  • Laboratory Medicine
    • Thyroid Laboratory Testing Lectures- Dr. Sophia L. Wang, MD
    • Adrenal Hypertension Lectures- Dr.Daniel Holmes, MD
    • Scientific Basis Of Lipid Disorders Lectures- Dr. Daniel Holmes, MD
    • Immunoglobulins Lectures- Dr. William E. Schreiber, MD
    • Autoantibody Testing In SARDS Lectures- Dr. Micheal C. Nimmo, MD
    • Complete Blood Count (CBC) Interpretations Lectures-Dr. Tyler Smith MD
    • Introduction To Coagulation-Dr. Tyler Smith MD
    • Transfusion Medicine Basics-Dr. Kate Chipperfield MD
    • Transport For Microbiology Labs-Michael Payne
    • Introduction To Mycology- Michael Payne
    • Laboratory Diagnosis Of Viral Infections- Dr. Christopher Lowe, MD, FRCPC
    • Evaluation Of Acid Based Status lectures – Dr. William E. Schreiber, MD
    • Disturbances In Plasma Sodium Lectures- Dr. Daniel T. Holmes, MD
    • Lab Testing In Diabetes Lectures- Dr. Sophia L. Wang, MD
  • Learning in Healthcare Education Series - Dr. Karim Qayumi
    • Curriculum Development
    • Gamification in Education
    • Fundamental Theories Behind Education
    • Exploring Competency-based Education
    • Post-Series Q+A
  • Pharmacology and Therapeutics
    • Gastrointestinal Pharmacology Lectures- Dr. Andrew Horne, MD
    • Endocrine Pharmacology- Dr. David Miller, MD
    • Anticancer Pharmacology- Dr. Jennifer Shabbits, MD
    • Pharmacology Of Antimicrobial Agents- Dr. David Godin
    • Pharmacology Of Antiepileptics- Dr. Andrew Horne
    • Quantitative Pharmacokinetics Lectures- Dr. David Godin, MD
    • Pharmacology Of The Autonomic Nervous Systems- Lectures Dr. Micheal Walker, MD
    • Cardiac Pharmacology Lectures- Dr.Michael Walker, MD
    • Diuretics Lectures- Dr. David Godin, MD
    • Pharmacology Of Local Anaesthetics Lectures- Dr. David Godin, M
    • Pharmacology Of Inhaled Anaesthetics Lecture- Dr. Peter T. Choi, MD
    • Pharmacology Of Antidepressants- Dr. Dean Elb
    • Pharmacology And Anxiety- Dr. R. Randhawa MD
    • Pharmacology Of Antipsychotics-Dr. Ric M. Procyshyn
    • Variability In Response To Drugs-Dr. David Godin
    • Fundamental Concepts Lectures- Dr. David Godin, MD
  • Surgical and Medical Ethics Series - Dr. Alberto Ferreres
    • Medical Ethics and Bioethics 101
    • Patient-physician Relationship and Communication
    • How to Deliver Bad News
    • Medical Futility
    • The Surgical Informed Consent Process
    • Surgical Ethics: Principles and Practice
  • Home
  • Docs
  • Introduction to Simulation
  • Introduction to Simulators and simulation Technology
  • Introduction To VIST
View Categories

Introduction To VIST

9 min read

VIST #

#

Description #

This is an introductory unit that provides the important information on the set up and clinical features of the Vist endovascular simulator in order to enhance the comfort level of the trainees in the simulation environment and help them to acquire the technical skills to use the simulator more effectively.

Learning Objectives #

To understand the technical fundamentals of using the Vist endovascular simulator.

Introduction #

VIST™, Vascular Intervention System Trainer, reproduces the physics and physiology of the human cardiovascular system such that a person can learn to perform various procedures such as cardiac catheterisation. The simulator is a generalized solution to endovascular simulation. The initial content scenarios focus on coronary, carotid, renal intervention and stenting as well as pacemaker lead placement. This simulation is combined with a haptic interface to give the user a natural, correct way to interact with the simulation. In addition there is an instructional system coupled to the simulation that provides a framework for learning from the simulation.The training system consists of the software simulation of the cardiovascular system, the haptic interface device, the instructional system and two monitors, one for the synthetic x-ray and one for the instructional system. The simulation consists of units replicating the hemodynamics, blood flow and dye contrast media mixing, and catheter-vasculature physical interaction. In addition, a unit produces a synthetic x-ray image to replicate the fluoroscopic image used by interventional cardiologists to guide them during their work.

Overview of Equipment #

The simulator is currently set up on a stationary table with its monitors on top of the boxes that contained the system when it was delivered to the centre. It will be moved to a mobile workstation for ease of use and transport in the near future.

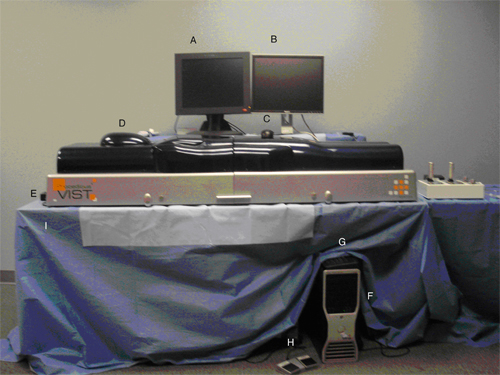
Figure 1: VIST setup with tools laid out on adjacent table

The following equipment accompanies the simulator:

A. Monitor (on left): User interface screen. Once the program has been started and the user has logged in and chosen a case to simulate, there will be eight tabs at the top of the screen, which can be accessed by clicking on them.

B. Dell monitor (on right): The Fluoro Monitor. It is only active when you press the fluoro pedal. Information such as which unit, status for cineloop, roadmap and autotrack, fluoro position, time and contrast spent are found on this monitor.

C. Mouse: Controls cursor (mouse pointer) on the screens (can go from one screen to the other by simply moving it).

D. VIST Simulator: The equipment is inserted through the port (see figure 2) ONLY AFTER ONE HAS SPECIFIED WHAT EQUIPMENT WILL BE INSERTED BY ACTIVATING THE EQUIPMENT USNG THE TOOLS SELECTION TAB LOCATED ON THE ADMINISTRATIVE MONITOR.

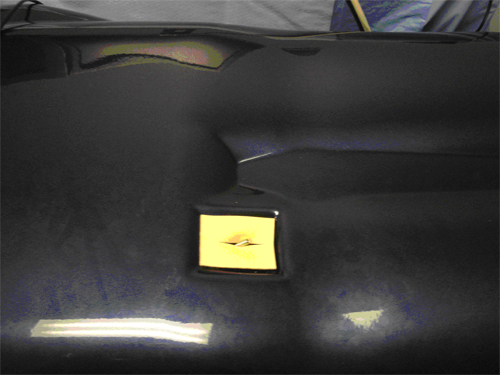
Figure 2: Port that the tools are inserted into.

E. VIST Power Switch: ONLY TURN ON AFTER THE COMPUTER HAS LOADED EVERYTHING.

F. Dell Computer: Only to be turned on, nothing else should be done to the computer.

G. Keyboard: Press F1 when the screen asks you to. Enter your username and password to access your account.

H. Fluoro/Cine pedal: Pedal marked ‘Fluoro’ will activate the fluoroscope, while the pedal marked ‘Cine’ will activate the cineloop.

I. Tables: Physically support the equipment.

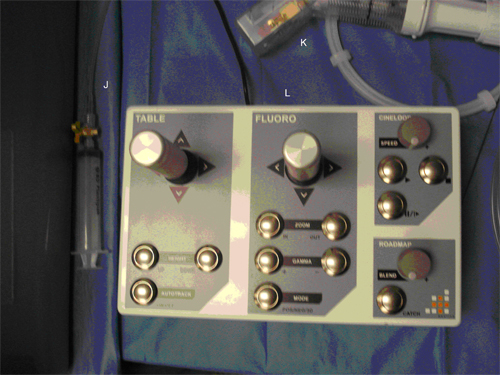
Figure 3: Overhead view of joystick and other tools.

J. Contrast Syringe: Simulates the release of contrast in the patient.

K. Pump: Expands balloons and stents (which are simulated inside the machine, no actual balloons or stents must be put in the machine; they will clog it up and damage it).

L. Joystick: Representation of what is used in actual surgical suits, will accomplish the same tasks in the same desired manor. The functionality controlled by the joystick is the same as on software tabs.

M. Medical Equipment (not in picture): Used during the simulated surgeries ONLY AFTER ONE HAS SPECIFIED WHAT EQUIPMENT WILL BE INSERTED INTO THE MACHINE BY ACTIVATING THE EQUIPMENT USNG THE TOOLS SELECTION TAB LOCATED ON THE ADMINISTRATIVE MONITOR.

Scenario Preparation**** #

Room Policy and Safety Precautions #

Safety Precautions

  • Turn on the Computer and let it load everything before you turn the VIST simulator on.
  • Activate the tools in the tool selection tab before putting them in the simulator.
  • Do not use damaged, bent or soft tipped tools in the simulator.
  • It is of uttermost importance that tools are inserted slowly. If a tool is inserted too quickly the simulator might detect it when it has been inserted some distance (because of fixed time until detection). This could make the tool protrude to long in the device and push onto the end wall, inhibiting further movement.
  • Tools should be moved as carefully as in a real case.
  • When running crm/rav, 0.14” guidewire should always be through and in front of the lead tip. 
  • Remove all tools from the VIST simulator BEFORE EXITING THE CASE.
  • Do not yank on anything if it gets stuck.

Troubleshooting

  • If anything isn’t working get a technician.

Technical and Functional Aspects of VIST #

In this section, we will first introduce the VIST and supporting technical equipment through images. After completing this unit, we want you to be able to recognize each component of the VIST and be able to use each component properly. As well you should be able to start up the simulator and also to be able to shut it down properly. Click on Next Page on the top or bottom of the screen, or use the Content Navigation window to the right of the screen to access the startup and shutdown procedures for the VIST, followed by the comprehensive instructions on the use of the accompanying peripheral devices and software. If at anytime you have a question, please ask CanHealth staff immediately.

Startup Sequence #

Start Up:

  • Sign in at the front desk of CanHealth.
  • Press the power button on the computer (located under the table, possibly covered with the blue smock).
  • When prompted by the screens, press F1 on the keyboard (which is located on top of the computer terminal. If there is nothing on the screens, get a technician)
  • Wait for the Windows operating system to load completely (everything will be at rest on the screen when the load has been completed, i.e. there will be no more pop ups and all previous pop ups will have disappeared) then press the power button on the VIST simulator (which is located on the left side of the mannequin).
  • Double click on “VIST – Neuro” to access neurological procedure simulation or “VIST generic” to access all other simulation cases that are available.
  • Login with your username and password and choose a type of surgery by clicking on it, then choose a specific case and click the arrows to start the case.

Note: If one does not have a username and password then one should request them from one’s instructor, only after one has gone through an orientation and explanation of the simulator. Once one has been assigned then one should remember them. Instructors will be given an administrative account while residents and fellows will have student accounts. The administrators will be able to create courses and assign specific curriculum to student accounts, while those with student accounts can access their assigned curriculum and complete the cases within.

Software:

Dell monitor (on right):

  • Once a case has been started there will be various tabs that appear on the left side monitor, which one can choose from in order to complete the surgical simulation.
  • The first tab that will appear when a case is chosen is the journal tab; this tab has a basic description of the case that has been chosen.
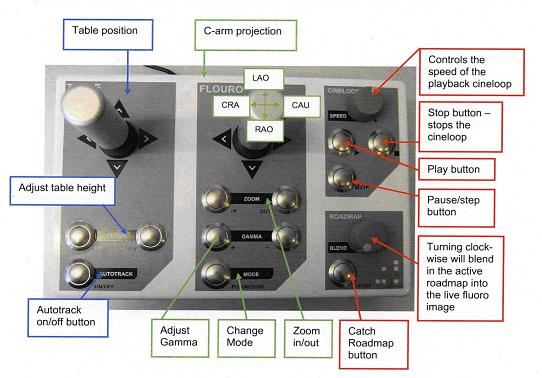
  • The ‘Table/Fluoro’ tab will allow the user to change the table and C-Arm position, zoom in and out, adjust gamma and decide which mode of viewing to use, positive, negative or 3d-Mode. Autotrack is a function that is unique to the simulator; it follows the furthest tip of the furthest tool. It is turned on by default and can be turned off by pressing the Autotrack button. In the Neuro program, the autotrack is automatically turned off when the table is moved or the cineloop is activated. The Status of the Autotrack can be viewed on the right hand screen.
  • The tool selection tab is the next tab to the right. It is very important to select the tools on this tab before you insert it into the VIST device. NOTE! NEVER INSERT BENDED OR SOFT TIP TOOLS INTO THE SIMULATOR. THE TIP SHAPE IS ADDED IN THE SOFTWARE WHEN YOU MAKE THE TOOL SELECTION ON THIS PAGE. THE BENDED TOOLS MAY DAMAGE THE SIMULATOR!
  • The Cineloop tab. It is used for recording one or several clips from the fluoro. After recording a cineloop one can play, pause the cineloop, increase and decrease the speed and swap between cineloops.
  • The Roadmap tab is used to take a snapshot from the fluoro screen. One does this by clicking on the ‘catch’ button to either catch the paused cineloop or the active fluoro picture. One can catch as many roadmaps as they would like and can scroll through them with the arrows. There is a slider that can be used to blend in the roadmap. The roadmap will not appear until the fluoro is once again activated.
  • The ‘Ruler’ tab has a button that can be used for turning a ruler on and off that can be used to estimate the size needed for a balloon or stent. It cannot be moved or rotated, it will automatically appear next to a lesion.
  • The ‘About’ tab describes which version of different software is used in the system.
  • The last tab is ‘Exit’. REMOVE ALL TOOLS BEFORE EXITING. One can exit the current simulation by pressing the button that appears once the ‘Exit’ tab has been selected.

Shutdown Sequence #

  • Remove all tools from the VIST simulator BEFORE EXITING THE CASE.
  • Exit any current case that you are undertaking.
  • Click the arrows that are pointing to the left until you see an option on the top right of the screen to logout. Click ‘Logout’.
  • Click ‘Exit’ which will have taken the place of ‘Logout’ on the screen layout.
  • Click yes, when prompted, “The Web page you are viewing is trying to close the window. Do you want to close the window?”
  • Click, Start, then Turn Off Computer and Turn Off.
  • Turn off the VIST.
  • Replace all equipment in proper location.
  • Sign out at the front desks of CanHealth.
Introduction To Laerdal SimMan 3G
Table of Contents
  • VIST
  • Description
  • Learning Objectives
  • Introduction
  • Overview of Equipment
  • Scenario Preparation****
  • Room Policy and Safety Precautions
  • Technical and Functional Aspects of VIST
  • Startup Sequence
  • Shutdown Sequence
Educational Resources
  • Dashboard

© Copyright - CyberPatient 2024