URO Mentor #
#
Description #
This is an introductory unit that provides the important information on the set up and clinical features of the URO Mentor in order to enhance the comfort level of the trainees in the simulation environment and help them to acquire the technical skills to use the simulator more effectively.
Learning Objectives #
At the end of this unit trainees will master the use of URO Mentor which includes the following:
- 1. URO Mentor setup and supporting equipment.
- 2. Room Policy and safety precautions.
- 3. Technical and Functional aspects of URO Mentor.
- 4. Clinical aspects of URO Mentor.
URO Mentor and Supporting Equipment #
This section will help you to get familiar with the simulation environment by providing the information on the set up of Simbionix URO Mentor and the equipment that is available during the simulated sessions.
The simulator is accompanied by three scopes, all of which are attached at the same time and each of which performs different tasks. Each scope admits one diagnostic tool at a time and each has the camera attached to the front of the scope.
There are additional tool channels accompanying the simulator located on the working table.
The system simulates four different scopes. There is a rigid cystescope and ureteroscope that serve as the tools for their simulated counterpats, as well as a flexible scope that serves as the tool to simulate both a flexible cystescope and ureteroscope.
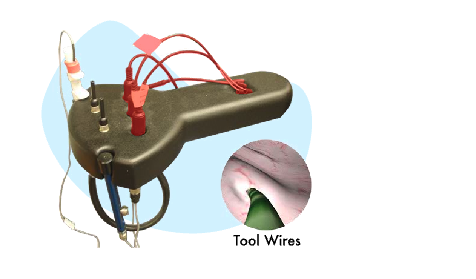
The wires are inserted into the tool channels of the scopes. The white tool controls the baskets and balloons, while the blue tool controls the forceps.
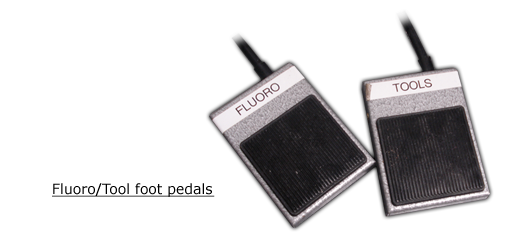
If any tool requires electricity this is provided by the Tool foot pedal. The fluoro foot pedal will provide the fluroscopic image.
Room Policy and Safety Precautions #
This section provides the information on simple care and maintenance steps that will help to ensure the simulator stays in good working condition.
Each time you use the simulator:
- Before you begin working with the scope, ensure that the tool handle is facing outwards so that it is not damaged when you remove it from its holder.
- Use only the tools that accompany the simulator, and use these tools solely with the simulator.
- Do not lubricate or sterilize the endoscopes.
- Use the utmost caution when handling the endoscopes as they can be irreparably damaged if dropped or otherwise impacted.
- When the endoscopes are not in use, make sure that they are either placed securely on the holder with the tip not touching the ground or stored in their case.
- Insert the wires slowly and gently to prevent damage as the tools will be visible after only a few centimeters of wire is inserted.
- Do not lean on the simulator.
- NO FOOD OR DRINK IN SIM Room.
Troubleshooting: #
- If anything is not working get a technician.
- If further instruction is needed in how to operate the system, please ask CESEI staff for more clarification.
Technical and Functional aspects of URO Mentor #
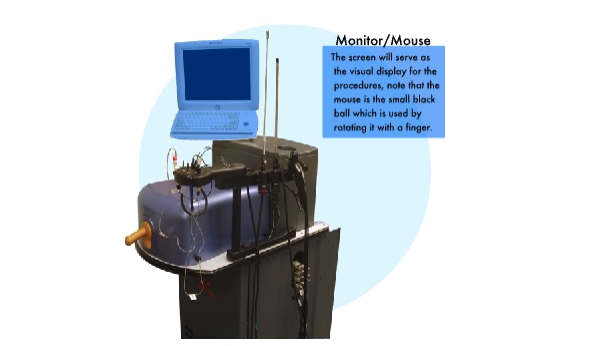
In this section, we will first introduce the URO Mentor and supporting technical equipment through images from different perspectives. After completing this unit, we want you to be able to recognize each component of URO Mentor and be able to use each component properly. As well you should be able to start up the simulator and also to be able to shut it down properly. Click on Next Page on the top or bottom of the screen, or use the Content Navigation window to the right of the screen to access the startup and shutdown procedures for URO Mentor, followed by the comprehensive instructions on the use of the accompanying peripheral devices and software. If at anytime you have a question, please ask CanHealth staff immediately.
Startup and Shutdown Sequences #
This section will inform you on the proper start-up and shut down sequences, which are quite simple.

Software Navigation #
This section will describe the proper use and navigation of the software, as well as detail the combined use of the software with the accompanying equipment.
Beginning Work with the Simulator: #

Working with Virtual Patient Case: #
Tool Usage: #
When we require the use of a tool, we must Press on the desired icon in the Tools & Accessories menu. A sub-menu will open from which, we select an item by pressing on it. If there is a further sub-menu providing different tool diameters, that sub-menu will open, allowing us to make our selection in the same fashion. After we have selected the tool from the tools menus, we must select one of the wires on the working table and insert it into one of the tool channels, either on the working table or on the scope. The wires must be inserted slowly and gently into the channel until it appears on the screen.
Now that we have activated the tool and inserted it properly we may work with the scope and the tool wire to position the tool or accessory where needed. If the tool that we have chosen requires electricity we may activate it by pressing the Tool foot pedal. The fluoroscopic image will not appear in the circle on the right until either the Fluoro button or the Fluoro foot pedal is pressed; a beeping sound will indicate the Fluoro is in use. When we have finished with the tool, we gently remove it from the tool channel to finish
In many cases, a guide wire will be the first accessory to be entered after the initial scope. In general we should select a short wire, and insert it into a channel on the working table. Working in this fashion will allow us to remove the scope we began with and insert a different scope without removal of the guide wire from the system. Once the guide wire is in place we can use it to assist in the insertion of an ureteroscope. This in done in the following fashion
- With the guide wire in place, remove the initial cystoscope.
- Select an alternative scope. Under the picture of the ureteroscope on the screen will be two check boxes for selecting ‘over the wire’ or ‘alongside the wire’.
- Press the appropriate check box to indicate the method of scope insertion either over or alongside the guide wire.
- Insert the ureteroscope and begin moving forward to continue performing the procedure.
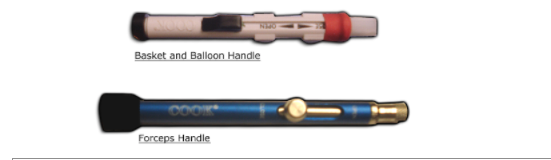
Baskets, Forceps, and Balloons
To operate the baskets, forceps or balloons we must first maneuver the tool to the desired position. Then we must choose the correct tool handle (white for basket/balloon, blue for forceps). With the correct handle we can open and close the tools by sliding to the positions marked on the tools.
Electrode
To operate the electrodes you must first maneuver the tool into the desired position using the tool wire and scope. Now from the control panel beneath the fluoroscopic view, we must select either cut or coagulate. The electrode can then be activated when we press on the Tool foot pedal.
Fluid Controls
In order to inject contrast into the virtual patient we must first select the method for injecting contrast agent (Antegrade/Retrograde) from the lower control panel on the right side of the screen. Now we can press on the syringe icon under the fluoroscopic view; each press on the button will inject 2cc or 5cc of contrast agent depending upon the method chosen. This will cause contrast agent to be injected via the scope tip. Now when we press on the fluoro foot pedal or the X-ray button, the current fluoroscopic image after contrast agent injection will be displayed.
As in real life, the simulator enables us to improve vision with irrigation pressure and by draining fluids, by flushing with a 20 cc injection of irrigation fluid through the endoscope tip or by controlling the mmHg of irrigation pressure. This is done if we press once on the Flush button. With the simulator, fluids may be drained by removing the flexible scope and then reinserting it as in real life. Or if we press on the Drain button we accomplish the same effect without removing the scope when using either flexible or rigid scope. To increase or reduce irrigation pressure we press on the – or + buttons on either side of mmHg at the far right of the screen.
C-arm Control
If we wish to manipulate the fluoroscopic image we can click on the image of the table and fluroscope located near the bottom right of the screen on the window containing the fluroscopic view. A large view of the table and fluoroscope along with the patient will now appear over the left window. We can then select the appropriate control arrows in the centre of the screen to move the C-arm cranially, caudally, towards or away from the patients head, right or left or to rotate the C-arm.
Image Control
There are a number of image controls that can be accessed by clicking the image control button on the top right of the window. These include a variety of manipulation such as rotation of the image and toggling between a positive and negative fluoroscopic image.
Saving Data #
Once you have finished a scenario your data that accords to your performance has been saved so that you may review it at a later date. You can review your report and see how you did on the most recent procedure as well as revue your past procedures. This information is accessible via, the My Info tab on the top of the screen or via the procedure specific information is accessible in the Results tab of the chosen procedure.