Welcome to BabySim #

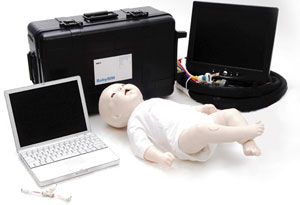
BabySim setup and supporting equipment #
This section will help you to get familiar with the simulation environment by providing the information on the METI BabySim Unit and medical equipment/supplies that are available during the simulated sessions.
Room Policy and Safety Precautions #
This section provides the information on simple care and maintenance steps that will help to ensure mannequin stays in good working condition.
Each time you attend the Simulation program and use the simulator:
- Avoid using writing instruments and sharp objects while standing over the patient mannequin, to prevent markings, snags and rips in the skin.
- Use only distilled or sterile water for injection.
- Position the mannequin horizontally and do not place anything on top of it.
- Avoid improper and aggressive use of equipment in event of difficult airway and intubation.
- While using defibrillator or pacer, it is better to use lower energy levels.
- Avoid giving fluid or inhalers through the mouth.
- NO FOOD OR DRINK IN SIM Room
Troubleshooting: #
- If anything is not working get a technician.
- If further instruction is needed in how to operate the system, please ask CanHealth staff for more clarification.
Technical and Fundamental Aspects #
For Instructors (For Trainees to be familiar with only)
In this section we will cover the Startup and Shutdown Sequences for BabySim. If you encounter problems or have any questions, please contact CanHealth staff.
The BabySim consists of the following components:
- BabySim simulator
- PCU Box
- Patient Monitor
- Instructor Workstation (Laptop)
- Remote Workstation (Laptop)
- Compressor
Updates to the BabySim
The current version of the BabySim uses the MUSE software. If you purchased BabySim before the release of MUSE, you will have to continue to use the previous BabySim software. There will be an additional charge to upgrade to MUSE.
In addition, the current BabySim uses one laptop to run MUSE, and one workstation to run the TouchPro patient monitoring software
Startup Sequence #
Cable Connections #
- As the BabySim is more portable than the Human Patient Simulator (HPS) and Pediatric Simulator (PediaSim), sometimes it is moved around and cables are unpluged.
- Please ensure the following cables are connected:
A power plug from the BabySim PCU to a power outlet.
A tube from the compressor to the BabySim PCU
An umbilical cord from the BabySim mannequin to the umbilical cord outlet on the Babysim PCU.
Fluidic/Pneumatic umbilical cord to the BabySim PCU.
A cable from the Macbook (Instructor’s workstation)’s network outlet to the Workstation outlet on the BabySim PCU.
The Compressor
- Turn on the ventilator located underneath the table of the BabySim patient simulator.
Turn on the Macbook (Instructor’s Workstation) #
- Power on the Macbook
- If prompted for a log in name, select “HPS User” for the name and hps (all lowercase letters) for the password.
- The software should launch automatically. If not, click on the METI HPS icon (the orange icon with the black arrow) to launch the software.
 #
#
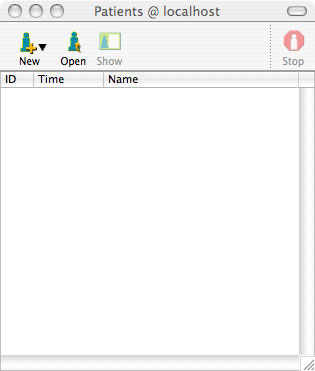
When the software starts, you will see the window below. Click Open.
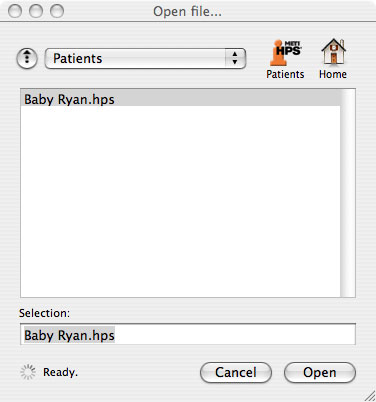
Click on Baby Ryan.hps. The selection window will then show your Baby Ryan. Then click on Open at the bottom of the window.
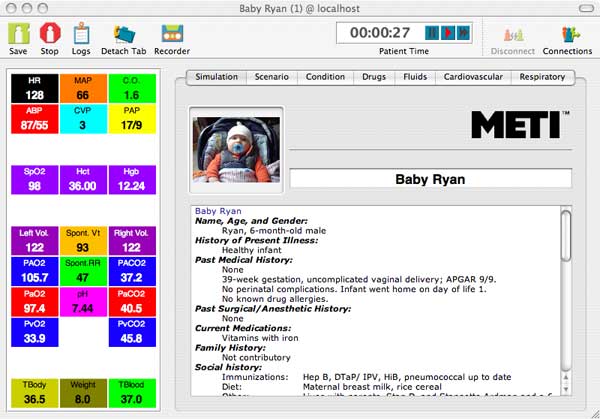
You will see Baby Ryan’s profile below. Please click on Connections on the top right hand corder of the screen.
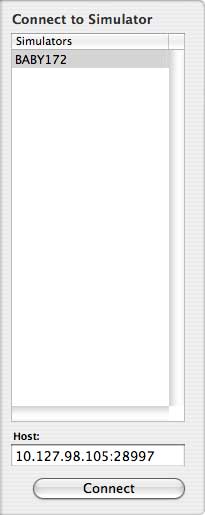
Wait for Baby172 to appear under the Connections Tab. Click on Baby172, and then click on Connect at the bottom of this screen.
- Make sure the external monitor is connected to this Macbook.
- Turn on the external monitor.
- Click on the waveform icon to activate the waveforms and vital signs on the external monitor. (The 3rd icon from the left).
 #
#
Turn on the 2nd Macbook (Remote Control)
- Power on the Macbook.
- If prompted for a password, select HPS User for the name and hps (all lowercase letters) for the password
- The software should launch automatically. If not, click on the METI HPS icon (the orange icon with the black arrow) to launch the software.

- When the software starts, you will see a window saying Connect to Patient Model
- Click on the entry inside the Patient Model. Then click CONNECT.
- Click on SHOW.
- You will see Baby Ryan’s profile below.

Congratulations. You have successfully completed the startup sequence. You are now ready to begin a simulation scenario. #
Shutdown Sequence #
Shut down the software and both Macbooks #
- Click Stop in the Patient Window of the Macbook. When prompted to save, select Don’t Save.
- Click on the Waveform Display menubar and select Quit Waveform Display.
- Once the waveform has been shutdown, press the power button on the external monitor to turn it off.
- Quit the software by clicking on HPS on the top menu bar and selecting Quit HPS.
- Shut down both Macbooks by click on the Apple incocn and selecting Shutdown.
Disconnecting cables and power #
- Turn off the compressor.
- Turn off the blackbox.
- Disconnect all cables from the BabySim PCU.
- Clean up the mannequin.
CanHealth staff will shutdown all audio/visual equipment #
- Cameras, microphones, LCD screens, plasma screens, etc.
Introduction to BabySim (Clinical Features and possible interventions) #
The BabySim is very similar to the adult ECS in terms of features, equipment, and software. These are the main highlights of the BabySim.
- Bulging fontanel capability
- Blinking eyes, with variable pupil size
- Liquid secretion from eyes, ears, and mouth
- Realistic airway
- Pre-recorded sounds such as crying, laughing, screaming
- Trachea with realistic anatomical landmarks
- Chest excursion
- Chest rise and fall during breathing
- Heart and breath sounds
- Unilateral needle decompression and chest tube insertion
- Bilateral brachial and femoral pulses
- Bowel sounds
- Interchangeable genitalia
- Unrine output
Airway #
These are the basic airway features of the BabySim.
- Hard and Soft Palate
- Oropharynx
- Nasopharynx
- Laryngopharynx
- Conical Trachea
- Carina
- Clinical Device use such as a LMA
- Spontaneous and Mechanical Ventilation
Thorax & Periphery #
These are the main features of clinical intervention
- Bilateral Chest Excursions
- Bilateral Breath Sounds —normal and abnormal—synchronized with breathing and ventilation
- Seesaw breathing
- Synchronized Heart Sounds (normal and abnormal)
- Chest Compressions – generate palpable pulses, artificial circulation, cardiac output, peripheral blood pressures, and CO2 return
- 3-Lead ECG Monitoring
- Transthoracic Pacing
- Synchronized Cardioversion
- Defibrillation
- Needle Decompression (unilateral)
- Chest Tube Insertion with Drainage(unilateral)
- Auscultation of Karotkoff Sounds
- Bowel Sounds
- Four Bilateral Pulses (brachial and femoral)
Trauma #
These are the main trauma features
- Laryngospasm
- Bronchial Occlusion
- Esophageal, Nasal and Oral Intubation
- EndTidal CO2 Detection via Colormetric Device (ETCO2)
Pharmacology #
The BabySIM mannequin has IV access site (Femoral) and a specific infant drug library designed to isolate critical pharmacology learning objectives. The BabySIM does NOT have the automatic drug recognition system of the HPS, PediaSim HPS, or SimMan 3G.
Additional Features #
- Oropharyngeal Intubation
- Nasopharyngeal Intubation
- Bag Valve Mask Ventilation
- Laryngoscopic Procedures
- Endotracheal Tube Intubation