Description #
Basic information for Table Top Sterilizers – Compact steam sterilizers that have a chamber volume of not more than 2 cubic feet and generates their own steam when distilled or deionized water is added by the user. (JB)
Learning Objectives #
- 1. Introduction to Tabletop Steam Sterilization (JB)
- 2. Preparing devices for tabletop steam sterilization
- 3. Device and set assembly
- 4. Packaging Materials
- 5. Labelling packages for sterilization
- 6. Using a Tabletop Steam Sterilizer
- 7. Unloading and cooling a load
- 8. Monitoring a TSS cycle
- 9. Documenting
Introduction to Tabletop Steam Sterilization
As you have learned from previous units, effective sterilization is a process, not a single event. In order for sterilization to be achieved, devices must be properly cleaned and prepared. And once sterilized, they must be correctly stored so that sterility can be maintained until the devices are needed.
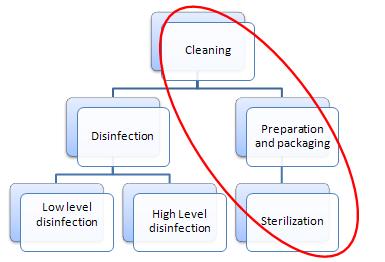
Fig. 1
You have also learned that sterilization can be achieved using a number of different sterilants. These include:
- Steam
- Hydrogen Peroxide gas/vapour
- Ethylene Oxide gas
- Liquid Peracetic acid
- Ozone
The focus of this unit is on steam sterilization using tabletop steam sterilizers (TSS).
What is a tabletop steam sterilizer?
Steam sterilizers come in a wide variety of sizes, and can be grouped into 3 types:
- Floor loading
- Carriage loading
- Tabletop
The Canadian Standards Association defines a tabletop steam sterilizer as one that “has a chamber of volume of not more than 42.5 L (1.5 cubic feet) and that generates its own steam”.
Tabletop steam sterilizers have small chambers and are not connected to water and drain lines. The user adds water to the sterilizer when required, and at the end of the cycle, the steam that was created is vented directly into the room in which the TSS is located. The only service that TSSs require is power (to boil the water to create the steam).
Preparing Devices for Tabletop Steam Sterilization #
Preparing devices for tabletop steam sterilization
Before loading devices into a TSS, you must ensure that they are correctly prepared. Preparation of devices includes:
- Decontamination i.e. cleaning
- Inspection
- Clean
- No damage
- Complete and in working condition
- Presentation for sterilization e.g. disassembly or reassembly according to the device manufacturer’s instructions, protection for delicate and/or sharp devices
- Packaging
The requirements of each of these preparation steps have been covered in previous units. However, in preparing devices for TSS, some reminders are in order.
Device and set assembly
- Position items to ensure that the steam can directly contact to all parts of every device.
- Disassemble all devices with multiple parts (unless the device manufacturer’s instructions for use specify otherwise)
- Make sure that the jaws of instruments are opened or loose, and ratchets are unlocked
- Place concave (cupped) surfaces facing downward or on edge
- Separate nesting surfaces
- Avoid multiple layers of instruments in a set or tray
- Protect sharps. Use a validated product i.e. the manufacturer of the protective product as demonstrated that the protector does not interfere with sterilant contact.
- Add a internal chemical indicator to each package before sterilization
Packaging Materials
There are 2 main types of packaging materials that are used for TSS; wrappers and peel pouches. Whichever packaging materials you chose to use, you need to ensure that they have been validated for steam sterilization. This means that sheeting, newspaper or brown paper bags must not be used. Packaging materials for the various methods of sterilization are described in Unit _____.
Using peel pouches
Peel pouches are made of medical grade paper and plastic-paper one side, plastic the other. They are for small, light items, and are usually used for 1 or 2 instruments. Any more instruments in a pouch create a higher risk for contamination when the pouch is being opened at the point of use.
Pouches come in 2 forms; precut and rolls. Most come with an external chemical indicator pre-printed onto the paper side of the pouch.
Precut pouches are manufactured in various lengths and widths. They are pre-sealed on 3 sides. Once a device and chemical indicator are put into the pouch, the 4 side is sealed with either a self seal or a heat seal. The heat seal is applied using a temperature specific sealer that melts the plastic to the paper backing.
Rolls come in long lengths of various widths. They are pre-sealed on 2 sides. A desired length is cut, the device and chemical indicator inserted between the 2 layers, and both ends are heat sealed.
Using wrappers
In Unit ____ you learned that wrappers can be either reusable or single-use (disposable). Most tabletop sterilizer manufacturers recommend that single use wrappers, either polypropylene or paper, be used. Often reusable wrappers have not been approved (validated) by sterilizer manufacturers for use in TSSs. Before choosing a wrapping material, carefully check the sterilizer manufacturer’s instructions for use.
Wrappers are used to package sets of instruments that are held in trays or cassettes. They can also be used to wrap loose items that are too big for peel pouches, or for multiple items when there is no tray and/or they are too heavy for a peel pouch.
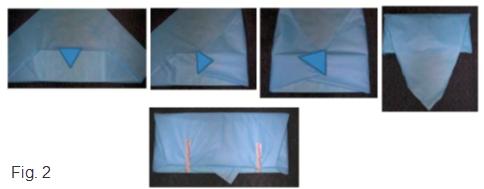
Wrapping techniques for TSSs are the same as you would use for larger sterilizers i.e.
- Use 2 single use wrappers. They can be bound together to make 1, double thickness wrapper, or they may be 2 separate wrappers
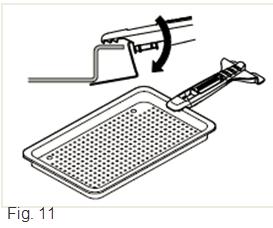
- Apply the wrappers using the envelope wrapping technique shown below.
Wrapped packages are sealed using sterilizer (autoclave) tape. As you know, this tape changes colour after sterilization and provides a visual indication that the package has been processed through the sterilizer. The colour change (unprocessed to processed) may be different among tape manufacturers and so it is VERY IMPORTANT that users, both in the processing area and in patient care areas, know the colour change to expect following sterilization.
CSA Z314.3-14 Effective sterilization in health care settings by the steam process. Clause 5.3.2
Using a Tabletop Steam Sterilizer #
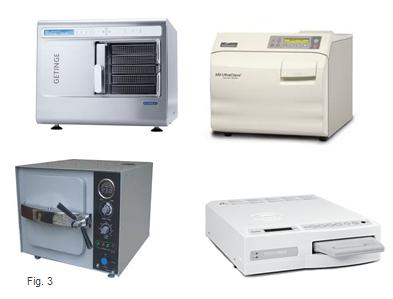
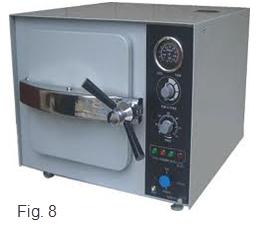
As you can see from the preceding pictures, there are many types and models of tabletop steam sterilizers. Each will have specific operating instructions that must be followed. Refer to your sterilizer Operator’s Manual for complete information.
In spite of the differences, all TSSs have a number of common elements and requirement, and that is what is covered in the following information.
How do TSSs work?
There are 3 basic operating principles of a steam sterilizer that you should be aware of:
- When steam is put under pressure, its temperature will rise
- The higher the temperature, the shorter the time required to kill microorganisms
- All air must be removed from the chamber before sterilization can begin
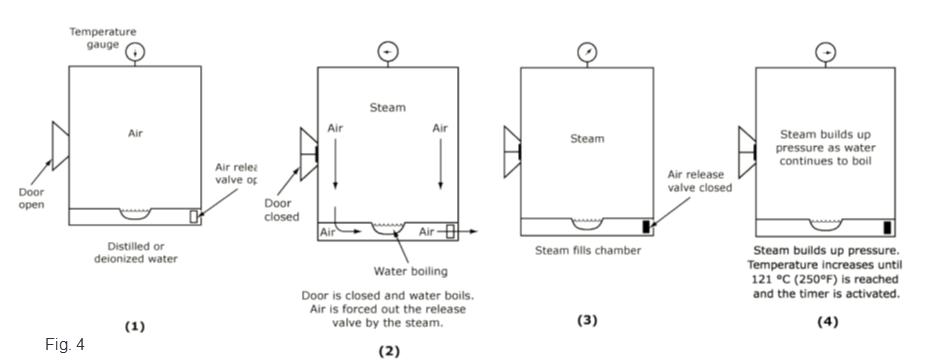
The following figure is a schematic of how table top sterilization is accomplished. As steam is created it pushes air out of the chamber through a release valve. With all the air gone, the release valve closes. As steam continues to build up in the chamber the pressure rises, which in turn increases the temperature.
Correct device positioning in the chamber is essential to ensuring that air is not trapped. You can see from the following diagrams, the difference that positioning can make. When steam fills the chamber from the top and begins to push down on the colder air, if the air is held within a concave shaped device, and cannot flow freely out the drain valve, it will be trapped (Figure on the left). Trapped air cools the steam and can prevent microbial kill. In the figure on the right, the device is positioned so that air trapping does not occur. Air flows out and steam flows in with no cooling. Microbes will be killed.
Load weight limits
Tabletop sterilizers differ from other steam sterilizers in that there will usually be a maximum, total weight specified for a sterilizer load. The maximum weight will be established and documented by the sterilize manufacturer and will be described in the sterilizer operator’s guide. For example, the Statim® sterilizer load limits are as follows
Statim®
Maximum load weight per cycle
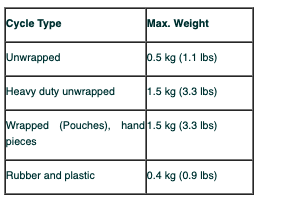
The limits for one brand or model of TSS do not necessarily apply to other brands or models. Nor does a limit for one type of cycle apply to other cycles types in the same sterilizer. You much check the User’s Guide for load limits for your specific sterilizer brand, model and cycle.
Loading a TSS
The principles of loading a TSS are the same as those for loading a larger sterilizer.
Packages should be on edge whenever possible. This is especially important for those containing devices with concave surfaces and solid trays. Only trays that have perforated bottoms may be sterilized flat. Peel pouches should also be on edge. If this is not possible, and they must be sterilized flat, the pouch should be positioned with the plastic side down, paper side up.
Packages should not touch the chamber walls as this can interfere with steam circulation. It can also create points where steam may condense, which in turn can lead to wet packs following sterilization.
They should be loosely packed to allow the steam to circulate freely and get to all parts of all packages in the load. Tightly packed loads can limit steam penetration and microbial kill as well as steam removal at the end of the cycle, leading to wet packs.
Do not stack packages unless you have specific manufacturer’s instructions that have validated this practice. Each layer of packages, be they wrapped trays or peel pouches, should be on a separate shelf.
Positioning aids are available to facilitate loading.

CSA PLUS 1112 Infection Prevention and control in office-based health care and allied services 2004. p 48
*Statim 2000/5000 Cassette Autoclave Operator’s Manual 95-112663 Rev 2.0 SciCan Ltd. 2012
Operating a TSS
Water
A TSS is not plumbed into a facility’s water system. Instead, water is added as required, by the user. Each TSS will have a reservoir, but the location, capacity and measuring system will vary among units.
The following images show 2 examples of fill ports.
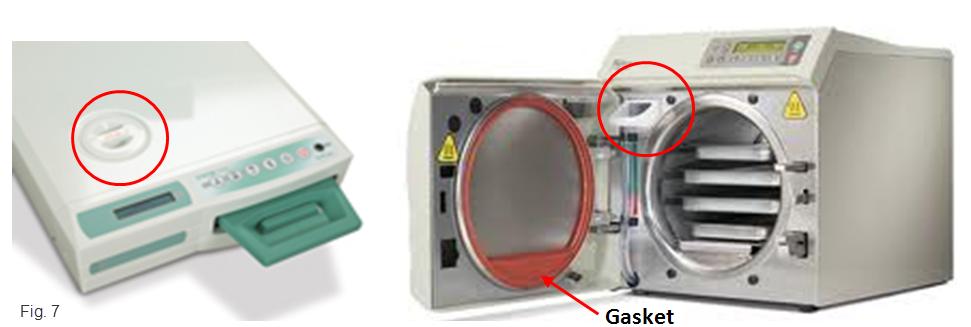
Once again, follow the sterilizer manufacturer’s instructions for use regarding the amount, frequency and type of water for filling. Usually distilled or deionized water is required. In many areas, the mineral content of tap water will create deposits in the chamber and/or valves and so should not be used.
The water reservoir should also be drained regularly. Water that stands for periods of time can develop biofilm, a gelatinous coating that is very difficult to remove and can harbor and protect microorganisms, creating the potential for infection.
Door closure
During the sterilization cycle, the chamber door must be closed tightly in order for pressure to build and the temperature to rise to the point that microorganisms will be killed. A gasket ensures that the seal is tight. After you place a load in the sterilizer chamber, before you close the door, check the gasket to ensure that it is intact. It must be smooth, without tears, nicks or gaps. If not, air could leak in, steam could leak out and in either situation, sterilization would not be achieved.
If the door of your sterilizer has a screw type latch, make sure that it is closed securely.
If the door is not secure, as with a faulty gasket, and air or steam leak could cause a sterilization failure.
Controls and Displays
Every sterilizer will have a means to control the:
- Power i.e. turn it on and off
- Sterilizing/ exposure TIME
- Sterilizing/exposure TEMPERATURE
On newer sterilizers, the controls may be a simple as electronic touch pads. Older models may have mechanical dials and switches. Either way, you must know how to turn the unit on and off, and how to set the sterilization time and temperature.
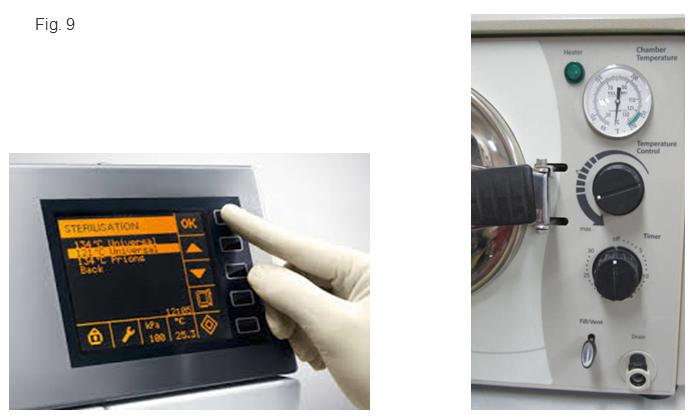
The standard settings for time and temperature will be sterilizer specific. They will depend on the make of the sterilizer, the cycle you wish to run, the device that you wish to sterilize and perhaps even the packaging material. For example, some cycles on some sterilizers require a sterilizing temperature of 121°C and a time of 35 min. Others require 132°C for 5 minutes. You must refer to the User’s Guide for your specific sterilizer and the reprocessing instructions of the device that you want to sterilize to determine the correct combination of time and temperature. Time and temperature requirements are not interchangeable.
On the front of every sterilizer will be a display that will tell you what is happening in the chamber at any given time. At a minimum, the display will show you the time and temperature as the cycle progresses. It may be electronic (above left) or mechanical (above right).
The Printer
A printer will create a hard copy (permanent record) of the conditions in the sterilizer chamber during a cycle. The permanent record is essential for quality assurance purposes. It confirms that conditions for sterilization (i.e. time and temperature) were achieved during a specific cycle. Most new tabletop sterilizers have printers built right into them. However, sometimes printers are sold as an option and purchasers decline the option because of cost. This is no longer an acceptable choice. Quality assurance and national standards of practice require that every sterilization cycle be documented.
Sterilizers that have been in use for many years may not have a printer, and may be so old that a printer cannot be retrofitted. If you are using a TSS that does not have a printer, you should:
- Plan to replace it
- Manually check and record the time and temperature at regular intervals during the sterilization phase of each cycle
- Use a Class 5 chemical integrator in each package in every load (Refer to Unit___ for information on chemical indicator classes)
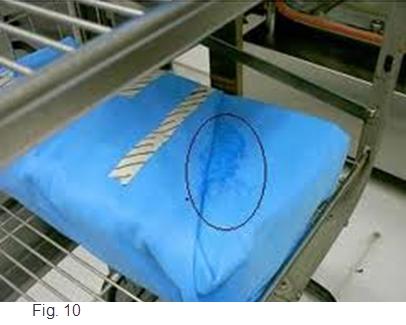
Unloading and Cooling a Load #
Items that have been sterilized must be cooled to room temperature and be completely dry before they are handled. Any moisture remaining in a package following sterilization could allow external microorganisms to penetrate the package and contaminate the contents. A wet package, as shown in the picture below is considered to be contaminated and must be rewrapped and resterilized before it can be used.
Tips to ensure that items in a load are dry:
- Don’t overload the sterilizer at the start of a cycle
- At the end of the cycle, leave the door ajar to allow further drying in the still warm chamber
If you must handle still warm packages
- Perform hand hygiene before touching any packages
- Rather than pick up individual packages, pick up the entire shelf containing the packages. Some sterilizer manufactures make handles that can be used to grab hot shelves.
- If the packages are moved to another area for further cooling, place them on a mesh surface rather than a solid one. The contrast in temperature between a solid surface and the warm packages may cause condensation which in turn will wet the packaging material and cause contamination of the package contents
- Ensure that the cooling area is in a restricted area, away from activity and traffic, and away from cooling vents.
Midmark M9/M11 Installation Operation Guide 003-2546-00 Rev C 12/13/13 Accessed 29 Dec 13
Monitoring a TSS Cycle #
The principles and requirements for monitoring a TSS cycle are much the same as for any other sterilization cycle. TSS cycles are monitored via:
- Displays and Printout
- Chemical Indicators-internal and external
- Biological Indicator
Refer to Unit ___ for detailed information.
There are some specific differences between biological monitoring of a large steam sterilizer and a TSS that you need to be aware of. Wwhen using a biological indicator (BI) for the routine testing of a sterilization cycle, a BI is placed in a process challenge device or PCD. The PCD is sometimes called a test pack. The PCD is designed to mimic the most challenging type of package that is routinely processed in the sterilizer. When using a PCD we assume that if the sterilizing cycle can kill all of the test microorganisms in the most challenging pack, microorganisms in the less challenging packages will also be killed.
The difference between TSS and larger sterilizer testing is that commercially prepared PCDs are available for to test larger sterilizers. There are no commercially available PCDs for TSSs, so users have to make their own. The sterilizer manufacturer’s instructions for use should contain instructions on how to assemble and use a suitable PCD. If you cannot find any manufacturer’s information, there is an excellent article, entitled “Quality Control of Table Top Steam Sterilizers” by Martha Young, published by 3M and available online, that describes and illustrates the testing process that should be followed.
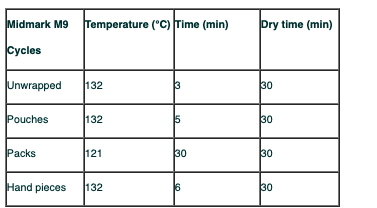
Routine biological testing should be performed every day that the sterilizer will be used, in every type of cycle that will be used that day. For some sterilizers and some facilities, this means that there may number of cycles to be routinely tested every day. For example, a Midmark M9 sterilizer has 4 different cycles that may be run . Because the time, temperature, packaging materials and devices varies with the cycle, each cycle (if it will be used that day) must be tested.
The PCD is usually placed in a fully loaded chamber, in the 1st load of the day.
Similarly, a Statim® sterilizer has 4 different cycles to choose from. All cycles that will be run during a day should be tested.
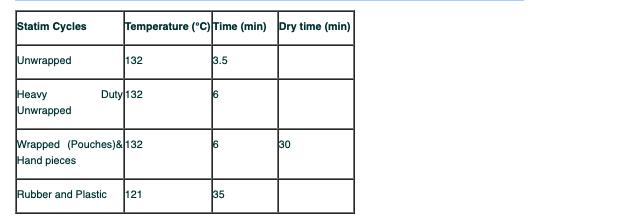
Note the differences in cycle parameters (sterilizing times and temperatures) and load items between the various Midmark M9 and Statim® cycles.
Documenting
The results of all cycle monitoring measures and test results must be documented. And the documented results must be linked to the items in the cycle load. Refer to Unit ___ for detailed information regarding the documentation of sterilization cycles and loads.
Young, Martha. Quality Control of Table Top Steam Sterilizers, 3M Jan 10. Accessed 29 Dec 2013
Midmark M9/M11 Installation Operation Guide 003-2546-00 Rev C 12/13/13 Accessed 29 Dec 13
Statim Operators Manual 96-112663 Rev 2.0 2012 Accessed Dec. 2013