PNLPN 002 – Perioperative Safety #
The second module in the Perioperative LPN Nursing Program series is all about safety! In the previous module you were presented with the varied roles of the perioperative nurse. This module will explore the safety challenges these nurses face every day. Some of the concepts will be old hat to you…you have likely experienced them to some extent in your current area of nursing. You will be reintroduced to some of these safety practices and how they apply in the context of the perioperative setting. Some new safety elements that affect both the perioperative nurse as well as the patient will also be introduced.
Description #
Overview of electrical, mechanical and occupational safety concerns in the operating room in terms of patient and staff safety issues. Also, equipment maintenance standards will be reviewed. The electrical surgical unit (ESU) and pneumatic tourniquet will be discussed in terms of theory, operational use and electrical safety issues (other types of electrical equipment will be outlined in terms of safety, but operational use will be reviewed during the clinical program i.e. ultrasound, etc). Routine precaution practices will be reviewed. Specific occupational safety issues will be reviewed. The specific areas of laser, fire safety and latex allergies will be also be discussed. Also, overall patient safety will be introduced in a form of team communication – the Surgical Safety Checklist. A focus will be placed on nursing responsibilities in providing patient and staff safety.
Learning Objectives #
At the end of the session the nurse will be able to:
- Describe the principles of electrical and mechanical safety issues.
- Describe the principles of equipment maintanence procedures.
- Describe the principles and demonstrate the safe use of the electrosurgical unit (ESU.
- Describe the principles and demonstrate the safe use of the pneumatic tourniquet.
- Describe the principles and implementation of standard precautions.
- Describe various occupational safety concerns in the operating room and how they can be minimized.
- Describe the principles of laser use and demonstrate the safe use of laser equipment.
- Describe the potential causes of fire hazards in the operating room and how they can be prevented.
- Describe latex allergies and how staff and patient reactions can be avoided.
- Describe how the use of the Surgical Safety Checklist can reduce surgical errors and complications and promote a culture of safety in the perioperative setting.
Introduction #
To get you started…..
Safety and occupational hazards exist in all areas of nursing practice. The perioperative area presents potential safety concerns for both patients and the perioperative staff. The prevention of harm is paramount for everyone involved in providing patient care.
At the end of the module, the nurse will be able to:
- Describe the basic principles of equipment safety.
- Describe the procedures of equipment maintenance and malfunction.
- Describe the basic principles of electricity and electrical safety.
- Describe the basic operating safety features of specialized electrical equipment (e.g. ultrasound, MIS, endoscopes, and tourniquets)
The electrical surgical unit (ESU) and the pneumatic tourniquet will be discussed in this module section.
Safety concerns and occupational safety regarding other types of equipment (i.e. laser) will be reviewed in other modules and /or during the full-time clinical Program.
Electrical Surgical Unit
Upon completion of this module, the student will be able to:
- Describe the principles of electricity in relation to the electrical surgical unit (ESU).
- Describe monopolar and bipolar cautery and how they differ.
- Describe the proper placement of the patient ground pad (dispersive electrode pad).
- List the built-in safety features of the ESU.
- Describe safety practices for the perioperative setting (i.e. smoke evacuators).
- Identify potential hazards associated with ESU use.
Principles of Electricity and ESU Components #
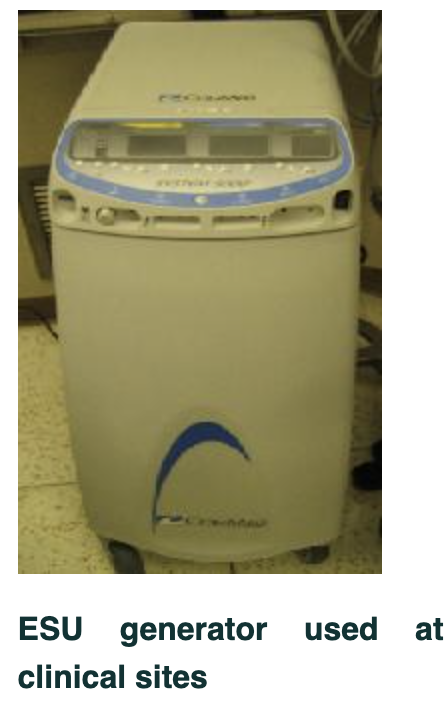
Note: Focus on the safety features that are presented in the following videos. ESU models may vary at different clinical sites. Clinical instructors will review the safety features of specific models during the clinical experience.
Electrosurgery is the passage of high frequency electric currents through human tissue that are intended to create a desired clinical effect such as hemostasis or to cut tissues. The following video clip demonstrates electrosurgery.
The Characteristics of Electricity #
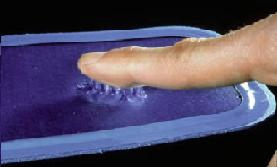
Electricity follows the path of least resistance and always seeks a pathway to the ground. A return electrode (also called a dispersive electrode or grounding pad) is placed on the patient to ensure that the electricity flows in the desired direction. (Undesirable grounding pathways lead to burns.)
Current: the flow of electrons during a period of time, measured in amperes (amps). Electrical flow always travels from a negative to a positive charge.
Impedance/resistance: the opposition to the flow of current. Impedence is measured in ohms. The main source of impedance or resistance in electrosurgery is the tissue of the patient.
Voltage: the force, which pushes the current through the impedance/resistance. It is measured in voltage (volts). This is reflected in the settings (amount of power) of the electrosurgical unit.
Electrosurgery Units (ESU) #
There are two types of ESUs used during surgery, monopolar and bipolar. The difference between monopolar and bipolar ESU is how the current flows through the patient.
Monopolar ESU
- Every time the unit is activated, a continuous circuit is created from the pencil (active electrode) that passes through the patient to the grounding pad and back to the ESU machine (generator). (See illustration below.)

- Active and return electrodes are separate from each other
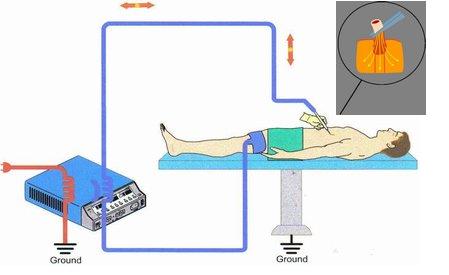
- The pencil (with cautery tip attached) is the active electrode. This makes contact with the patient’s tissue to carry out the desired tissue effect.
- Laparoscopic monopolar instruments are fully insulated along the shaft to prevent any leakage of the current. (See ESU Safety Concerns page.)
- The grounding pad is the dispersive or return electrode.
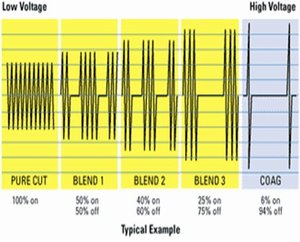
Monopolar current can be delivered in three ways:
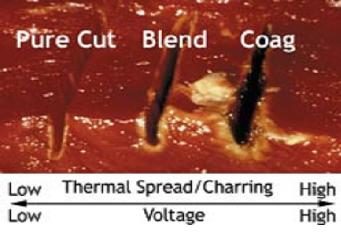
- Cut mode: continuous waveform. A lower voltage is required to obtain the desired outcome. Intense heat causes the cells to expand and explode. The current vapourizes the tissues in such a way that a clean cut is made with a minimum of coagulation.
- Blend mode: a variation on the cut mode. The waveform is continuous with rest cycles or a blended waveform. This mode allows for some coagulation while cutting. Higher voltages are used than those used in the pure cutting mode.
- Coagulate mode: interrupted waveform. In this mode, a higher voltage is required to obtain the desired outcome resulting in more thermal spread and charring a coagulum is formed (fulguration). Tissue destruction is superficial when short activations are employed. This mode coagulates oozing tissues and capillaries and is often done by touching the active electrode to a metal tissue forcep that is grasping the tissue. (The current runs through the metal forceps and the tissue that is grasped by the forceps.) Desiccation occurs when the electrode contacts the tissues directly.
The effect of electrosurgery on tissue will depend not only on the waveform or mode, but also on any of the following factors:
- Power setting: the higher the setting the greater and faster the tissue destruction.
- Length of exposure: the surgeon will only activate the electrode for the length of time that is necessary to cut or coagulate the tissue.
- Active electrode size: active electrodes come in different lengths and diameters and are selected according to what is required for a specific area of use.
- Type of tissue: depending on the vascularity of the tissue, the amount of impedance will vary and the settings or the length of exposure may need to be altered accordingly.
- Eschar presence: eschar is the build-up of tissue debris on the active electrode tip. This build-up impedes the flow of electricity. The active electrode tip must be kept clean with a device called a “scratch pad” or cautery tip polisher to avoid this build-up.
Return Electrodes #
The return electrode may also be referred to as the dispersive pad or the grounding pad. These terms are often used interchangeably. The return electrode can be either a disposable or a reusable product. The mechanism of dispersing the electrical current is the same for both, however, the safety principles around application differ.
Disposable Return Electrodes #
- Check the outer packaging for integrity and the expiration date. (The gel may be compromised if the package is beyond the expiration date. Discard the package if it is outdated or the packaging is compromised.)
- Do not use the electrode if it has been removed from a single-use package (disposable.)
- Well seal the multi-use package after opening. It is used with a non-disposable multi-use cable.
- Ensure that the adhesive gel is moist.
- Inspect before use for wire breakage or fraying prior to application.
- Do not cut, trim or alter the return electrode pad.
- Place the return electrode pad over non-hairy, dry and intact skin.
- If necessary, shave and clean the area where the return electrode is to be applied. Currently, most pads are made with a gel that allows for conduction over a moderately hairy area, eliminating the need to shave the area. However, shaving the skin promotes optimal conduction.

- Place the return electrode over a well-vascularized, large muscle mass (e.g. upper thigh or buttocks.)
- Place the return electrode as close to the surgical site as possible. Place the pad with the cord edge directed toward the ESU generator or the operating table’s mattress to reduce the chance of any “tug” on the cord, causing the pad to peel away.
- Do not apply the return electrode until the patient has been positioned in the final position to prevent the pad from shifting with further movement.
- Be careful to avoid pooling of any liquids (skin prep solution, irrigation solution and bodily fluids). Pooling of liquids may cause skin maceration, lack of pad adherence or burns.
- Avoid placing the return electrode over bony prominences, scar tissue, implanted metal prosthesis, pressure points and adipose tissue.
- Burns are usually the result of inadequate return electrode placement.
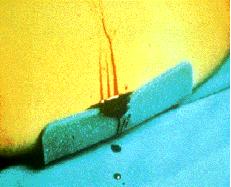
- An improperly placed or “tented” return electorde can result in an inadequate surface area over which electricity is dispersed, creating small concentrated “hot spots”.
Nursing Considerations – ESU Safety Concerns #
ESU Generator #
Perioperative nurses using the ESU generator must:
- Be familiar with ESU equipment.
- Check the equipment prior to use.
- When disconnecting the generator from the wall outlet, pull on the plug rather than the cord.
- Ensure that the cord is placed flat across the floor to avoid a tripping hazard.
- Start at the lowest possible setting.
- Ensure that there is an audible tone from the ESU when using the active electrode.
Watch the following video on ESU tips and audio sounds of the cut/coagulation modes.
Pneumatic Tourniquet Safety #
The purpose of the pneumatic tourniquet will be discussed with a focus on nursing responsibilities for safe use (cuff application, inflation and deflation times, and documentation). The operation of the pneumatic tourniquet will be reviewed and practiced during the full-time clinical component of the Program during a hands-on session.
Purpose #
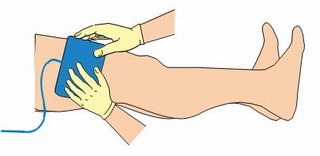
The pneumatic tourniquet is a device that restricts the blood flow to the limb with a pneumatic cuff that is applied and inflated on an extremity. It is used in the operating room for two reasons:
- To create a bloodless surgical field which facilitates the sugeon’s ability to see the surgical wound clearly. This is extremely helpful for bone surgeries that tend to ooze blood (e.g. bone fracture, total joint replacement).
- To provide a method of anesthesia by restricting flow of blood to an extremity (usually in the arms) in order to inject a local anesthetic. This is a form of regional (local) anesthesia called a Bier block. The injected local anesthesia is restricted to the limb as the tourniquet prevents it from circulating to the rest of the body. This form of anesthesia will be discussed in the anesthesia module PNLPN-003.
The remainder of this module section will focus on the first purpose of the pneumatic tourniquet: creating a bloodless surgical field. The safety issues and methods of application also apply when the pneumatic tourniquet is used for anesthesia purposes. (See PN-003.)
Safety Issues #
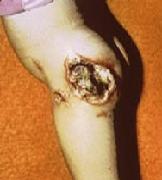
The pneumatic tourniquet provides the surgeon with the benefit of a bloodless surgical field, it can potentially cause harm to the patient if safety measures are not taken. Potential complications of the pneumatic tourniquet include:
- Limb ischemia resulting from restricted blood flow to the limb due to prolonged inflation of the tourniquet.
- Nerve injury due to improper application of the tourniquet onto the limb and/or prolonged inflation.
- Pressure injury due to excessive pressure used to inflate tourniquet or prolonged inflation time. (Excessive pressure may also cause ischemia, skin breakdown, and nerve damage.)
- Systemic toxicity when used for Bier block anesthesia. If the tourniquet is deflated too soon after injection of the local anesthetic drug, the patient will receive a bolus of drug and potential local anesthetic toxicity. The tourniquet must remain inflated for at least twenty minutes to allow for adequate absorption of the local anesthetic.
Contraindications for use:
- Extreme hypertension
- Limb ischemia
- Vascular compromise to the limb
- Skin damage over application site (e.g. burn)
- Surgeries that will be longer than two hours
Equipment and Supplies Required #
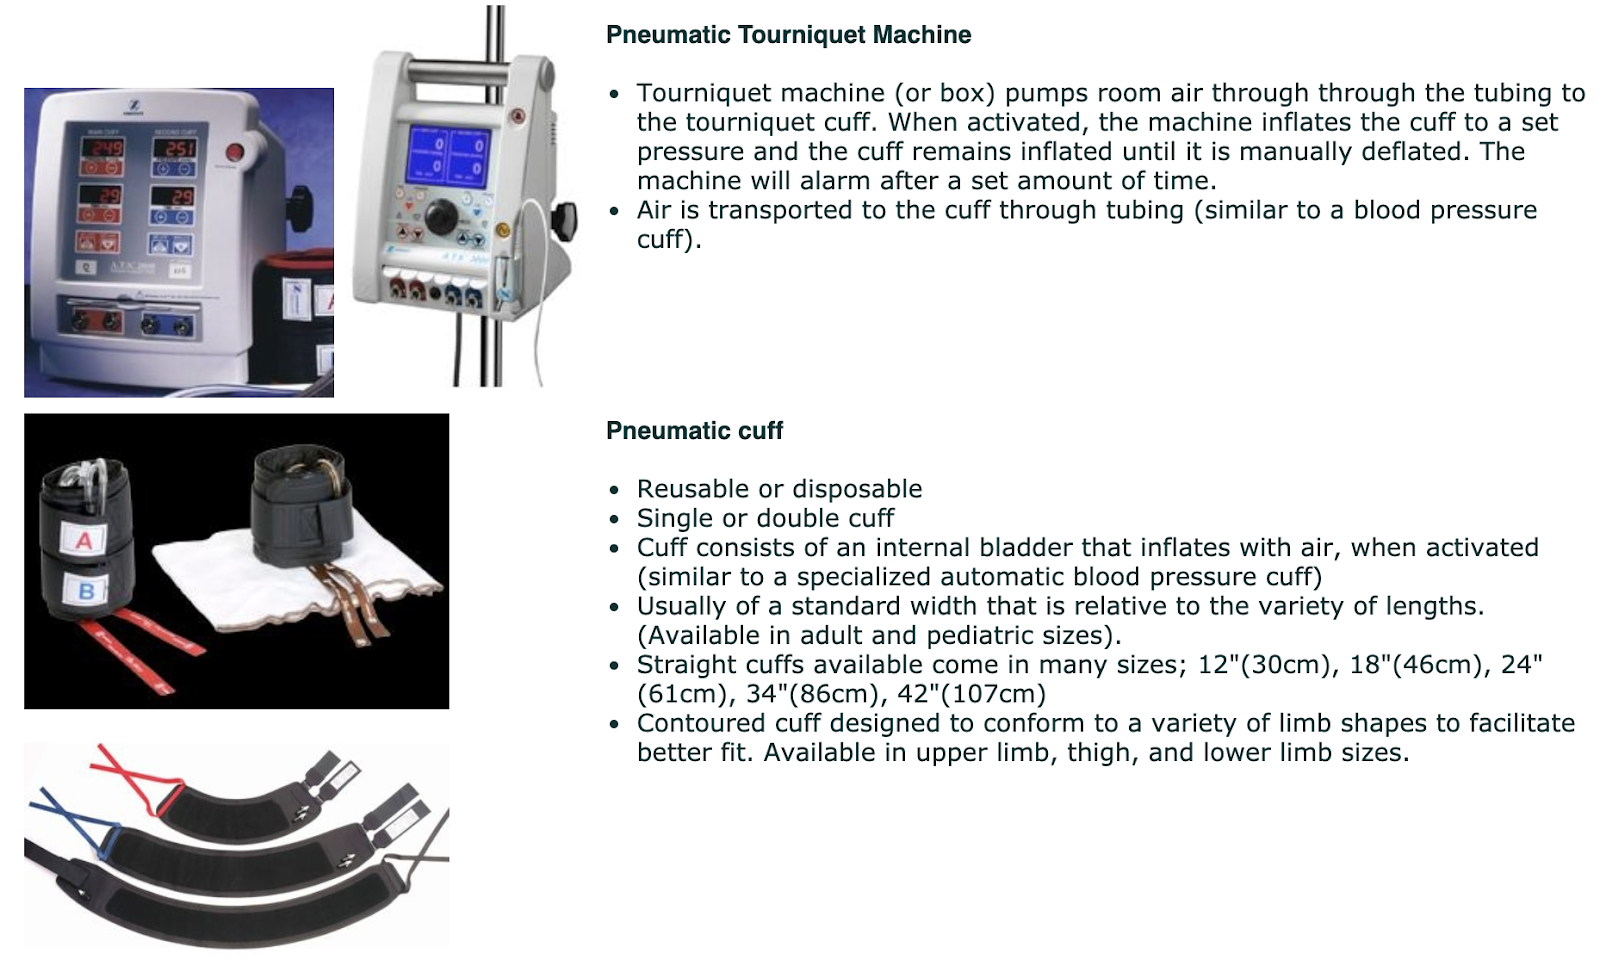
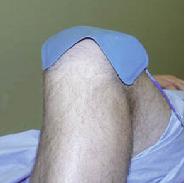
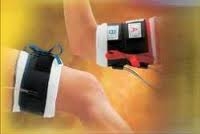
Cuff Application Safety #
Choosing the cuff
- The length of the cuff chosen should fit snugly around the limb and must overlap upon itself precisely between 7.5cm-10cm (3″-6″).
- The cuff has an “O-ring” around each connection port to provide a snug fit around the tubing-to-cuff connection and to prevent leakage. It is important to ensure that the chosen cuff has two intact “O-rings”.

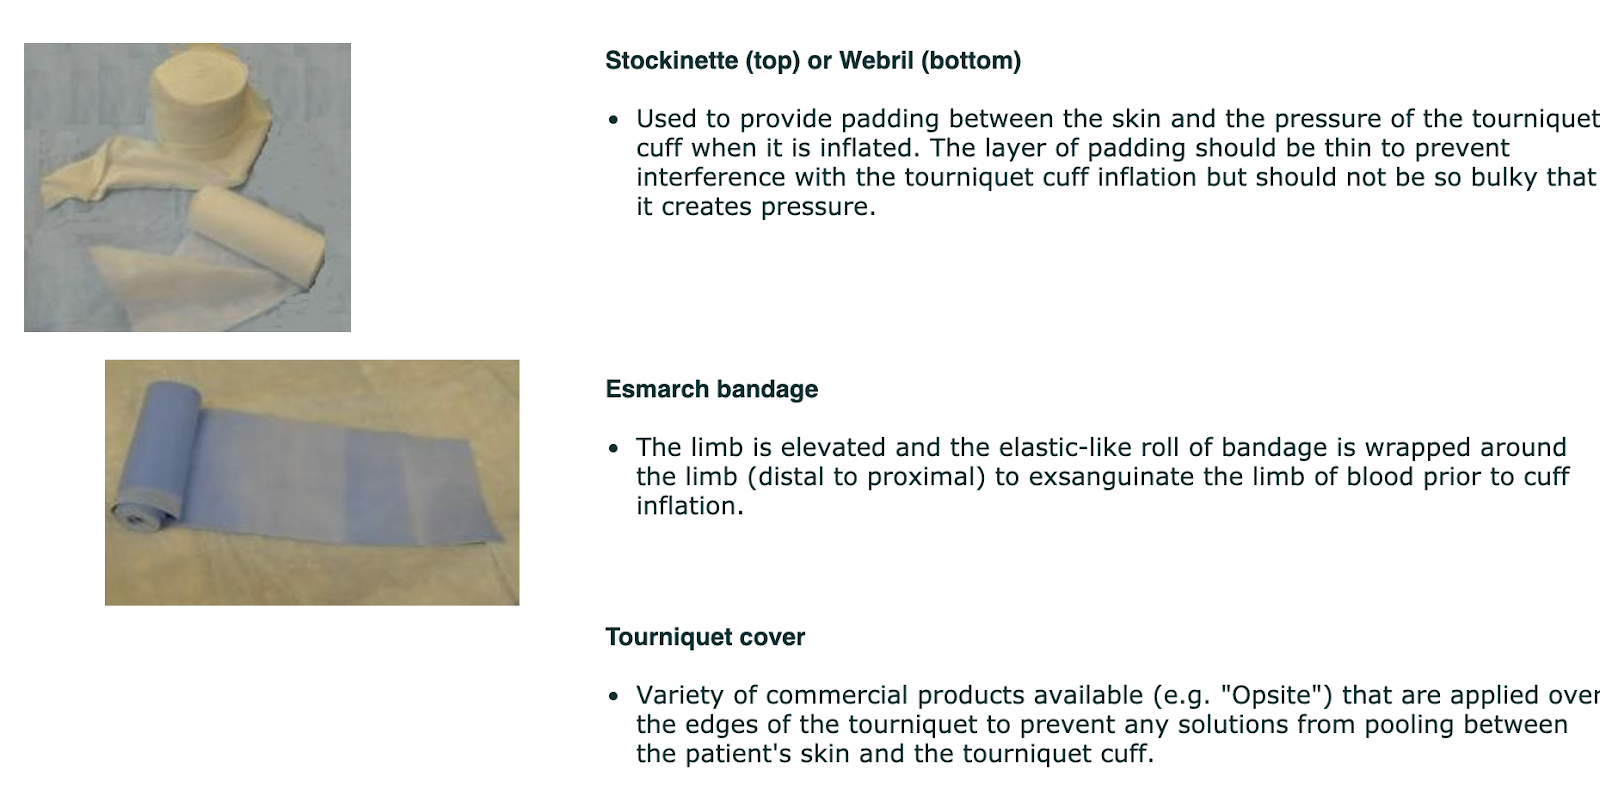
- Choose the appropriate size of stockinette to fit the size of the limb.
Applying the cuff
- The stockinette/webril is applied first and the cuff is applied on top. The stockinette is then folded down over the upper and lower edges of the cuff.
- The cuff is applied to the most proximal area of the limb without causing undue pressure into the groin, knee, elbow or axilla.
- The cuff application should leave sufficient room between the operative site and the cuff to maintain a sterile field. If this cannot be achieved, a sterile tourniquet should be considered.
- The tourniquet tubing connections are placed facing away from the operative site to prevent the tubing from falling into the sterile field and interfering with the surgical procedure.
- Ensure that nothing is trapped under the tourniquet cuff (e.g. excess adipose tissue, genitalia).
- A properly applied cuff should be pulled tight enough to allow the placement of one or two fingers underneath it. This finger placement test should be done to ensure that the cuff is not too tight or too loose. A cuff that is too loose will not adequately inflate and may lead to an unnecessary increase in pressure. A cuff that is too tight can potentially cause a pressure injury.
Attaching the tubing
- Ensure that the “O-rings” are intact prior to attaching the tubing to the cuff.
- Ensure that the tubing is directed away from the operative site.
- Ensure that the tubing is not resting on the patient during the procedure and that it is not in a location where it will be stepped on or pulled.
Tourniquet Operation Safety #
Choosing a pressure setting
There are three ways to determine what the inflation pressure setting should be:
- The inflation pressure setting should be based on the “lowest occlusion pressure” (LOP) which is the lowest pressure necessary to occlude blood flow to the limb. The LOP is influenced by the patient’s blood pressure. Some tourniquets will have a built-in sensor (a Doppler-like device) to detect the LOP and will automatically set the inflation pressure.
- In the absence of a sensor, the pressure setting can be determined by the patient’s systolic blood pressure. The pressure setting should be 50-75mmHg above the patient’s systolic blood pressure. For example, if the patient’s blood pressure is 130/80, the tourniquet can be set between 180-205mmHg. Ideally, the anesthesiologist who constantly monitors the patient’s blood pressure during the surgical procedure will adjust the tourniquet setting accordingly. In reality, the pressure setting is often set by the patient’s initial blood pressure and the setting is maintained throughout the procedure. The pressure may have to be adjusted slightly if the limb has an excessive amount of adipose tissue.
- A third method for choosing a pressure setting for the tourniquet is to use a predetermined individual setting for the arm or the leg, with minor adjustments for the size of the limb. The predetermined settings that are considered to be safe are 250mmHg for an arm and 300mmHg for a leg. However, a proper assessment should be made for each patient to accommodate limb variations.
Choosing a time setting
- The “ischemic time” for a limb is the duration of time that blood flow to the limb can be restricted without causing irreversible damage. This time should be limited to sixty minutes for an arm (with a maximum of ninety minutes) and ninety minutes for a leg (with a maximum of 120 minutes).
- The tourniquet time is set for the specified durations and an alarm will sound when the time has been reached. The surgeon may extend the time as necessary. When the maximum time has been reached, the tourniquet must be deflated. Although this may create unwanted blood in the surgical field during an operative procedure that is in process, the safety of the limb is paramount.
- The tourniquet can be reinflated after a certain amount of time has passed if the procedure is going to be longer than the maximum time period.
- The tourniquet must remain deflated for five minutes for every thirty minutes that it was inflated. For example, if an arm tourniquet was on for the maximum time of ninety minutes, the tourniquet must remain deflated for fifteen minutes (30 minutes x 3 = 90 minutes and 5 minutes x 3 = 15 minutes). After the cuff has been reinflated, the alarm should again be set for sixty minutes with the maximum extended time as ninety minutes.
Alarms
The tourniquet has a set of safety alarms that will alert users to the maximum tourniquet time limits. Other alarms may provide alerts for kinks or air leaks in the tubing. All alarm sounds should be investigated for cause and lead to an immediate resolution of the problem.
Strict implementation of the above safety measures will ensure that the patient’s limb is not compromised during the procedure.
Documentation #
The following documentation is required when using a tourniquet:
- The number or identifer of the tourniquet machine
- The anatomical location of the cuff (right or left arm or leg)
- Initials or signature of the person who applied the cuff
- Pressure setting
- Time of inflation
- Time of deflation
- Notification and communication of time intervals to the surgeon (after 60 and 90 min for an arm; 60, 90 or 120 minutes for a leg)
- Total time of tourniquet inflation
- The condition of the skin after the tourniquet was removed
Infection Control – Routine Practices #
Learning Objectives #
At the end of the module the nurse will be able to:
- Describe routine infection control practices.
- Describe operating room protocols for specific infection control precautions: contact, airborne, droplet.
- Understand the importance of personal protective equipment (PPE) and personal protective practices for staff and patients, as recommended by safety and professional organizations.
- Understand the importance of proper handwashing techniques and practices.
The Evolution of Precautions #
Long before the science of microbiology was developed, there was awareness that diseases could be transmitted from person to person. This was evident in the segregation of people with Hansen’s disease (leprosy) and the avoidance of areas of pestilence.
However, it wasn’t until the nineteenth century that Louis Pasteur first identified micro-organisms or “germs” and recognized that heat could destroy them. Joseph Lister was the first to advocate for the use of antiseptics to decrease surgical mortality from infections caused by “germs”.
Florence Nightingale identified the importance of the environment in disease transmission. Nightingale made radical changes in sanitation practices that led to significant reductions in mortality from contagious diseases. These changes included the separation of patients from each other and the use of dedicated equipment.
In the 1970s in Canada, Hepatitis B, Hepatitis non-A and Hepatitis non-B were identified as blood-borne pathogens.
In the 1980s Hepatitis non-A and Hepatitis non-B were reclassified as Hepatitis C. In addition, Human Immunodeficiency Virus (HIV) was also identified.
Universal Precautions
In 1987, blood and body fluid precautions were introduced. Initially, blood and body fluid precautions were utilized specifically for patients who were known to have or suspected to have blood-borne pathogen infections. Because patients do not always present with overt signs and symptoms of HIV infection or hepatitis, blood and body fluid precautions should be used for all patients regardless of their blood-borne infection status. These precautions are known as “Universal Precautions” and apply to any exposure or potential exposure to blood and other body fluids containing visible blood. “Universal Precautions” are intended to protect health care workers from blood-borne pathogens that may be present in any parenteral, mucous membrane, and non-intact skin of patients. Immunization with Hepatitis B virus vaccine is considered an important adjunct to universal precautions.
“Universal Precautions” provide protection for disease transmission from blood and body fluids with the exception of the following:
- Feces
- Nasal secretions
- Sputum
- Saliva
- Sweat
- Tears
- Urine
- Vomitus
It is important to note that “Universal Precautions” do not protect against infectious organisms found in all body fluids (e.g. Clostridium difficile and antibiotic-resistant organisms).
The recommended system of infection control for health care providers to use is known as “Routine Practices”. Utilizing “Routine Practices” of infection control for all patients during health care delivery is intended to prevent and control the transmission of organisms in health care settings. The “Routine Practices” system embodies the concept of “Universal Precautions” and applies to all patients receiving care, regardless of their diagnosis. The implementation of “Routine Practices” protects health care workers from potential disease transmission when exposed to:
- Blood
- All body fluids, secretions and excretion (except sweat)
- Non-intact skin
- Mucous membranes
The implementation of “Routine Practices” in infection control is the primary strategy for successful control of disease-producing micro-organisms. The “Routine Practices” initiative helps to reduce the risk of exposure for health care workers, whatever the source.
Applying Routine Practices #
How Can We Protect Ourselves and Others? #
- Personal Protective Equipment (PPE)
- Hand hygiene
- Best practices
PPE #
Personal protectice equipment includes, but is not limited to:
- Gloves
- Gowns
- Masks
- Eye protection (goggles, shields, glasses)
- Shoe covers
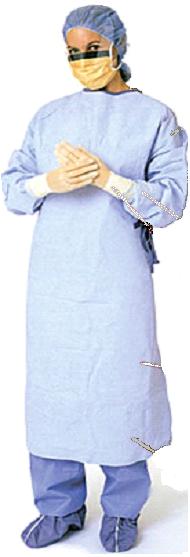
Perioperative scrub nurses should wear all of the above items. For nurses in the circulating role, the required PPE will depend on the task being performed.
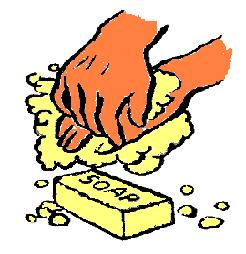
Hand Hygiene #
Prompt and frequent hand washing is the single most important measure to reduce the spread of micro-organisms.
Best Practices #
- Staff members should always be mindful of sharps hazards and any movements involving sharps should always be purposeful. Communication is the key to preventing injuries from sharps in both the scrub and circulating nurse roles. The use of a “neutral zone” for the passing of sharps will be discussed in a future section.
- All sharps should be handled and removed with an instrument (not manually with hands), and should be disposed of properly.
- Used needles should not be bent, sheared or broken. Needles should not be recapped by hand and, if it is absolutely necessary to recap, the one-handed scoop method should be used.
- Scalpel blades should be removed using an instrument or device. Safety scalpels should be used when available.
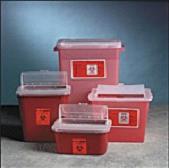
- Disposable sharps should be placed in a puncture-resistant, labelled container. Reusable sharps should be separated and easily visible to the staff that are responsible for reprocessing them.
The Epidemiological Triangle and Mode of Transmission #
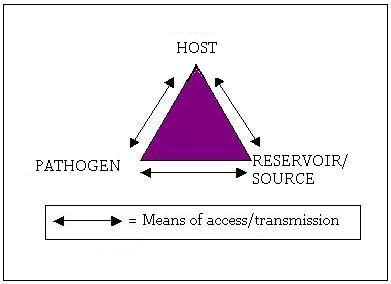

Reservoirs (Source) #
In epidemiological terms, the “reservoir” or source refers to the place where organisms can grow and reproduce. This is usually where it all begins – at the source or as it may be called, the reservoir. Sources of infection may include the following:
Inanimate objects:
- Food, water and drugs may harbour bacteria. Examples of fluids in which bacteria exist (if left open for longer than recommended) include: Total Parenteral Nutrition (TPN), Propofol (a lipid-based anesthetic agent), multi-dose vials such as Heparin, saline and Lidocaine.
- Inanimate objects that harbour bacteria are also known as “vehicles”.
- Equipment that is not cleaned properly or cannot be cleaned, such as bronchoscopes (found to carry Mycobacterium tuberculosis) and glucometers (found to carry hepatitis B/C).
People:
- Patients are the most significant reservoirs of pathogens (e.g. Methicillin Resistant Staphylococcus Aureus (MRSA) Surgical Site Infections (SSIs)).
- Specific patient populations present infection control risks including:
– The elderly
– People with chronic illness
– People with skin lesions
– People being treated with antibiotics
- Health care workers can become immediate vectors for infection, transmitting organisms from themselves or between patients. Infection may be spread due to the following:
– Staff with artificial nails or chipped nail polish
– Chronically colonized people
– People with abnormal skin
- Poor hand washing practices
Pathogens #
Micro-organisms that cause infection are:
- Bacteria
- Fungi
- Protozoa
- Algae
- Viruses
Bacteria are the most common cause of SSIs. These include:
- Staphylococcus
- Enterococcus
- Pseudomonas
- Streptococcus
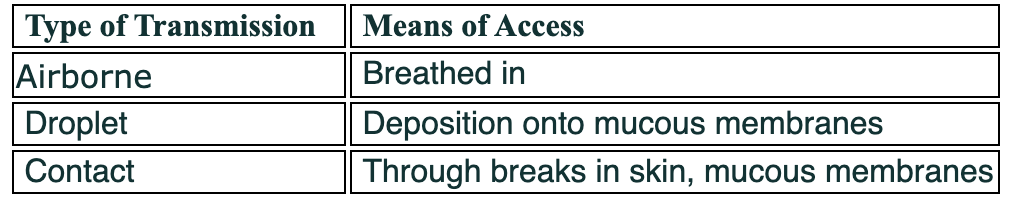
Routes of Access/Transmission #
Pathogens can be transmitted by:
- Contact: direct, indirect (i.e. contaminated linens) or droplet contact (i.e. droplets that are transmitted to mucous membranes or skin within close range)
- Airborne: organisms transmitted within a three-foot radius and inhaled or ingested
- Vehicle: transmission via a contaminated single source medium (i.e. water, food, drugs, blood). Technically this medium itself has become contaminated by another means of transmission, but once contaminated it becomes a source (vehicle).
- Vectors (vector-borne): transmission via a living agent (i.e. dogs, ticks, mosquitoes)
- Fomites: transmission via inanimate objects – infectious material has been deposited onto an inanimate object (i.e. doorknob) and then the infectious material is transferred to whomever touches the object (i.e. indirect contact)
Transmission of organisms occurs through a portal of exit from the reservoir or source (i.e. coughing, vomiting, bleeding) to the portal of entry of the host (i.e. inhalation, skin cut, ingestion). The portal of exit may not be obvious, as in the case of contaminated food. However, the portal of entry can often be determined (e.g. oral ingestion of the pathogen E. coli found in contaminated meat which would be considered the “vehicle”).
Host #
Patients may potentially become hosts for pathogens depending on their individual ability to resist disease, which is influenced by the following factors:
- Immune status: Patients with deficiencies such as white blood cell antibody-mediated immune deficiency (e.g. neutropenia, myeloma) are predisposed to common bacterial and viral infections. Patients with cell-mediated immune deficiencies such as Human Immunodeficiency Virus (HIV), lupus erythematosus or those who have received organ transplants are predisposed to tuberculosis, legionella and herpes zoster infections.
- Specific clinical disease
- Asymptomatic carriers of specific organisms
- Age: Infants and children have less developed immune systems and resistance to organisms. Elderly people may have an increased antimicrobial resistance and weakened immune system due to chronic illness or other factors.
- Non intact skin:
– Broken skin integrity due to minor superficial breaks or deeper, extensive breaks (e.g. surgery, burns)
– Necrosis
– Foreign bodies
– Internal conduits to the exterior skin surface such as central lines or catheters
Additional Precautions (Transmission-based Precautions) #
Airborne Precautions #
Diseases that are potentially transmitted through airborne organisms include:
- Pulmonary/laryngeal tuberculosis (TB) or extrapulmonary TB (e.g. aerosolization of TB during surgery for removal of TB in the spine)
- Measles
- Sudden Acute Respiratory Syndrome (SARS)
Precautions during patient transport:
- The patient must wear a surgical mask whenever transported from an isolation room as airborne micro-organisms can be widely dispersed and transmitted by air currents.
Personal Protective Equipment includes:
- Masks that filter particles and fit around the contours of the face to avoid air leaks (N95 mask).
- Staff members must be fit-tested for masks annually to ensure proper fit and protection.
Precautions in perioperative areas:
- Negative-pressure systems in operating rooms and recovery areas.
- Use of filters in anesthetic tubing to prevent anesthetic machine contamination; disposal of filters and anesthetic tubing after procedure.
Droplet Precautions #
Diseases that are potentially transmitted through droplet contamination include:
- Bronchiolitis/ common colds
- Bacterial meningitis
- Diphtheria
- Pertussis
- Respiratory viruses
- Adenovirus
- Influenza
Droplets are generated from the source person through:
- Coughing
- Sneezing
- Talking
Patient Transport:
- The patient must wear a surgical mask when leaving the isolation room.
- The patient must wear a surgical mask within three feet of another person.
- Droplets do not remain in the air and do not spread beyond three feet.
Protective Personal Equipment:
- Surgical mask; surgical masks differ from regular paper masks in that they have ≥ 80% viral filtration
- Eye protection (glasses, goggles, face shields)
- Gowns
- Gloves
- Annual influenza vaccination
Contact Precautions #
Contact contamination may occur under the follwoing conditions:
- Heavy contamination within the patient’s environment
- Organisms that are transmitted from the skin
- Diarrhea (e.g. salmonella, shigella)
- Skin rashes (e.g. scabies)
- Viral respiratory tract infections
- Antibiotic resistant organisms
- Herpes simplex
- Close contact between patients and personnel
Patient Transport:
- Maintain precautions whenever the patient leaves the isolation room.
- Notify any receiving department of the necessary precautionary measures.
- Adequate cleaning/disinfection of patient equipment is essential for good infection control.
Personal Protective Equipment:
- Gloves
- Gowns (forearms to be covered)
- Frequent hand washing
Infections #
The Rise of Drug-Resistant Bacteria (Contact Precautions) #
Penicillin became widely available during the Second World War. It was considered a “miracle” drug that vanquished infection, one of the biggest wartime killers. However, as early as 1943, strains of previously susceptible micro-organisms began to develop resistance to penicillin. The unfortunate fact is that bacteria have become resistant to antibiotics almost as fast as the drugs have been developed.
There are three types of antibiotic resistance:
- Naturally occurring resistance: intrinsic resistance, genetic mutation or transfer of genetic material.
- Externally acquired resistant strains: transmitted from a person or inanimate object.
- Treatment-related: incorrect use, overuse or underuse of antibiotics.
If an antibiotic maintains its presence in a population, it is said to exert a selective pressure on that population to retain the resistant gene. A bacterial strain with more protection has a higher chance of survival.
- What is the consequence of indiscriminate and widespread use of antibiotics?
- Should we use antibiotics that are effective against human infections in animal feed?
- Should antibiotics be freely available as over-the-counter drugs as they areseen in many Third World countries?
- Should we use broad-spectrum antibiotics for viral sore throats and earaches?
Tolerance #
Tolerance is the ability of bacteria to exist in a non-dividing state and survive in the presence of antibiotics. It is a direct precursor to resistance.
Resistance #
Resistance is the ability of bacteria to survive and duplicate in the presence of antibiotics. If a bacterium carries several resistance genes it is called multi-resistant and is informally known as a “superbug”.
The following conditions predispose patients to a higher risk of infection: #
- Diabetes
- Lymphoma
- Leukemia
- Neoplasia
- Uremia
- High dose corticosteroids
- Irradiation
- Chemotherapy
- Traumatic injury
- Obesity
- Surgical procedures
Micro-organisms That Cause Infection #
Methicillin-Resistant Staphylococcus Aureus (MRSA) (Contact Precautions) #
Staphylococci are gram-positive cocci, which are the most common causes of surgical site infections (SSIs). Staphylococci can be found in the indigenous flora of the skin, particularly the nose, groin and axillae and mucous membranes of the nasopharynx, vagina and urethra. Between 30% and 70% of people carry staphylococci on their skin; 20-30% of healthy people are colonized, whereas 70% of the chronically ill are colonized.
Colonization is the presence and multiplication of micro-organisms in or on a host without signs and symptoms of illness.
Staphylococcus aureus produces toxins that cause skin, wound, respiratory and bloodstream infections. Infection is the invasion and multiplication of organisms that become pathogens and subsequently cause tissue or cellular damage.
Staphylococcus aureus is normally treated with penicillin-related antibiotics. However, over the past fifty years, some strains of Staphylococcus aureus have become resistant to antibiotics. Currently, almost half of nosocomial Staphylococcus aureus infections are resistant to methicillin.
Common reasons for MRSA infections in surgical patients include:
- Previous prolonged stay in hospital
- Previous antibiotics treatment
- Previous Intensive Care Unit (ICU) admissions
- Close proximity to another patient colonized with MRSA
Staphylococcus aureus is one of the most common causes of hospital-acquired infections causing death in Canada (approximately 1200 in-hospital deaths per year), second only to influenza.
MRSA is associated with:
- Longer stays in hospital
- Increased costs
- Higher mortality
- Increased use of Vancomycin (and potential for an increased incidence of Vancomycin-Resistant Enterococci (VRE))
Identifying Patients with MRSA (Who gets screened?) #
The goal of screening hospitalized patients for MRSA is to identify the reservoir of the organism. Screening measures include:
- Active surveillance cultures
- Screening all patients who have been in the hospital for at least forty-eight hours in the last three month
- Multiple sites from the patient must be tested/screened including: nares, open wounds/drainage sites, rectum and/or perineum
Transmission of Infection #
MRSA can exist on people and in the environment for days or even months. Boyce et al (1997), found that 6%-35% of surfaces in the room of a known MRSA patient were contaminated with MRSA.
Health care workers can unwittingly play a major role in the transmission of MRSA, as it can be spread by unwashed hands or contaminated gloves of personnel after direct contact with patients or the contaminated environment.
Sites and/or excretions of a colonized patient:
- Anterior nares
- Sputum
- Surgical or burn wounds
- Decubitus ulcers
- Perineum
- Rectum
- Tracheostomies
- Gastrostomies
Eradication of the Reservoir #
Some patients clear themselves of MRSA on their own in a five to eight month time period, while others remain positive for MRSA even after three to five years. The following treatments are used to eradicate MRSA:
- Topical decolonization is the eradication of skin and nasopharyngeal colonization. Treatments include: Mupirocin, Polysporin Triple, Chlorhexidine 2% and the MRSAid device.
- Systemic eradication therapy includes: Rifampin/Doxycycline or Mupirocin.
Vancomycin-Resistant Enterococci (VRE) (Contact Precautions) #
Enterococci are gram-positive bacteria that exist as normal flora in the human respiratory tract, gastro-intestinal tract, hepato-biliary tract and female genital tract. The enterococci bacteria are normally harmless, non-pathogenic flora with little potential for human infection. Because these bacteria are persistent and quite “hardy” with a long lifespan, enterococci can cause infection when the host’s immunity is low.
Enterococci have an intrinsic resistance to many antibiotics, with a high level of resistance to Vancomycin, in particular. Enterococci have the ability to transfer microbial resistance traits to other organisms (e.g. Staphylococcus aureus).
VRE causes almost 25% of nosocomial enterococcal infections in hospitalized patients. It is the second most common hospital acquired infection (HAI) and the third most common pathogen for bacteremia.
The most common sites of VRE infection include:
- Urinary tract
- Intra-abdominal/soft tissue
Risk Factors for VRE Colonization/Infection #
- Underlying illness/increasing severity of underlying illness
- Invasive devices
- Antibiotic use
- Increased length of hospital stay
- Prior colonization with VRE (11-35% of patients who are colonized become infected with VRE)
- Renal dialysis patients
- Oncology patients
- Transplants patients
- Wounds or exit sites
Transmission of Infection #
Transmission of VRE occurs through contact from reservoir sites. VRE has been recovered from various hospital environments:
- Fingertip cultures
- Gloved hands
- Stethoscopes
- Bedrails
- Telephones
Identifying Patients with VRE (Who gets screened?) #
- Screen all patients who have been in a hospital for at least forty-eight hours in the last three months.
- Patients who are screened for MRSA are also screened for VRE.
- The best method of screening is to swab the rectum, ostomy or stools. (VRE does not live in nares.)
Reservoirs for VRE #
- Gastrointestinal tract and urinary tract of hospitalized patients. (Heavy contamination of the patient’s environment can occur when diarrhea or urinary incontinence is present.)
- Skin, wounds and chronic ulcers (due to shedding).
- Medical equipment can become contaminated, as VRE is hardy and survives on surfaces.
Healthcare worker colonization of VRE is uncommon compared to MRSA. VRE survives for a long time, and is resistant to drying and extreme temperatures. Consequently, enhanced cleaning is required in the presence of VRE, as 16% of room surfaces have been found to contain VRE after regular cleaning. Research has shown that after “bucket soaking” surfaces for ten minutes, VRE was eradicated (Farr, 1998).
Viruses #
Viruses are not classified as living cells as they have no metabolic activity and are reliant on a host for survival. Viruses invade the cells of the host and replicate. This replication stimulates the host’s antibody defence.
The presence of a viral infection can be determined by:
- Identifying the virus-specific antibodies that the host’s immune system produces
- Identifying the antigens produced by the virus and present in the blood
- Growing a culture of the virus itself
Question: What do the terms seroconversion, or seropositivity mean?
Viruses can be destroyed by high-level disinfection.
Examples of viruses are:
- Hepatitis (A, B, C, D, E and G)
- Human Immunodeficiency Virus (HIV)
Hepatitis #
There are six strains of hepatitis that are classified using the letters A,B,C,D,E and G.
Human Immunodeficiency Virus (HIV) #
Human Immunodeficiency Virus is a latent virus that attacks the immune system by destroying T-helper lymphocytes. The incubation period from exposure to HIV to the development of the actual disease can be twelve years or longer. During this time, the infected person is a carrier of the virus. People who are HIV positive carry the antibodies to the virus in their blood. It may take up to six months after initial infection for the antibodies to appear in the blood. During that time, the infection can still be spread to others before antibodies or symptoms are apparent. The Human Immunodeficiency Virus is present in all body fluids of an infected person including blood, semen, vaginal secretions, saliva, tears, breast milk, cerebro-spinal fluid, amniotic fluid and urine. Acquired Immune Deficiency Syndrome (AIDS) is the last phase in HIV disease.
Transmission of Infection #
Transmission of HIV can occur through percutaneous injury (needle stick), mucous membrane or non-intact skin exposure. If an exposure occurs within the workplace, appropriate post-exposure management must be implemented. The source person should be informed of the exposure and serology tests should be obtained. In addition, the health care worker should be counselled about the risk of infection. A person exposed to HIV should be evaluated clinically and serologically for evidence of HIV infection as soon as possible after the exposure.
An exposure incident should be treated as an urgent medical condition.
Signs and Symptoms of HIV Infection #
- Early signs and symptoms may mimic symptoms of influenza and can also include a rash and swollen glands
- Unexplained weight loss
- Unexplained fever and night sweats
- Severe fatigue
- Diarrhea and other bowel changes
- Shortness of breath and a persistent dry cough
- Mouth sores
- Swollen lymph nodes in the neck, axillae or groin areas
These symptoms can also be caused by many other illnesses.
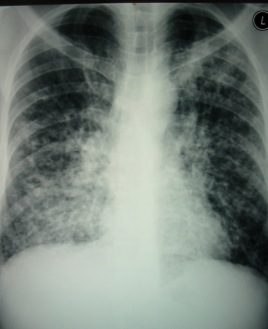
Mycobacterium Tuberculosis #
Mycobacterium tuberculosis is a non-spore-forming, non-motile, aerobic bacillus. Mycobacterium tuberculosis organisms spread throughout the host through the lymphatic system and bloodstream and through the alveoli and gastrointestinal (GI) tract. Almost any tissue can be affected including: skin, bones, kidney, lymph nodes, intestinal tract and fallopian tubes.
Transmission of Infection #
Mycobacterium tuberculosis is transmitted directly via airborne droplet nuclei when infected people cough, sneeze or speak. The organism is spread indirectly by means of contaminated articles and particles (e.g. lint, glove powder and dust) floating through the air. The droplet nuclei can remain airborne for a prolonged period of time.
Infection occurs when people inhale the airborne droplet nuclei, which ultimately infects the lung alveoli via the nasal passages, upper respiratory tract and bronchi. In the lung alveoli, the bacilli are taken up by macrophages and distributed to other parts of the body.
Mycobacterium tuberculosis can be directly discharged from the respiratory tract (via kissing or coughing) or from the gastrointestinal tract (although this is less frequent).
Extrapulmonary tuberculosis occurs when the Mycobacterium tuberculosis has travelled to another part of the body (i.e. vertebral bone). It is not infectious unless the infected tissue is handled and the Mycobacterium tuberculosis can become aerosolized.
Generally, two to ten weeks after the initial infection, the immune response in the body limits additional multiplication and spread of the bacilli, but they can remain dormant for many years (latent tuberculosis infection). People with a latent infection are asymptomatic and are considered non-infectious. The probability of becoming infected depends on the concentration of droplet nuclei the person is exposed to and the duration of exposure. When infected, an individual has a 10% chance of developing TB in their lifetime. The risk of this happening is greater in the first two years after initial exposure. Individuals with compromised immune systems have a higher risk of developing active TB from latent tuberculosis.
Preventing Transmission of TB #
- Use of negative-pressure ventilation for hospitalized patients
- Personal respiratory protective devices (with regular annual fit-testing) and personal respirators when indicated
- Formal risk assessment to plan for (and control) potential spread of disease
- Early detection and treatment of patients with TB
- Screening Programs for health care workers
Creutzfeldt-Jakob Disease (CJD) #
CJD is an infectious, neurodegenerative and fatal disease of the central nervous system. It is one of a group of encephalopathies known as Transmissable Spongiform Encephalopathies (TSEs). Another human type of TSE is variant CJD (vCJD). There is strong epidemiological and laboratory evidence of a causal association between vCJD and bovine spongiform encephalopathy (mad cow disease).

Creutzfeldt-Jacob disease is a “slow viral infection” caused by a self-replicating protein known as a prion.
Patients afflicted with CJD are between fifty and seventy-five years old. The etiology of CJD is unknown and the average duration of this incurable, and ultimately, fatal illness is six months following the onset of symptoms.
In contrast, the onset of vCJD affects people between eighteen and forty-one years of age. Patients exhibit initial psychiatric symptoms followed by neurologic symptoms (different from those of CJD), and the course of the illness lasts about fourteen months before ending in death.
Signs and Symptoms #
The incubation period for CJD can vary from months to years to decades.
Signs and symptoms include:
- Rapidly progressing dementia
- Memory loss
- Rapid physical and mental deterioration
- A distinctive electroencephalogram reading
A positive diagnosis CJD can be made only by direct examination of infected brain tissue.
Transmission of Infection #
CJD can be transmitted in a number of ways:
- Familial: inherited in the form of a mutant gene
- Sporadic: no family history and no known source of transmission (approximately 90% of cases)
- Iatrogenic: medically-related exposure from person to person
- Transplantation of contaminated central nervous system tissue, such as dura mater or corneas
- Pituitary hormone injections
- Use of contaminated surgical instruments or stereotactic depth electrodes
Controlling Transmission of CJD #
CJD and other TSEs are unusually resistant to conventional chemical and physical decontamination methods. Prions are resistant to steam autoclaving, dry heat, ethylene oxide gas and chemical disinfection with formaldehyde or gluteraldehyde.
Special protocols for instrument care after exposure to prions should be followed. Disposable equipment should be used for suspected highly infective tissues, as the resterilization of instruments and equipment is too difficult to monitor. Reusable equipment should be avoided or quarantined until a biopsy from the patient is determined. If the biopsy is positive, equipment that has been in direct contact with the tissue must be destroyed.
A process has been developed that uses radiofrequency gas plasma to eliminate prions that may transmit CJD from surgical instruments.
Other methods and protocols for removing CJD are still being investigated and developed.
Applying Routine Practices to the Perioperative Environment #
- All surgical patients are treated as potentially infectious.
- Routine Practices are maintained using the “confine & contain” concept.
- The area of contamination is confined to the smallest area possible (e.g. the operating room table and sterile field).
- Any unnecessary items or furniture in the room are removed prior to the start of the case.
- Items that become contaminated are contained in order to prevent cross-contamination.
- Everything that comes in contact with the patient’s blood or body fluids is potentially contaminated. Reuseable items are decontaminated after the case using appropriate cleaning methods and disposable items are discarded. (Note: methods of disinfecting of the environment will be discussed in a later module.)
- Operating room personnel is limited to those who are absolutely necessary for the case and traffic flow is restricted. Ideally a designated person in the room should remain free of patient contact, allowing that person to leave the OR and retrieve items, as necessary.
- Refer to the ORNAC standards and site-specific manuals for policies regarding Routine Practices, Additional Precautions and specific infectious disease such as (MRSA, VRE, TB and CJD).

Occupational Safety Issues #
Learning Objectives #
At the end of the unit, the student will be able to:
- Demonstrate how the use of proper body mechanics can help to avoid musculoskeletal injuries.
- Recognize the physical and emotional stressors in the perioperative setting and identify strategies to maintain individual fitness to practice.
- Describe electrical and mechanical safety concerns and how to avoid them.
- Define the principles of WHIMIS (Workplace Hazardous Materials Information Sheets) and explain the purpose of MSDS (Material Safety Data Sheet).
- Describe the biological safety concerns and the appropriate precautions required in the perioperative setting.
- Describe the key points of radiation safety and the necessary protective measures.
Introduction #
There are an overwhelming number of potential occupational safety issues and health concerns facing perioperative nurses and their patients. Occupational hazards may lead to staff disability issues and result in nurse leaving the profession. This further intensifies nursing shortages and contributes to nursing retention problems. Understanding issues of occupational health and safety will provided perioperative nurses with the knowledge to provide safe and competent patient care. Implementing preventative safety measures will contribute to building a safe and environmentally-friendly work site.
There are many safety issues in the perioperative setting. Patient safety issues that will be discussed in other units include:
- Patient consent and identification of the correct surgical site (PN-003)
- Protecting patient’s rights (PN-001 & PN-002)
- Medication errors
- Monitoring blood loss and temperature control (PN-003)
- Aseptic technique principles (PN-004)
- Surgical counts (PN-004)
- Handling of specimens (PN-005)
The focus of this unit is occupational safety.
Many of the occupational safety issues mentioned in this unit are common to all acute care settings. The perioperative nurse must be aware of the issues and how to deal with them safely and effectively to ensure that the surgical procedure is performed in a safe manner. These issues fall into the following categories:
- Ergonomic or physical stress
- Psychosocial stress
- Electrical and mechanical safety
- Biological hazards
- Chemical hazards
- Radiation safety
- Waste management
- Fire safety
- Laser safety
- Latex allergies
The first six categories will be discussed in this section. Basic electrical safety principles will be discussed (as mechanical safety, and electrical/ electrosurgical unit safety have already been covered in a previous section). During the full-time clinical Program, the principles of waste management will be discussed (safety, environmental, economic). Fire safety, laser safety and latex allergies will be presented in the next three sections.
The vision of WorkSafe BC is to keep: “Workers and workplaces safe and secure from illness, injury, and disease”. Hospital policies and ORNAC standards further state that:
- The facility has the responsibility to establish and promote a safe work environment.
- Perioperative nurses are responsible for following safety policies and reporting safety hazards.
Every facility in Canada must adhere to legislation and policy for worker safety. In British Columbia, WorkSafeBC is dedicated to promoting health and safety standards and enforcing Occupational Health and Safety Regulations. Perioperative nurses, as front-line workers, can contribute to safe work practices by collaborating with management to influence policy.
1. Refer to the WorkSafeBC website Health Care – Prevention Resources to review some of the safety concerns and regulations in the health care field.
2. Also refer to the VCH Connect, Human Resources, Workplace Health site at VCH workplace health website for Workplace Health policies have been developed in conjunction with relevant programs, based on applicable, current standards and regulations to ensure a safe and healthy work environment across VCH.
Hazards can be prevented, reduced or controlled by adherence to sound policies, procedures and regulations.
Physical and Psychosocial Stressors #
Physical Stressors #
Ergonomic
Direct patient care can have a significant physical impact on perioperative nurses. Factors that contribute to physical stress for the nurse in the perioperative setting are:
- Awkward positions
- Standing for long periods of time in one position
- Repetitive motions
- Moving patients
- Carrying heavy trays of instruments
- Improper body mechanics
Recommended safety practices:
Stretchers or beds:
- Wheel stretchers and beds at appropriate height.
- Utilize steering mechanism.
- Keep side rails up.
- Call for assistance if also pushing IV pump/pole or bed is awkward to manoeuvre.
Transferring patients:
- Use appropriate number of staff to assist with unconscious patients (usually four people).
- Maintain patient spine precautions utilizing six people.
- Patients who are awake may require between two to four people for transfer.
- Lock stretcher or bed and operating table prior to patient transfer.
- Lower side rails.
- Adjust height of stretcher or bed to appropriate level.
- Use proper body mechanics.
- Use a roller, sliding board, or appropriate transfer draw sheet (see draw sheet cautions as per WorkSafeBC)
- Secure patient with safety strap.
Scrubbed at the OR table:
- OR table height is adjusted to appropriate level for surgeon.
- Use footstools for staff (as necessary) to accommodate appropriate height level.
- Use caution with footstools to prevent accidental falls.
- Adjust mayo tray to appropriate height.
- Assume optimal position to alleviate unnecessary twisting or straining to reach equipment or patient.
- Move around to alleviate prolonged standing in a stationary position.
Lifting instrument trays:
- Use proper body mechanics when lifting.
- Ensure that appropriate surface is available for the relocation of a tray, prior to lifting it.
- Trays should not weigh more than thirty pounds.
Lifting equipment:
- Use proper body mechanics when lifting anything.
- Do not lift the equipment until necessary.
- Request assistance if the item is too heavy or awkward to lift.
Cords:
- Plug in equipment in overhead outlets if possible
- If cords must be on the floor, avoid placement across pathway.
- Cover any cords on pathways with a trip mat.
- Place cords in a flat position with no kinks or coils.
Haste:
- Take your time and focus on necessary tasks.
- Move efficiently and be aware of crowded surroundings when moving (e.g. avoid bumping into equipment, people).
- Leave a wide margin when moving around equipment to prevent bumping into equipment when rounding a corner.
Noise
Environmental noise has an impact on both the anesthetized patient and the OR staff. Noise can be distracting and can make it difficult for people to concentrate. Common sources of noise are:
- Excessive or loud talking
- Power tools, fans/motors, suction
- Electrical equipment – ‘in use’ sounds detect inadvertent usage
- Monitoring alarms – patient and equipment
- Music (can be distracting or soothing depending on the type and volume)
Noise levels should be kept to a minimum and at a tolerable level for everyone. Noise levels can be moderated according to the following:
- Use “mute” setting for equipment if appropriate.
- Maintain the volume of music devices at an acceptable level for everyone. Choose muisc that is acceptable to the majority of listeners.
- Keep all noise to an absolute minimum while the patient is being anesthetized (i.e. equipment, instrument or instrument pan noise, talking).
Psychosocial Stressors #
Currently, nurses in the workplace may face many issues that can cause emotional strain and can eventually lead to physical manifestations of stress. Psychosocial stressors include:
- Long hours
- Heavy workloads
- Lack of breaks
- Inappropriate staffing levels
- Mandatory overtime
- On-call scheduling
- Demographic diversity
- Physical and verbal abuse from both staff and patients
- Burnout
- Trauma patients
- Death in the OR
- Death of a family member or friend
- Lack of support from management (re: maintaining safety standards)
Although many issues that create psychosocial stress for perioperative nurses are uncontrollable, there are strategies to assist nurses to cope with stress. Nurses may take responsibility for their emotional health by:
- Refusing overtime when feeling stressed
- Reporting difficult scheduling issues to the manager
- Reporting any abusive situations or safety issues using appropriate channels of communication
Unfortunately, inadequate staffing levels in the OR can result in surgical cancellations and/or patient safety issues. Nurses must consider the personal health consequences of working excessive amounts of overtime to resolve staffing shortages. Most perioperative nurses are periodically required to be “on call”. It is important to plan ahead for the on-call schedule demands by getting enough rest, exercise and nutrition. The perioperative environment can be a challenging and stressful environment that requires excellent teamwork to provide the best patient care. As individual members respond to untoward outcomes differently, it is important for team members to supoprt each other in the event of emotionally upsetting circumstances (i.e. death). Many teams set aside a time to “debrief” with colleagues, managers, and support teams following a stressful event to assist people to cope with emotional stress. Emotional and physical health will be discussed further during the full-time clinical Program (after you have had an opportunity to become familiar with the perioperative setting). Prior to the clinical experience, review the CRNBC document – Fitness to Practice as a good source of information for all health professionals.
Electrical and Mechanical Safety #
Electrical Safety #
Electrical equipment presents serious potential safety concerns (shocks, fire, burns) for both staff and patients. In order to ensure that electrical equipment functions properly:
- Become familiar with the safe management procedures of equipment.
- Prior to use, check all equipment to ensure proper functioning. Follow hospital policy regarding malfunctioning equipment and maintenance (e.g. ORNAC & CSA standards outline a process to remove equipment to the Biomedical Equipment Department for repair).
- Use the lowest possible setting when initially using electrical equipment.
- Ensure that an there is an audible tone or “on” light when the equipment is activated.
- Electrical cords must be intact and free of kinks and knots.
- Discard or send any damaged (frayed) cords or elements for repair.
- Do not loop or twist cords around metal instruments as microscopic cracks in the cords can create sparks when in contact with the metal instruments.
- Ensure that there is no stress or tension on any cords or the active tip of the device.
- Place cords flat across the floor and place mats over the cords to prevent tripping.
- Always pull the plug (not the cord) when disconnecting from electrical outlets.
- Do not use electrical equipment in the presence of flammable substances.
- Do not place hot or active cords (i.e. fiber-optic light sources) on to drapes or other fuel sources.
- Do not place liquids on top of any piece of electrical equipment.
- Ensure that there are appropriate fire extinguishers readily available.
- Ensure that all electric operating room tables/beds and post-operative beds are in proper working order prior to placing a patient onto them.
There are potentially very dangerous and damaging consequences when electrical equipment is handled improperly within an oxygen-rich environment such as the OR.
Mechanical Safety #
Non-electrical equipment is categorized as “mechanical” and includes such equipment as stretchers, non-electrical, operating room tables, and sitting stools/chairs, mayo trays (that can be raised and lowered) and stationary furniture such as the back table or standing stool.
All furniture and equipment must be the appropriate size and selection for the surgical procedure. It must also be in good working order (no sharp edges or cracks; properly functioning wheels). any damaged equipment should be removed from the patient care area and sent for repair to the appropriate department.
Chemical Safety Issues #
There are a variety of chemicals and gases used in the perioperative area. All employees should be aware of the chemicals that are used in their work area and the potential hazards associated with them. It is important to have the knowledge and a plan in place for treating any potential exposure to chemical hazards that may occur.
WHMIS #
WorkSafeBC requires that employees review Workplace Hazardous Materials Information Sheets (WHMIS) on an annual basis. Within the WHMIS system, the Material Safety Data Sheet (MSDS) outlines information about “controlled substances” as follows:
- Chemical make-up of hazardous substances
- Preparation information (i.e. dilution)
- Product informatio: generic and manufacturer names of substances
- Physical data: physical characteristics of the substance
- Identification of hazards (i.e. fire or explosion hazards)
- Reactivity data (i.e. stability and/or interactions with other substances)
- Toxological properties (i.e. signs and symptoms of toxic exposure)
- Preventative measures: precautions or special handling that is needed
- First aid for chemical exposure
An example of a how to utilize a MSDS (formalin) in the event of a hazardous spill (Code Brown) can be found in the unit (PN-005 – specimen care). According to WorkSafeBC guidelines, suppliers, employers and workers are responsible to the following:
Suppliers
- Provide up-to-date MSDS (not more than three years old) for all controlled products they sell or produce.
- Provide supplier labels on all containers of controlled products they sell or produce.
Employers
- Ensure the workers understand information on MSDS, supplier labels, and workplace labels by providing effective worker education.
- Provide training in specific safe work procedures to workers who work with or near controlled products.
- Ensure that all containers of controlled products in their workplace have MSDS and WHMIS labels (supplier labels, workplace labels, or other acceptable means of identification as appropriate).
- Ensure that MSDS information is readily accessible to workers and that the employees know how to access the information.
Workers
- Understand the information on labels and MSDS.
- Use the information they receive through education and training to handle controlled products safely.
- Inform employers if labels are illegible or missing.
Worksafe Prevention staff in B.C.
- Administer WHMIS legislation.
- Provide general information about WHMIS to employers and workers.
- Ensure compliance with both federal and provincial WHMIS legislation.
The following symbols represent the eight types of existing hazardous materials. Examples that apply in the perioperative setting and preventative measures that should be taken when working with these substances are outlined.
Class A: Compressed Gas #

Examples of gases found in the OR:
Compressed gas cylinders:
- Oxygen, nitrous oxide, air (used as anesthetic gases)
- Nitrogen (used to run power tools)
- SF4 and C3F8 (used in ophthalmology procedures)
- Argon (used to power a type of electrosurgical unit to achieve a spray effect)
- Heliox (used for patients with airway obstruction)
- Carbon dioxide – CO2 (used as insufflator for laparoscopic procedures of the abdomen)
Safety Precautions:
- Ensure all cylinders are secure (chained during transport and storage) to prevent them from falling over as the impact of a fall could cause the neck of the cylinder to break off and explode.
- Ensure that all anesthetic gases are administered in a closed circuit via anesthetic tubing and that a scavenger system for used gasses is in operation.
- Regular checks for gas leaks are carried out in the OR to detect any failure of the scavenger system (part of the anesthetic machine).
- Report any symptoms of the presence of anesthetic gases (dizziness, fatigue, headache or drowsiness).
- Ensure that there is an adequate ventilation system in the recovery room as patients breathe out anesthetic gases (in a less toxic form)
- Be familiar with how to change the tank when empty.
- All tanks come with a gas-specific connector to prevent potential errors in interchanging gases (i.e. only oxygen tank lines will fit into an oxygen tank).
Class B: Flammable and Combustible Material #

Examples of combustible material in the OR:
- Alcohol-based skin preparations/ antiseptics and iodines
- Anesthetic liquids (placed in vapourizers which convert the liquid to gas) (i.e. Isoflurane, Desflurane, Sevoflurane)
- Cleaning solutions
- Acetone
Safety Precautions:
- Allow alcohol-based preparations to dry prior to the use of lasers or cautery and ensure that prep solutions do not pool under the patient.
- Use synthetic colloidal products (not acetone) to remove ECG electrode glue or nail polish. Do not use these products near cautery.
- Do not place bottles of skin preparation on electrical equipment (ESU, computers, lasers).
Class C: Oxidizing Material #

Examples of oxidizing material in the OR:
- Hydrogen peroxide (percentages over 6%) or paracetic acid which are used in sterilization procedures for endoscopic equipment (Sterrad sterilizers).
Safety Precautions:
- Wear gloves.
- Use oxidizing products in a ventilated area or with a fume hood. (Most agents are mixed in the sterilizer and exposure is limited).
Class D: Poisonous and Infectious Materials (Division 1 – Materials Causing Immediate & Serious Toxic Effects) #

Examples of poisonous materials in the OR:
- Mercury thermometers
- Bleach
Safety Precautions:
- Do not touch the mercury if a glass thermometer drops and breaks. Call appropriate personnel (as per policy and protocol) to come with a vacuum and secure the proper containers for disposal.
- Wear gloves when handling bleach or other cleaning agents and use in well-ventilated areas. (Most bleach and cleaning products used are of a synthetic or diluted variety).
Class D: Poisonous and Infectious Materials (Division 2 – Materials Causing Other Toxic Effects) #

Examples of poisonous materials in the OR:
- Formaldehyde (Formalin is used as a preservative for surgically-removed tissue.)
- Glutaraldehyde (used in sterilization process of surgical instruments)
- Cytotoxic drugs
- Methylmethacrylate (bone cement)
- Radioactive plaque (used in ophtalmologic tumours)
Safety Precautions:
- Use prefilled containers of formaldehyde. If it is necessary to pour from a large-volume bottle, wear gloves and use in a well ventilated area or with a fume hood. For large spills (>0.5L): remove people to a ventilated area and immediately contact the hazardous spill team to clean up. For small spills, obtain a hazardous spill kit, which provides gloves, a respirator mask and a special absorbent cloth to clean up the spill.
- When handling sterilization agents, wear gloves and use in a ventilated area or with fume hood. Most agents are mixed in the sterilizer and exposure is limited. Glutaraldehyde should not be used to soak and disinfect instruments and is banned in most facilities.
- All patients who have received cytotoxic drugs in the last forty-eight hours should be placed on “cytotoxic precautions”. Standard precautions should be followed regarding blood or body fluids. Any item exposed with the patient’s blood or body fluids should be disposed of in cytotoxic pails and labelled with cytotoxic or biohazardous signage. Reusable items such as surgical instruments must be immersed in water.
- Use closed cement evacuator systems when mixing Methyl methacrylate to vent the fumes.
- Surgeons will remove radioactive plaques from lead-lined containers and dispose of them upon removal in a container which is taken immediately for disposal by the Cancer Agency staff. The surgeon wears a sterile radioactive detection ring to detect any stray exposure.
Class D: Poisonous and Infectious Materials (Division 1 – Biohazardous Infectious Material) #

Examples of biohazardous infectious material in the OR:
- Human tissue
- Blood and body fluids
- Suctioned body fluids
- Pericardial tissue (allograft)
- Allograft tissue (bone, skin)
Safety Precautions:
- Use standard precautions.
- Dispose of items in biohazardard bins.
- Send specimens in appropriate containers and transport accordingly.
Corrosive Material #

Examples in the OR:
- Battery acid – dispose of batteries in appropriate containers
Dangerously Reactive Material #

o examples of dangerously reactive material are used in the OR.
Nursing Considerations #
Nurses must understand the hazardous materials symbols and the necessary precautions for handling any potential dangerous materials. Nurses must also be prepared to adminster specific first aid measures in the event of an exposure. It is important for all staff to know how to access the MSDS information in the workplace (electronically or manually) and to be aware of safety measures and hospital policies and procedures regarding a spill of any hazardous substance. It is important to avoid shortcuts when handling these substances as even small quantities may be dangerous, and repeated exposures may cause health risks.
Biological Safety Issues #
Biological hazards include exposure to: blood and body fluids, human tissues, infectious micro-organisms and needle-stick injuries, scalpel blade injuries and smoke plume inhalation.
Routine Practices #
As previously reviewed in the Routine Practices section, the importance of wearing appropriate personal protective equipment (PPE) to reduce the risks of exposure to blood and body fluids, human tissue and infectious micro-organisms cannot be overemphasized. Handling human tissue such as sharp as sharp bone fragments also increases the risk of poking, cutting or puncturing the skin for those who are handling the tissue. Punctures of this nature may also lead to potential exposure to blood or body fluids.
The most common potential infectious organisms include: HIV, HBV, HCV and TB.
Personal protective equipment includes:
- Masks with shields
- Shoe covers for cases
- Double-gloves for the scrub nurse
- Gloves for the circulating nurse when potential for exposure exists
- Fluid resistant (Gortex) gowns for the scrub nurse
Protection for TB includes:
- Negative pressure environments
- N95 mask (fit-tested)
- Ensuring that the anesthetic circuit has a filter (and that the filter and anesthetic tubing are discarded after the procedure)
Infectious precautions regarding tuberculosis include both respiratory TB and extrapulmonary TB. Surgical procedures of the spine or peritoneal cavity of patients infected with extrapulmonary TB, may potentially cause TB organisms to be aerosolized and thus expose perioperative staff to a potential risk of infection. All cases of TB or suspected TB (i.e. biopsy procedures) should be treated with respiratory precautions as per hospital Infection Control guidelines.
Immunizations and Screening
- Staff members are advised to receive Hepatitis B vaccination and to ensure that their titre levels are adequate.
- TB screening should ideally be done on an annual basis.
- Influenza immunization should also be considered on an annual basis for the protection of both staff members and vulnerable and immunocompromised patients.
Sharps Injury #
Injuries from sharp devices or instruments occur in about 7% – 15% of all surgical procedures. Percutaneous injuries are primarily associated with occupational transmission of HBV, HCV and HIV. Although the risk of seroconversion in HIV is low (<3%), the possibility is catastrophic. The risk of injury increases during more invasive and longer procedures. Suture needle pokes are the most prevalent cause of injury, with scalpel blades being second and other types of injuries, including punctures with retractors, skin or bone hooks or with electrosurgical tips, occurring on a less frequent basis.
Measures to Prevent Sharps Injury
- Double-glove; the risk of sharps injury is reduced significantly when two pairs of gloves are worn. Research indicates that when a puncture occurs with double-gloving, it is often only the outer glove that has been perforated.
- Monitor gloves for punctures.
- Use verbal notification when sharps are passed.
- Keep visual contact with sharps at all times.
- Use a “neutral zone” or “hands free” passing technique (This will be practiced during the full-time clinical portion of the Program.)
- Take steps to control the location of the sharp device.
- Contain sharps on the sterile field in a designated disposable container (e.g. magnetic suture container).
- Following the surgery, inspect the surgical set-up for sharps prior to dismantling the equipment.
- Safety scalpels should be used.
- Injection needles should not be sheared, bent, broken or recapped by hand (The one-handed recapping method should be used if there is no other alternative available.)
- Use blunt electrosurgical unit electrode tips.
- Load sutures using the suture package.
- Use only needless or sharp-protected systems.
- At the end of the case, separate out sharp instruments (to prevent inadvertent injury of the staff who will be cleaning the instruments). Do not clean up for someone else as you may not know the location of all sharps.
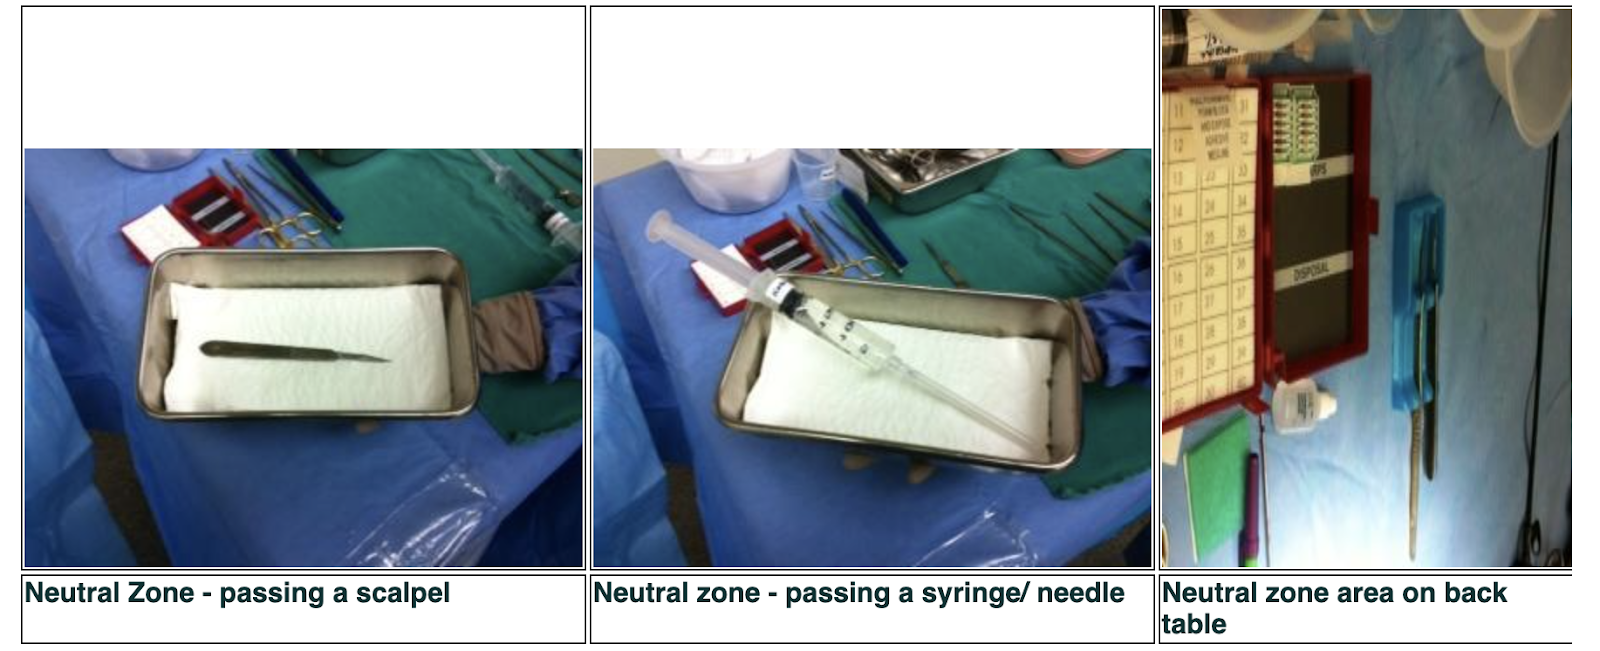
Use of the Neutral Zone
- Use of a designated container/area to hold sharps on back table (sterile field) and another designated container to pass sharps to the surgeon.
- Only one sharp will be in the passing neutral zone at a time.
- The neutral zone will be placed in an agreed-upon area.
- Items taken out of the neutral zone and used will be returned to the neutral zone.
- Only one person will retrieve an item from the neutral zone at a time.
- Utilize a neutral zone container for every procedure of any time length.
Surgical Smoke #
Surgical smoke is a respiratory irritant and a potential carcinogenic substance. Surgical smoke is caused by the evaporation of tissue, which results in steam and creates a plume of smoke. Some of the elements of a plume of surgical smoke that are of concern include:
- Aerosols: particles, gases, carcinogens, cellular DNA
- Smoke by-products: carbon monoxide, formaldehyde, hydrogen cyanide, phenol, methane
This is not an exhaustive list of the ingredients of surgical smoke, but it is enough to cause concern.
Preventative Safety Measures
- Wear a mask; an N95 mask is required for laser plume.
- Use a smoke evacuator for every procedure involving the use of an electrosurgical unit (or specific lasers).
- The use of wall suction is not sufficient to evacuate surgical smoke and it allows the entry of contaminants into the hospital vacuum system.
- Ensure that the smoke evacuator filter is changed as necessary.
- Some surgeons are reluctant to use the evacuator, as they dislike the bulkiness of the smoke evacuator tip and the noise made by the machine. The smoke evacuator should be used according to hospital policies to ensure the safety of all staff.
- Laparoscopic smoke evacuator filters are available to suction the smoke plume from the abdomen.
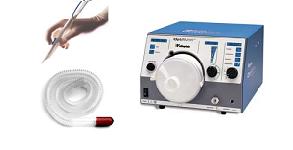
Radiation Safety Issues #
Radiation safety issues will be discussed in the downloadable notes (prepared by Dr. Emmy Duran, Radiation Safety Officer) – Practical Radiation Protection for Nursing Staff.
There are two types of X-rays: single shot or continuous. Single shot is a one-time exposure to take a single frame (i.e. chest X-ray). Continuous X-ray or fluorscopy involves taking a series of images (i.e. angiogram, in which a dye is injected into a blood vessel and the flow of the dye is viewed to determine if there are any blockages in the blood vessel). Fluoroscopy can also be used during surgery or procedures to ensure that an implant or stent is placed correctly and does not cause any damage as it is placed.
Measures To Prevent Exposure
- When X-rays are being taken, staff should leave the OR or stand behind lead-lined shields. The lead-lined shields should be readily available in the OR theater in readiness for required X-rays and positioned at least six feet away from the X-ray beam.

- Staff must wear X-ray gowns for all fluoroscopy (continuous X-ray) cases (e.g. large or mini C-arms). Ensure that the proper gown is worn. There are some backless varieties of gowns and staff members must be careful not to turn and expose an unprotected back when X-rays are taken.
- Wear thyroid shield protection in addition to gowns.
- X-ray goggles should also be worn for lengthy fluoroscopy cases, as prolonged radiation exposure can be harmful to the eyes.
- Pregnant staff (or staff with suspected pregnancy) must wear an X-ray gown (even for mini C-arm) or ask to be reassigned to an OR that is not using fluoroscopy.
- Lead-lined surgical gloves can be worn during lengthy procedures. The surgeon usually wears lead-lined gloves as their hands may be in the surgical field when the X-ray is being taken.
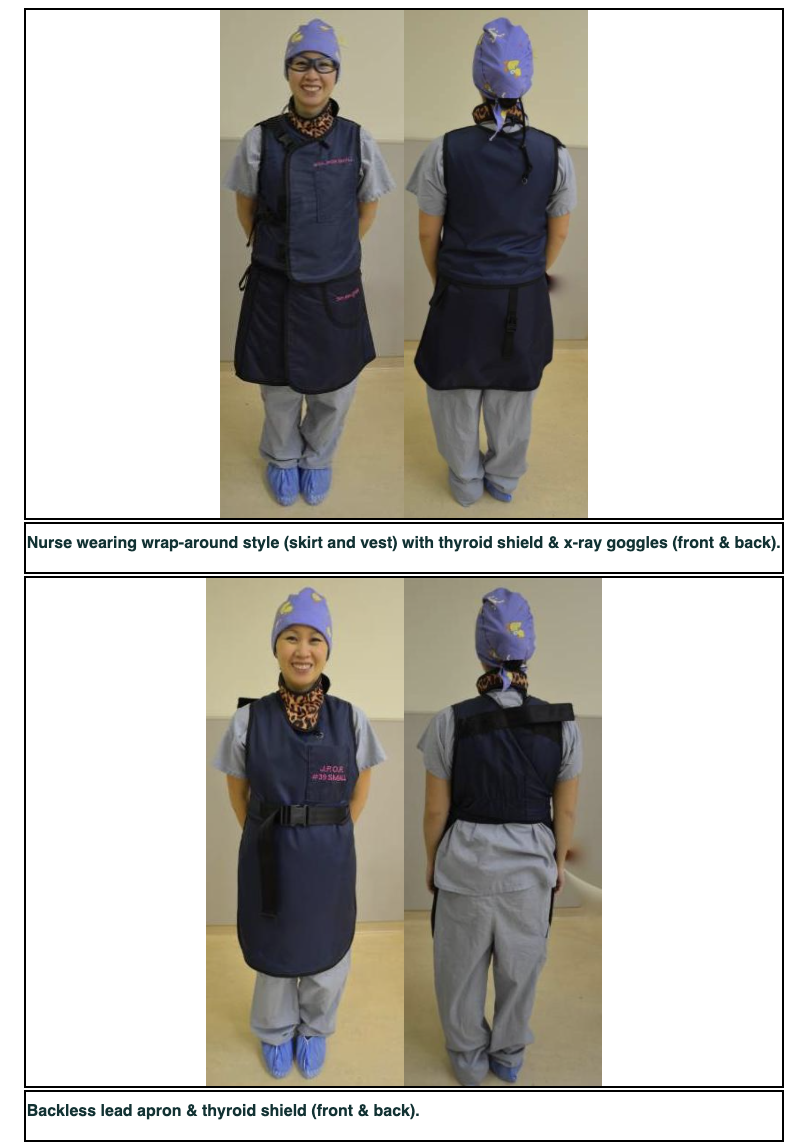
- X-ray gowns should be hung up or laid flat when not in use, as creasing or folding the gown can damage the protective lining.
- Surgeons should consider wearing lead-lined gloves and a gonad shield when standing or sitting during the use of the mini C-arm. Protective glasses may also be worn for prolonged or close exposure to the X-ray beam.
- All persons exposed to X-rays on a daily basis should wear monitoring devices (dosimeters). These devices should be worn in a consistent location (i.e. on the neck or waist of the X-ray gown). Monitoring devices should be read on a regular basis and results recorded.
- All patients of child-bearing age should have pelvic regions covered with an X-ray shield during procedures (where it does not interfere with the operative field). Patients should wear a thyroid shield during X-rays of the upper extremities.
- X-rays will not be taken without informing all personnel present and ensuring that all personnel are protected.
- Radiology staff will record the amount of X-ray (fluoroscopy) time used on the patient; the goal is to minimize a patient’s radiation exposure as much as possible.
- An unusual occurrence must be reported (i.e. incident report) when an X-ray is required outside the realm of the surgical procedure (e.g. for detection of a missing sponge or surgical instrument).
Laser Safety #
Learning Objectives #
At the end of the unit, the nurse will be able to:
1. Define the term “laser”.
2. Describe how lasers work.
3. Outline the safety hazards of laser operation.
4. Describe the laser safety measures for the perioperative setting.
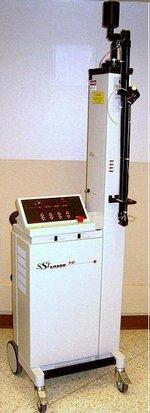
Laser Basics #
Lasers are important surgical tools and are used in a variety of surgical specialties. It is imperative for the perioperative nurse to understand the basic physics and related safety issues regarding lasers in order to maintain safe environments for patients and staff.
Advantages of Lasers #
- Dry surgical field
- Reduced blood loss
- Reduced edema
- Limited fibrosis and stenosis
- Fibre-optic delivery
- Potential reduction in the spread of metastases
- Precision
- Reduced post-operative pain
- Sterilization of the impact site
- Contact or no-touch technique as an option
History of Lasers #
Lasers have been around since the early 1900’s. The basic advances have been:
- Einstein (1917): described the stimulation of matter to cause the release of energy.
- Maiman (1960): produced the first ruby crystal laser to be used for dermatological and retinal surgery.
- Contact tip technology for urologic & vascular procedures developed (1980s).
- Fine tuning of lasers with technological advances continues in the present.
Surgical Specialties Using Lasers #
- Urology
- Ophthalmology
- Dermatology (the most prevalent user of lasers worldwide in clinic settings)
- Otorhinolaryngology
- Gynecology
- Neurosurgery
- Photodynamic therapy
- General Surgery
- Gastroenterology
- Oral surgery and Dentistry
- Orthopedics
- Vascular Surgery
- Pulmonary Medicine
Dermatology is the biggest user worldwide (clinic type settings).
Types of Lasers #
The active medium is the element that gives a laser it’s name. Different types of lasers have different wavelengths on the electromagnetic spectrum and a laser is associated with a different wavelengths on the electromagnetic spectrum and a laser is associated with a different colour according to where it is placed in the spectrum. This will be discussed in more depth.
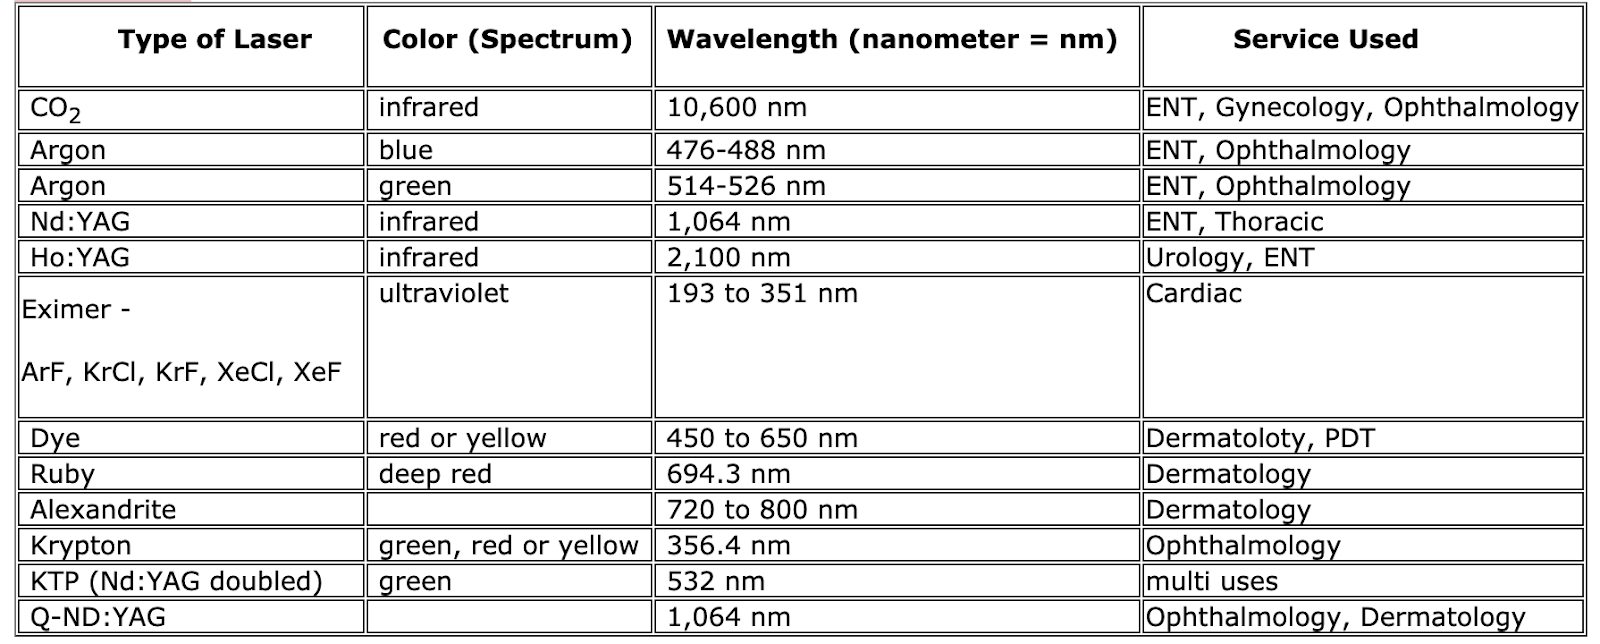
There are several different types of lasers, differentiated by the variety of mediums they use and the wavelengths at which they operate. Both of these factors determine the effect the laser will have on tissue. A basic knowledge of laser physics is necessary to understand the ramifications of laser use.
Laser Physics #
What is Laser? #
A laser is not only a device, but also a process that converts one form of energy to another (usually electrical energy into optical energy). Laser is an acronym that describes the process by which light energy is produced. LASER stands for:
Light
Amplification
Stimulated
Emission
Radiation
The result of the laser process is the production of an intense beam of highly monochromatic and coherent radiation. In this context, radiation refers to light and not the ionizing radiation associated with X-rays.
Components of a Laser #
An laser machine is made up of the following components:
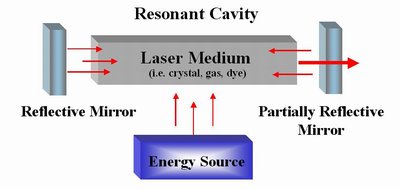
What Do I Really Need to Know About How a Laser Works? #
Tissue Effects
Each type of laser exhibits different biological tissue effects and is therefore effective for different applications. The different tissue effects depend on the laser light’s degree of absorption in the targeted tissue and the amount of power delivered (see picture below). The choice of laser will depend on the type of tissue and what type of tissue effect you want to achieve (i.e. from heating the tissue to vapourizing the tissue).

The light must be absorbed by the tissue to create a tissue effect. It can also be transmitted, reflected or scattered, giving a variable tissue effect or no tissue effect at all, which can be used to the surgeon’s advantage (to enhance the effect) or disadvantage (to harm surrounding tissue).
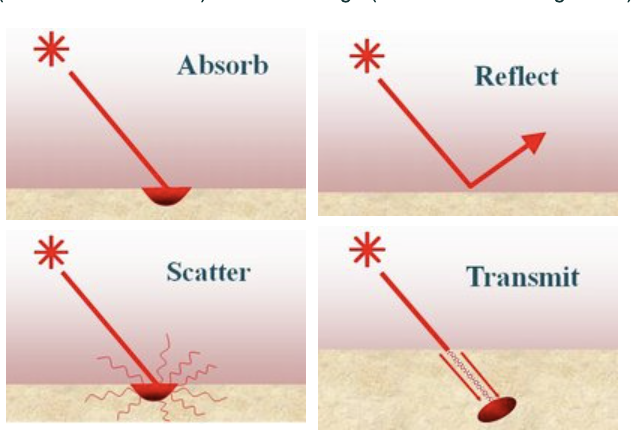
Coupled with the power density (explained below) the depth of absorption will determine the depth of penetration of the light.
The biological tissue effects created by the laser are:
1. Photochemical
- Use of photosensitive drugs to activate specific wavelengths of light (i.e. Photodynamic Therapy (PDT))
2. Photodisruptive
- Photodissociation: nonthermal ablation of tissue with the use of specific wavelengths of light (i.e. corneal laser surgery)
3. Photothermal
- Tissue heating: by conduction, convection or radiation heat transfer
- Hemostasis: tissue coagulation
- Photothermolysis: coagulative levels of heat generated in specific structures by the absorption of specific wavelengths of light
- Vapourization: destruction of tissue with creation of a smoke-like steam (laser plume)
- Non-linear effects: creation of “shock waves” (i.e. lithotripsy of kidney stones)
Power Density
The power of the laser beam itself is measured in watts (W). This refers to the rate at which energy is delivered. The amount of power delivered per unit area is the Power Density (W/cm3).
The power density determines the laser’s ability to vaporize, excise and coagulate tissue. It determines the rate of tissue removal and gives the surgeon a sense of eye-hand coordination. The power density (set by the setting on the laser) in combination with the spot size will create the desired tissue effect. A high power density produces a clean vapourization of tissue, but is hard to control by the surgeon and can lead to perforation of tissue. A low power density is easier to control, but can lead to slow hand movements and therefore can cause excess heat build-up and lead to burning or charring of tissue.
The energy the laser delivers is measured in joules (J). The amount of energy delivered per unit area is the fluence (J/cm3). This is often seen in the settings of the laser; the laser beam can be delivered in a continuous mode, a pulsed mode or short bursts of energy or variations of both. Pulse mode is important in that the longer energy is delivered, the greater the heat build-up and surrounding tissue damage. Using a pulse mode reduces the total time the beam is applied but the total power delivered is not affected. This is often measured as the exposure time.

Spot Size
The spot size is the size of the laser beam and is controlled by the surgeon (although it is affected by the wavelength of the laser light, lens focal length, etc). The larger the spot, the larger is the area of tissue that can be treated. The smaller the spot size, the smaller is the area that is treated. However, when the power density is factored in, the energy delivered over a smaller surface area equals a greater tissue effect. The larger the spot size the lesser the degree of tissue effect. The larger the spot size the higher the power density that is required to maintain the same tissue effect.
It is easier to control the laser (and to work on larger areas) with a larger spot size, but the higher power density required (and due to variations in tissue) can cause uneven results to occur. However, the larger spot size covers a greater surface area, requiring less lasering time.
The surgeon should use the the highest power density that they can control, with a spot size sufficient to cover the required surface area. This allows the surgeon to complete the surgery as quickly as possible and to prevent any collateral damage to surrounding tissues.
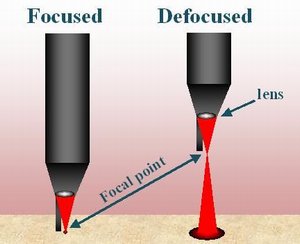
Handling of the Laser Machine
When moving the laser machine ensure that it is not bumped or moved over uneven surfaces. The mirrors inside the laser are set to reflect the beam in a certain way and they must not be jarred. This is also one of the reasons that a laser must be tested prior to patient use.
Safety Issues
The safety issues related to the operation of the various lasers will be discussed.
Safety and Nursing Considerations #
The use of lasers has increased considerably and the widespread use requires that all personnel involved in their operation become familiar with the potential hazards associated with the misuse of this valuable piece of equipment.
It is common practice in many facilities for surgeons to be trained and certified in the use of the laser. This means that they have taken a manufacturer-approved course about the operation of the laser. Specific lasers should only be operated by surgeons who have the necessary certification.
Testing and operating the laser should be limited to the perioperative staff members that have received the required training. All maintenance should be done by trained biomedical staff. Many hospitals have a laser safety officer (LSO) who is designated to:
- Provide staff training on laser safety.
- Ensure proper certification of surgeons.
- Write policies on the use of lasers in the hospital.
- Troubleshoot any problems with lasers.
Many hospitals also have laser safety committees to review policies. Each staff member should review basic laser safety on an annual basis.
Lasers are divided into classes, which describe how serious the effects of the laser light emitted can be.
- Class I – supermarket checkouts, high speed copy machines
- Class II – helium laser pointer
- Class III – hazardous for direct exposure to specular reflection
- Class IV – significant skin, eye and fire hazards from direct reflection of beam
Most lasers used in surgery are considered to be Class III or IV lasers.
It is imperative that lasers are operated by people who are properly trained and educated in their use to prevent the serious potential problems that could occur. Potential hazards of laser use can be categorized as:
- Eye hazards
- Skin hazards
- Fire hazards
- Chemical and biological hazards
- Electrical hazards
Control of the area in which lasers are used is an important safety concern. Laser safety experts have identified the area around a laser as “the nominal hazard zone” (NHZ). In most hospitals, the NHZ is defined as the entire OR theater because this are can be difficult to specifically delineate.
- Keep unauthorized personnel out.
- Lock doors and pull shutters down. This prevents laser transmission outside the OR through the window; some wavelengths can pass through glass.
- Post signs or turn on “laser in use” signs to inform everyone that there is a laser is in use. If people must enter the room, appropriate precautions must be taken prior to entering.
- A laser checklist helps, to ensure that all safety measures have been attended to prior to initiating use of the laser.


Shutters down, both doors locked and laser sign illuminated/ or posted on door
ursing considerations related to potential laser hazards and proper laser safety will be discussed. (Note: some of the safety measures and products are specific to facilities and will vary from the examples)
Eye Hazards #
“It’s all fun and games, until someone loses an eye” – Mom
Eye damage or blindness are potential high-risk injuries resulting from directly looking into the laser beam or receiving laser beam scatter or reflection. The following illustration depicts the dangers from exposure to certain wavelengths of light.
- 315-390nm near-ultraviolet (UV-A) absorbed in the lens may contribute to certain forms of cataracts
- 400-550 nm blue light hazard
- Retina damage with long term or exposure lasting for minutes or hours
- Due to the eye’s refractive ability the light will be focused on the eye in a pinpoint of light that is greater in intensity than when it entered the eye
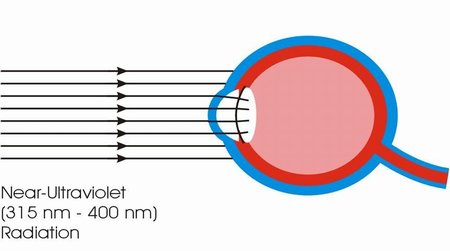
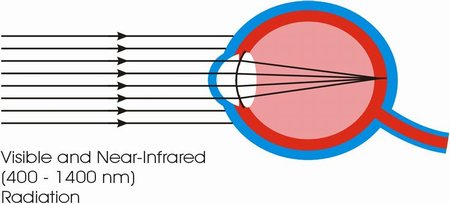

- 180-315nm actinic-ultraviolet, “welder’s flash” or photokeratitis
- 3000-1mm far-infrared (IR-C) absorbed in the front surface of the eye
- 1400-3000nm mid-infrared (IR-B) penetrates deeper, “glass blower’s” cataract
- Extensive exposure to near-infrared (IR-A) may contribute to cataracts
Everyone in the operating theater must wear protective eyewear that is specifically designed for protection from lasers. Laser shields must be placed over the patient’s eyes prior to activating the laser. Perioperative staff must choose eyewear that is specific to the wavelength of the laser being used. Optical density (OD) is an indication of the strength of laser light that the lens will block. The optical density of the eyewear should be identified directly on the glasses, usually etched as a range of wavelength. This range should match the wavelength indicated on the laser itself.
The eyewear that is used may be tinted or have coloured filters. The colour of the glasses or goggles does not determine whether the eyewear offers appropriate protection for the laser being used. Users must be sure that the selected eyewear is identified as safe and appropriate for the laser being used. This information can be found on the laser safety tag attached to the laser.
Laser safety tag information should include:
(posted on laser)
- Type of laser
- Wavelength of laser light and corresponding OD for protective eyewear
- Eyewear label name
- Manufacturer name and model
- Number of key used to turn on laser (i.e. 24)


When a laser is used in microscopic procedures, a filter with the proper wavelength protection on the microscope is sufficient. It is not necessary for the surgeon to wear additional safety glasses/goggles. Although it is not damaging to the eyes to view a laser light on a television screen, eyewear must be worn as a precaution as the laser could be inadvertently fired as it is removed
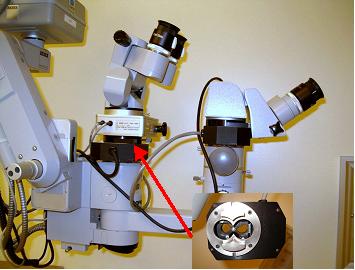
Eye Safety Practices
Patients must wear one of the following:
- Laser eye shields
- Glasses or goggles with side shields that specifically filter out wavelength of laser in use
- Eye pads covered with aluminum foil (shiny side in to prevent laser beam reflection)
- Moistened eye pads (for CO2 lasers only)
Staff must take the following safety precautions:
- Glasses/goggles with side shields that filter out specific laser wavelength in use
- Endoscope or microscopic filter required (not required for CO2 lasers as optical elements sufficiently block 10,000nm)

Both CSA (Canadian Safety Association) and ANSI (American National Standards Institute) emphasize that the following eyewear does not comply with the standards for laser safety eyewear, especially for CO2 lasers. (Eyewear for this laser is often clear and it is essential that it not be confused with the eyewear listed below.)
Prescription eyewear:
- Does not provide peripheral protection
- Not rated with optical density (OD)
- Not rated for specific wavelength
Plastic safety eyewear (worn for splash protection)
- Not rated with optical density (OD)
- Not rated for specific wavelength

Proper laser safety eyewear with 10,600nm @OD≥ 4.8
Refer to the chart on the Laser Basics page to determine the wavelength of eyewear required for specific lasers.
Skin Hazards #
The effects of a laser beam on the skin can result in burns. In the:
- 180-315nm range (actinic-ultraviolet): result in “sunburn” or erythema of the skin, skin cancer and accelerated skin aging
- 315-390nm range (near-ultraviolet (UV-A)): at high irradiances produce “ion wave” erythema of the skin and photokeratitis
- 310-400nm range (near-UV & 400-600nm (visible)) range: photosensitive reactions
- 700-1000nm range (near-infrared): bioeffects such as skin burns and excessive dry skin
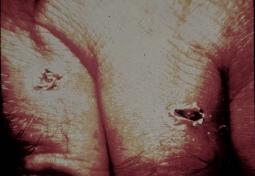
Skin Safety Practices
- Ensure that there is constant vigilance about where the beam is directed.
- Use covered foot pedals to avoid inadvertent activation of laser.
- Place laser in “standby” mode when not in use to avoid inadvertent activation of the laser.
- All lasers require a key to turn them on. This helps to avoid the possibility of unauthorized personnel inadvertently turning on and firing the laser.
- Test the laser beam aim prior to use to ensure accurate firing of beam.
- Use anodized, non-reflective instruments to prevent beam reflection.
Fire Hazards #
The following depiction of the fire triangle demonstrates the potential fire hazard of a laser.
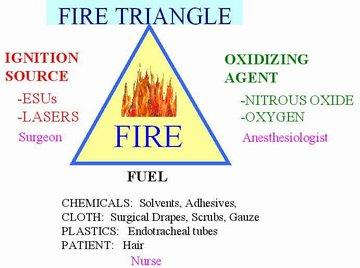
The most important source of fire prevention is the communication between the surgeon, anesthesiologist and the nurse. It is usually the nurse who has the broad overview of the OR and is therefore in charge of ensuring that the laser is not taken off “standby” until a level of safety is achieved (fuel sources are at a minimum, oxidizing agents are controlled and the ignition source is not turned on until safe to do so). This cannot be achieved unless there is communication between all parties involved.
The laser is a potent ignition source is controlled by the surgeon (or the person testing the laser). The surgeon must be constantly vigilant about where the laser is pointed.
The oxidizing agents found in the OR are nitrous oxide and oxygen (O2), the latter being in abundant supply. The patient may be receiving O2 by mask or nasal prongs. Extreme caution must be used with lasers near the facial area. The most dangerous risk of potential fires with laser use is for patients undergoing procedures around the endotracheal tube (ETT). The potential for an airway fire is high with standard ETT’s which are made of plastic and are easily ignited as a fuel source, coupled with the presence of O2 passing through the ETT. Airway fires are potentially lethal and can happen so fast that they are hard to stop before significant damage has occurred. The safety measures to prevent airway fires during ENT procedures close to the ETT include the following:
- Use ETT designed for laser use (laser shielded) and ensure that the tube used is the correct one for the laser being used.
- Apply wet cottonoids around the ETT cuff as an additional heat sink.
- Some laser ETT tubes have a dye in the cuff that will detect an air leak and the potential for O2 escape.
- Use 30% O2/ 70% Helium (He) or 30% O2/ 70% air in anesthetic gas mixture to lessen the O2 presence and still adequately oxygenate the patient.
- At times, a jet ventilator will be used which mixes with the O2 as above, but allows bursts of gases to be administered in between lasering.
- Use water-based lubricating jelly for intubation. (Petroleum products are flammable.)
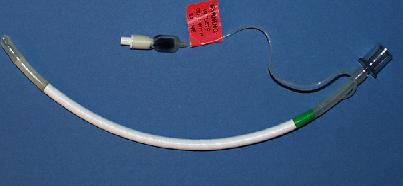
There are many fuel sources in the OR in the form of chemicals (solvents, adhesives, alcohol based antiseptics), cloth (surgical drapes, scrub gowns), paper (surgical drapes), plastics (ETT’s) and the patient (hair). The following measures are important to prevent the ignition of these fuel sources:
- Use moistened drapes or gauze around the surgical site. Ensure the material are not so wet that they could contaminate the sterile field (i.e. strike through).
- Be aware of O2 accumulation under the drapes (i.e. tenting) of patient’s receiving O2 by mask or nasal prongs.
- Avoid alcohol-based skin prep solutions.
- A container of sterile water must be available at all times.
- Avoid combustible dry materials such as cottonoids or plastic instruments.
- Cover shiny instruments with wet towels or use anodized instruments.
- Use “standby” mode to prevent inadvertent activation.
- Shut down the laser completely when it is no longer required.
- Verbally announce, “laser activated” when the laser is removed from “standby” mode.
- Ensure that there is a fire extinguisher in the room.
Chemical and Biological Hazards #
Some lasers (CO2 and Nd:YAG) are capable of vapourizing tissues. When tissue is vapourized, smoke known as the “laser plume” is produced. The laser plume (like ESU smoke) is a biological and chemical hazard and contains two types of contaminants as follows:
Bio-aerosols
- Produced by heat-generating equipment (lasers & ESU’s)
- Remains in the air for up to ten minutes
- May travel on air currents throughout the OR
Particles
- Carbonized tissue
- Blood
- Possible viruses or bacteria
The laser plume appears as smoke (somewhat denser than ESU smoke), which is conseidered hazardous although it may be barely detectable. A laser plume potentially has mutagenic and carcinogenic effects and can also cause ocular and upper respiratory tract irritation.
The following precautions are necessary when using the CO2 or Nd:YAG lasers or when producing a smoke plume:
- Use a high-powered smoke evacuator with a clean filter designed for laser use; change filter as per recommendations.
- Use evacuation tubing that carries the plume from the laser tip to the smoke evacuator.
- Wear an N95 particulate filter respirator, which is a mask that filters the most microscopic viruses. A regular surgical mask is insufficient to filter the laser plume. Anyone entering the OR must wear an N95 mask, no matter how brief the visit.

Box of N95 respirator masks
Electrical Hazards #
Measures to ensure electrical safety with lasers include:
- Never handle electrical equipment when hands, feet or body are wet or perspiring or when standing on a wet floor.
- When using high voltages, all floors should be considered conductive and grounded unless covered with a well-maintained, dry, rubber matting suitable for electrical work.
- Use mats over cords to prevent tripping.
- Never operate lasers alone; always use a buddy system.
- Some lasers (i.e. older Nd:YAG) utilize a cooling system of water flowing into and out of the laser. Extra caution must be taken to avoid leaks, as electricity and water do not mix.
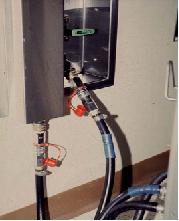
Water input and output for a specific type of laser
The use of lasers is increasing in all areas of surgery and will continue to have new applications in the future. Knowledge of the hazards of sunlight and man-made light sources has permitted scientists to establish safety standards for lasers. These standards are established to protect laser users and patients are sufficiently protected against the potential hazards related to laser use. The use of laser safety checklists helps to ensure that all steps are taken prior to use of the laser.
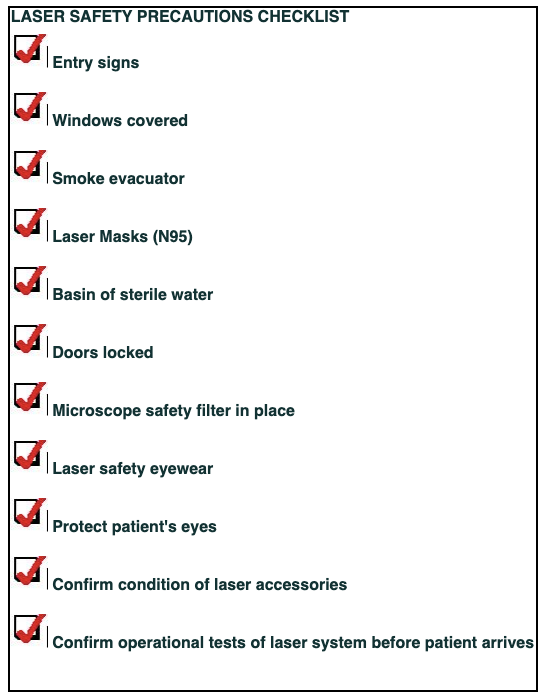
Laser Physics #
What is Light? #
Light is a form of energy. The unit of light energy is a photon, which is a bundle of energy. Photons have no electric charge or rest mass and act as photons only when they are in motion and carry the electromagnetic field. The speed of light is 299,792 km/second in a vacuum.
Light has the following characteristics:
Waves
Photons travel in waves and are measured in wavelengths. Each wave has a:
- Wavelength
- Amplitude
- Frequency
- Velocity (speed)
The wavelength refers to the distance between two successive crests and is the determinant of the colour of light. (The term “wavelength” is also interchangeably referred to as “colour” or “energy”.) The shorter the wavelength, the more intense the colour.
The amplitude is the height of the wave. The higher the wave, the more power it will possess.
The frequency of the wave is the number of waves passing a given point per second measured in cycles per second (Hertz). As mentioned above, light travels at a given velocity, which causes the wavelength and frequency to become inversely proportional. That is to say, at a constant speed, the shorter the wavelength, the greater the frequency and hence the more energy is emitted. The velocity is constant through a given material, but the velocity will alter if passing through different materials.
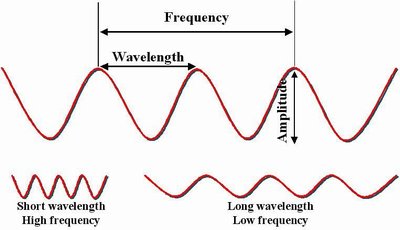
Frequency=# of waves/second
Amplitude=height of wave & power
Wavelength=distance between two wave crests
Electromagnetic Spectrum
Light is a form of electromagnetic energy that can be shown on a continuum. The wavelengths are measured in micrometers (μm) or nanometers (nm). They range from the ultraviolet to the visible to the near-infrared, mid-infrared and far-infrared. At the lower end of the continuum are X-rays, cosmic rays and ultraviolet (UV) rays. At the far end of the continuum are microwaves, television and radio waves. Visible rays are in the 400 nm (violet) to 750 nm (deep red) range. Visible light refers to the fact that it is the only range on the spectrum that the human eye can detect. Laser energy extends from the shorter waves in the ultraviolet range to the longer waves in the infrared region. Again, the shorter the wavelength (i.e. cosmic, gamma, UVB rays), the greater is the frequency and the more intense the energy.
Unlike the forms of ultraviolet rays (UVA and UVB), laser energy is non-ionizing which means that it does not cause continual tissue exposure and damage. Lasers are safe for human use, as they do not emit harmful ionizing radiation.
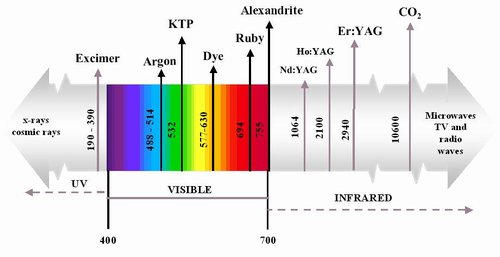
There are three main differences between laser light and ordinary light as following:
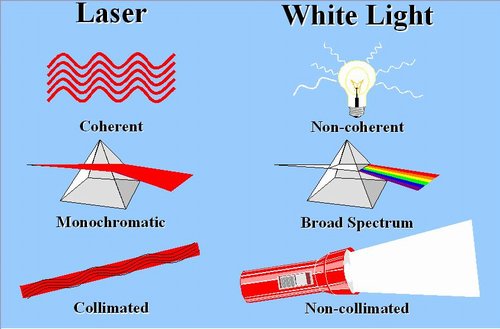
The collimated beams consist of waves that are parallel and do not diverge over great distances, resulting in tight waves of light interpreted as brightness. In contrast, the light emitted from a flashlight is non-collimated, and subject to great divergence. Collimation and low divergence allow the laser to generate a small spot size for precision aim.
The light from a laser is monochromatic and consists of pure colours of light. A light bulb that emits light consisting of a broad spectrum of colours and an emissionof a white light. Lasers are used mainly for their thermal effects. Colour only becomes important in how the generated heat interacts with tissue (i.e. vapourization versus coagulation). However, the fine tuning of colour can be important for the effect of certain lasers such as those used for macular work in ophthalmology and dermatological procedures.
Laser light is described as “coherent”. This means that the waves travel in an orderly, locked fashion in the same direction. The waves that are in phase (coherent) and result in amplification and order. This is important to the amplification process of laser light.
These three qualities give laser light a consistent, intense beam of power with low divergence.
Laser Power – Spontaneous vs Stimulated Emission
The source for light is the atom. Electrons orbit a single atom and the higher the level of energy of the atom, the farther the excited electrons will orbit. If the energy of the atom changes, the electrons must move between the orbital levels around the atom. Each time movement occurs the energy changes. Energy is absorbed if the movement of electrons is outward from the atom. Energy is emitted if the movement of the atoms is downward. The emitted energy takes the form of a photon (or light). When energy is used up, the electrons will return to a resting state.
The electron’s spontaneous decay to resting state is known as spontaneous emission which is a random process that results in diffuse, broad spectrum light being emitted (i.e. a light bulb). (See the diagram below.)
In laser energy, an electron that is in its excited state is further stimulated by another photon of precisely the same colour. This creates decay of the electron, resulting in a release of stored energy which presents as the emission of an identical photon. This stimulated emission results when the stimulating photon (P2 in the diagram below) forces the atom (P1) to release an identical photon from its stored energy. This results in coherent wave patterns created by multiple photons of the same colour.

The previous sections provide a fundamental understanding of how laser energy is produced. The components of how a laser machine produces laser energy will be reviewed in the following section.
Components of a Laser #
Active Medium #
The active medium can be:
1) Solid
- Nd:YAG
- Ho:YAG
- Er:YAG
- Ruby
- Alexandrite
2) Gas
- Carbon Dioxide
- Argon/ Krypton
- Excimers (Excited Dimers)
- Helium Neon
3) Liquid
- Dyes
4) Electronic
- Semiconductor – Diode
- Diode Pulsed Solid State (DPSS)

The active medium contains a host atom and the doping atom. In the above example, the host atom is Yttrium Aluminum Garnet (commonly known as YAG). In an Er:YAG laser the doping atom would be Erbium. Holmium (Ho) and Neodymium (Nd) are other types of YAG lasers. These atoms work together in the stimulated emission process, in that the doping atom’s photons stimulate the photons of the excited host atoms, creating the laser energy (light).

an the rare earth elements: Erbium (Er)? Neodynium (Nd)? Holmium (Ho) be found in the Periodic Table of Elements?
Garnet is a crystal. A Yttrium Aluminum garnet (YAG) is one type of crystal. Can you find Yttrium (Y) and Aluminum (Al)?
Can you find the Ion Lasers (Noble Gases): Argon (Ar), Krypton (Kr), Carbon Dioxide (CO2)?
Excitation Mechanism #
The excitation of atoms is created by an energy source. Lasers receive their energy from one of three sources:
- Direct Current (DC): used in most gas lasers
- Radio Frequency (RF): carbon dioxide lasers
- Optical flash lamps (i.e. Nd:YAG). Some elements are not electrical conductors and must be pumped by another light source such as flash lamps.
Some lasers have a heavy power plug that must be fitted into a specially adapted power outlet (60A 208Vac electrical supply) due to the high-energy output of lasers. Some lasers also come with a water supply adapter that will cool the laser as it is operated. Operating rooms that use these lasers must provide these power outlets.
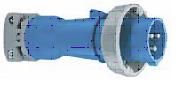
60A 208 Vac electrical plug
Totally Reflective Mirror and Output Coupler #
The totally reflective mirror (mirror at the back) and the output coupler (mirror) at the front of the resonator chamber are what amplify the light produced by stimulated emission. The mirrors reflect the light that is created back on itself, creating an infinite back and forth reflection; the light bounces back and forth at a resonating speed that builds in intensity until the light is sent out the partially transmissive front mirror. The stimulated emission begins the process of light amplification, but it is the process of the resonating chamber that builds the intensity of the amplification and ultimately produces the intense beam of light.
Fire Safety #
Learning Objectives #
At the end of the module the nurse will be able to:
- List the necessary elements to create a fire (fire triangle).
- Describe fire prevention practices in the perioperative setting.
- Describe the necessary actions in the event of a fire in the operating room.
- Describe the different types of fire extinguishers and their uses.
The Fire Triangle #
Fire is an inherent risk in the operating room. Fire in the operating room poses a hazard to the safety of both the patients and health care workers. Perioperative nurses must consider the environmental hazards that exist in the clinical setting and identify any potential sources of injury to patients and staff. Perioperative nurses have a responsibility to follow established hospital policies and protocols in the event of fire.
The Fire Triangle #
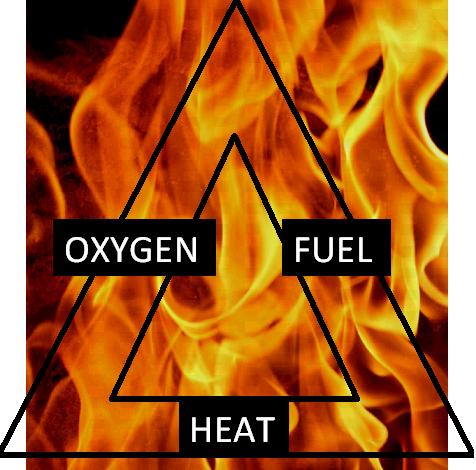
Al three elements must be present. This combination results in a sustained fire.
All three elements are present during operative procedures.
Ignition Sources #
Ignition sources include anything that produces heat and commonly include:
- ESU: Heat is produced by the concentration of the electrical current at the tip of the electrode. The temperature at the cautery tip is several hundred degrees Celsius.
- Laser: Most common cause of airway fires due to ignition of the endotracheal tube. Drapes can also be ignited when the laser beam is accidentally activated.
Less commonly ignition risks in the OR:
- Fibre-optic cord: the temperature at the end of a fibre-optic light cord is well above the ignition temperature of most surgical drapes.
- Light source boxes
- Drills, saws, burrs
- Argon beam coagulators
- Defibrillators
Fuel Sources #
Many things in the perioperative area can be a fuel source, particularly in the presence of oxygen:
- Linens
- Drapes; surgical drapes are used to cover the patient during surgery to form an sterile barrier. Manufacturers of surgical drapes are not subject to fire safety standards (as they are for children’s sleepwear). Drapes are made of a wood-pulp/polyester material, natural fibre or a polypropylene fibre. All drapes will burn in an oxygen-enriched atmosphere.
- Supplies
- Prep solution; many contain alcohol
- Gauze
- Clothes
- Patient’s body hair
- Caps/hats/hoods
- Shoe covers
Primary Oxidizers #
- Oxygen
- Nitrous oxide
Oxygen Facts
- Oxygen is essential for combustion.
- An oxygen level above 21% should be considered an oxygen-enriched environment.
- Increased levels of oxygen will allow substances to burn with increased intensity.
Fire Prevention in the OR #
Perioperative nurses can prevent fires in the operating room by practicing the following:
When using ESU #
- Keep the ESU cautery tip in a holster when it is not in use.
- Use the lowest possible power setting.
- Inspect the active electrode for integrity before use and ensure it is free of eschar.
- Do not use ESU in the presence of flammable solutions.
- Do not use ESU in the presence of oxygen or nitrous oxide.
Lasers #
- Use a laser-specific endotracheal tube.
- Do not use combustible lubricants, liquids or ointments in conjunction with laser.
- Prevent pooling of skin prep solution.
- Do not use uncuffed standard endotracheal tubes in the presence of a laser or the ESU.
- Ensure that water and the correct type of fire extinguisher available.
Light Sources #
- Turn all light sources to “off” or “standby” after all connections have been made; be ready to turn them on again just prior to use.
- Place light sources away from flammable materials/items.
- Do not place a light cable that is connected to a light source on drapes or sponges.
Power Tools/Drills/Burrs #
- Instruments/equipment that move rapidly generate intense heat.
- A slow drip of saline onto a moving drill or burr helps prevent heat build-up.
Electrical Equipment #
- Ensure that all electrical equipment is regularly checked by the biomedical department.
- Check and document the biomedical inspection numbers on the intraoperative record.
- Do not use equipment with frayed or damaged cords or plugs.
- Avoid using extension cords.
Prep #
- Use flammable solutions with caution.
- Do not allow solutions to pool around or beneath patients.
- After prepping, allow the prep to dry and the fumes to evaporate as wet prep and fumes trapped beneath drapes can ignite.
- Do not allow drapes that remain in contact with the patient to absorb flammable prep solutions.
Methyl Methacrylate (bone cement) #
- Methyl methacrylate is a reactive and flammable chemical and can be a fire and explosion hazard under the right conditions.
- Always mix bone cement in a vented vacuum system.
Patient’s Tissue and Body Hair #
- The patient’s own body can be a fuel source.
- Use a water-based jelly/lubricant to coat any of the patient’s body hair that is in close proximity to an ignition source.
Patient’s Intestinal Gases #
- Intestinal gases are flammable.
- Use suction during colorectal surgery to remove any intestinal gases.
Oxidizers (oxygen or nitrous oxide) #
- Ensure that all anesthetic circuits are free of leaks.
- Use suction to help evacuate any accumulation of oxygen in body cavities such as the mouth or chest cavity.
- Do not use laser or ESU in proximity to oxygen.
- Do not allow oxygen to accumulate under the drapes. “Tent” the drapes when nasal cannulas or masks are used for delivering oxygen to the patient.
Other Considerations #
- Use water-soluble substances instead of petroleum-based ointments.
- Use OR drapes that are fire-resistant.
- Know the location of fire extinguishers and be familiar with their operation.
- Know the location of fire alarms, exits and the main medical gas turn-off points.
- Know all department policy and protocols for evacuation.
- Review fire safety procedures on an annual basis with all staff members.
Fire Management #
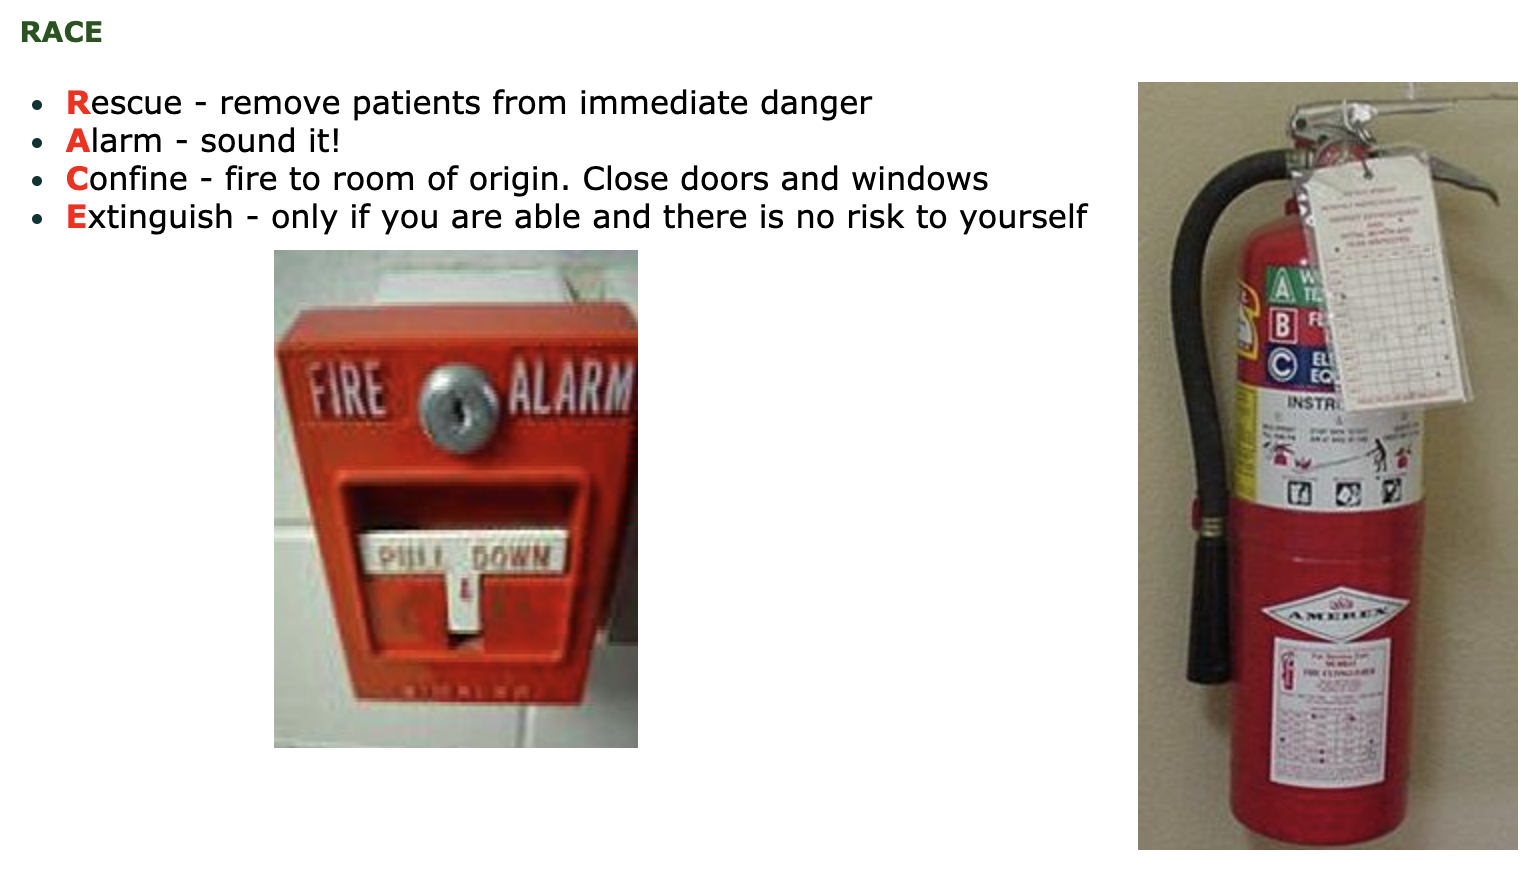
Airway Fires #
What you will see:
- Black smoke may be seen coming from the patient’s mouth as well as the expiratory limb of the circuit.
What you should do:
- Believe your eyes! Act quickly!
- Inform the anesthesiologist, who will remove the endotracheal tube from the patient’s mouth. The nurse may need to assist.
- The anesthesiologist will examine the patient’s airway to ensure that all burning matter is removed.
- The anesthesiologist will then attempt to re-establish an airway and the nurse must be ready to assist.
Drape Fires #
- Immediately remove the drape from the patient, cover and smother the fire.
- Water or saline thrown onto a water repellent surface may repel the liquid rather than extinguish the flames.
- If a staff member’s gown catches fire, they must drop to the floor and roll.
Hospital Fires
- Do not start a procedure if you hear the fire alarm sounding in the building. Find out the location of the fire.
- Be prepared to evacuate your patient. Have an ambu-bag and oxygen available for transport.
In The Event of a Fire #
In the event of a fire in the operating room, each team member has specific responsibilities. It is important for all staff members to know the facility policy regarding fire protocols. It is also important to know what the fire alert system sounds like at individual facilities. When a fire alarm sounds, the location of the fire must be determined to know if there is any risk in proceeding with the surgical procedure.
The Circulating Nurse #
- Activate fire alarm and call the fire code.
- Extinguish small fires or douse them with liquid, if appropriate.
- Remove burning material from the patient or sterile field and extinguish it on the floor.
- Provide needed supplies to the anesthesiologist and scrub personnel, as required.
- In collaboration with the team, determine whether to turn off the medical gas shut off valve.
- If the fire is electrical, immediately unplug the equipment.
- Be aware of the safest escape route and obtain a stretcher in preparation to move the patient.
The Scrub Nurse #
- Remove patient materials that may be on fire and help extinguish the fire.
- Obtain sterile towels or covers for the surgical site.
- In the event of an evacuation, gather a minimum number of appropriate instruments into a sterile basin for transport with the patient.
The Surgeon #
- Control bleeding and prepare the patient for evacuation.
- Place sterile towels over the surgical site.
- If the patient is not in immediate danger, conclude procedure as quickly as possible.
- Remove the patient from the area, if necessary.
The Anesthesiologist #
- Shut off the flow of oxygen/nitrous oxide to the patient and use an ambu-bag to maintain patient’s breathing.
- Turn off medical gas shut-off valves.
- Disconnect all electrically-powered equipment on the anesthetic machine.
- Disconnect leads and lines.
- Maintain the patient’s anesthesia during transport.
Types of Evacuation #
- Horizontal evacuation: first mode of response; move patients down the corridor and through at least one set of fire doors to a safe area.
- Vertical evacuation: move patients down the stairs to a lower level of safety and ultimately out of the building.
Fire Extinguishers #
Remember – PASS #
- Pull the pin
- Aim the nozzle at the base of the fire
- Squeeze the handle
- Sweep the stream over the base of the fire
Class A Extinguishers #
Class A extinguishers will extinguish fires of ordinary combustibles (wood and paper). The numerical rating for this class of fire extinguisher relates to the amount of water it contains and the amount of fire it will extinguish.

Class B Extinguishers #
Class B extinguishers should be used on fires involving flammable liquids (grease, gasoline, oil etc). The numerical rating for this class of fire extinguisher identifies the approximate number of square feet of a flammable liquid fire that a non-expert person can be expected to extinguish.
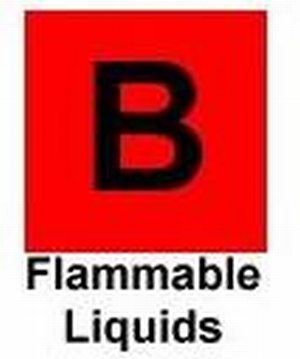
Class C Extinguishers #
Class C extinguishers are suitable for use on electrically-energized fires. This class of fire extinguisher does not have a numerical rating. The presence of the letter “C” indicates that the extinguishing agent is non-conductive.

Multi-purpose Extinguishers #
Many extinguishers available today can be used on different types of fires and will be labelled with more than one designation (e.g. A-B, B-C, A-B-C). Ensure that multi-purpose extinguishers are properly labelled.
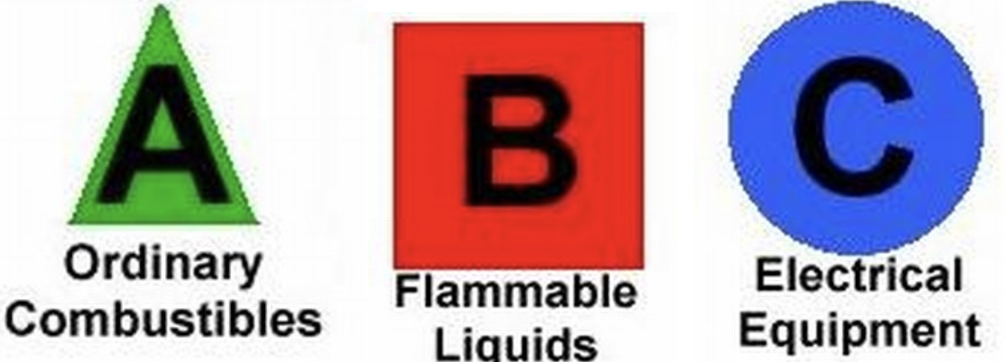
Latex Allergy #
Learning Objectives #
At the end of the unit the nurse will be able to:
- Define a latex allergy and the causative agents.
- List the allergic reactions that may occur.
- Describe the practices for latex allergy patients undergoing a surgical procedure.

What is a Latex Allergy? #
Latex #
“Latex” refers to natural rubber latex, the product manufactured from a milky fluid acquired by tapping the rubber tree Havea brasiliensis.

Natural rubber latex is found in more than 40,000 industrial products and approximately 400 medical products.
Allergic reactions are most often triggered by dipped latex products. These include gloves, balloons and condoms. In rare instances, people who are allergic to latex may react to rubber bands, erasers, elastic in clothing and pacifiers. Several synthetic materials may be referred to as latex (e.g. butyl, petroleum-based materials) but they do not contain the proteins that cause allergic reactions.
Latex Gloves #
During the manufacture of latex gloves, powder is applied as cornstarch slurry. Water-soluble proteins leach from the surface of the glove onto the cornstarch particles. This dry glove powder acts as a vector, carrying latex proteins from the glove into the environment. Aerosolization can contaminate a facilities environment with latex allergens.
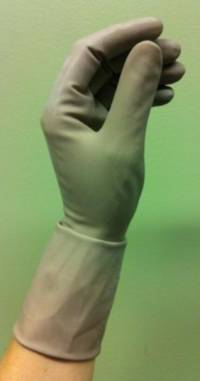
In 1987 blood and body fluid precautions (universal precautions) were introduced to protect against diseases such as HIV and Hepatitis C. This initiative lead to a twenty fold increase in the use of medical gloves. This was one of several factors that contributed to making powdered, latex gloves becoming the most common cause of latex sensitivity.
Did You Know? #
- Oil-based hand creams can cause latex gloves to deteriorate.
- It is important to always wash your hands after wearing gloves to ensure latex proteins are removed from your hands.
- Hypo-allergenic does not mean latex-free.
- Most hospitals now routinely use powder-free latex gloves.
- It is not necessary to use latex gloves for all tasks. Consider alternatives for the required task before donning gloves.
Latex Allergy #
“Latex allergy” is a broad term often used to describe various health problems associated with the use of rubber products. A latex allergy is a reaction to certain proteins in latex rubber. The amount of latex exposure needed to produce sensitization or an allergic reaction is unknown. However, increasing exposure to latex proteins increases the risk of developing allergic symptoms.
Sensitivity is an immunological memory to the specific latex proteins. An individual with a sensitivity may be asymptomatic. Sensitivity to latex is more common than an actual allergy. However, an individual with latex sensitivity is at risk of developing a life-threatening reaction.
Allergy is the demonstrated expression of the sensitivity, e.g. hives, rhinitis, conjunctivitis and anaphylaxis.
A demonstrated expression of the sensitivity to latex proteins in known as an allergy (e.g. hives, rhinitis, conjunctivitis and anaphylaxis).
Types of Reactions #
There are three types of allergic reactions:
- Irritant
- Delayed hypersensitivity – Type IV
- Immediate hypersensitivity – Type I
Irritant Reactions #
An irritant reaction is a contact dermatitis that does not involve the immune system.
Causes:
- Hand washing
- Insufficient rinsing
- Scrubbing
- Antiseptics
- Glove powder
Signs and symptoms:
- Dry,crusty, hard bumps
- Sore and horizontal cracks
- Itchy dermatitis

Delayed Hypersensitivity – Type IV Reactions #
Delayed hypersensitivity is a T-cell mediated immune response, including symptoms of allergic contact dermatitis that spread beyond the area of contact. There is a delayed reaction of eighteen to twenty-four hours, peaking at forty-eight hours.
Causes:
- Exposure to chemicals used in latex manufacturing.
Signs and symptoms:
- Red, raised, palpable bumps and sores
- Cracks may extend up the forearm
- Appears several hours after glove contact and may bepresent for many days
- Each exposure may lead to increased sensitization and a more severe reaction
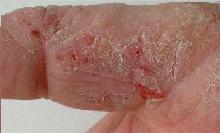
Immediate Hypersensitivity – Type I Reactions #
Immediate hypersensitivity is an immunoglobulin (IgE)-mediated response to one or more specific proteins (antigens) in natural rubber latex. There is a rapid introduction of latex antigens into the vascular circulation causing anti-latex IgE antibodies to stimulate mast cell proliferation and histamine release. There is usually an onset of anaphylactic symptoms within minutes.
Causes:
- Exposure to proteins in latex on glove surface and/or bound to powder
- Particles suspended in the air
- Particles that have settled on objects or are transferred by touch
Signs and symptoms:
- Wheal and flare response
- Itchy redness on the skin, under the glove
- Occurs within minutes
- Fades away rapidly after removing the glove
- Facial swelling
- Rhinitis
- Conjunctivitis
- Urticaria
- Respiratory distress: laryngeal edema/bronchospasm
- Asthma
- Rare cases: anaphylactic shock leading to death

Prevalence:
Studies indicate that IgE-mediated allergy (Type I hypersensitivity) affects from 0.8% to 6.5% of the general population. It is responsible for 70% of anaphylactic reactions occurring in anesthetized children with spina bifida.
The sensitization rate for health care workers with significant exposure to latex is 10% to 17%.
Interventions:
All individuals presenting with natural rubber latex sensitivity should be treated as if they are allergic to latex as the possibility of a reaction always exists.
Staff members with a suspected latex allergy should be tested by the hospital Employee Health staff to determine if they do have a latex allergy.
Risk Factors #
Population at risk #
People who are at risk of developing a latex allergy include:
- People with a history of multiple surgeries, beginning at an early age (e.g. spina bifida patients or those with urinary tract malformations).
- Individuals with a history of Type I reactions or multiple environmental allergies (e.g. history of asthma, eczema, rhinitis).
- Those who have Type I allergic reactions to various foods as follows:

- Those with a positive skin patch test to natural rubber latex.
- People at risk of developing latex sensitization (e.g. health care workers, housekeepers, hairdressers, people who work in industries that manufacture latex products).
- Latex allergy crosses racial and ethnic backgrounds and can affect males and females at any time during the lifespan.
Associated cross reactivity #
Certain plant products contain the same allergy producing proteins found in natural rubber latex. People who are allergic to these fruits can develop a previously undiagnosed reaction to latex. After years of latex exposure and latex sensitivity, the individual may develop fruit allergies.
Dual latex sensitivity is determined by common antigens or cross-reacting antigens which are yet to be determined.
Exposure #
Systemic exposure to latex proteins (antigens) can occur through a number of means:
- Mucous membranes
- Ingestion
- Inhalation
- Intravenous
- Cutaneous
Severe allergic reactions can occur as a result of proteins coming in contact with mucous memberanes of the mouth, vagina, urethra, rectum or internal tissues during surgery.
Examples include:
- Intraoperative anaphylaxis may occur when latex surgical gloves come in contact with the peritoneum or internal organs.
- Powdered surgical gloves are easier to don. However, the use of powdered latex gloves in proximity to a sensitized individual can produce an allergic reaction. This is due to the aerosolization of latex proteins are bound to the glove starch powder during the manufacturing process. The proteins are expelled into the air when the gloves are opened, donned or removed.
- Inhalation of latex proteins can lead to bronchospasm or laryngeal edema.
- Facilities should limit or eliminate the use of powdered gloves for patient safety and the safety of staff; repeated exposure to the powder seemed to increase the chance of developing latex sensitivities.
Nursing Considerations #
Establishing a latex safe environment #
- The only effective preventative strategy to latex allergies is latex avoidance. Latex avoidance would prevent the initial sensitization of non-sensitive people and the potential development of allergic reactions.
- Thorough product evaluation must be done prior to product selection and purchase for perioperative practice settings.
- All medical devices containing natural rubber latex should have a warning on the packaging. In Canada, the Canadian Standards Association (CSA) has developed recommendations that hospitals purchase non-latex items. In addition, manufacturers are requested to provide product content information if a latex warning label is not on an item.

- A latex-free cart is helpful for consolidating all latex-free items in one area for ease of use.
Be Alert #
Carefully observe patients for signs and symptoms of latex allergy. These may vary depending on their level of consciousness:
Conscious Patients
- Itchy eyes
- Generalized pruritus
- Shortness of breath
- Wheezing
- Nausea
- Edema
- Vomiting
- Abdominal cramps
- Diarrhea
- Faintness
- Feeling of impending doom
Unconscious/Sedated Patients
- Facial edema
- Urticaria
- Rash
- Skin flushing
- Bronchospasm
- Laryngeal edema
- Generalized edema
- Hypotension
- Tachycardia
- Cardiac arrest
Preoperative Care #
- Identify the patient’s risk factors for latex allergy and communicate the information to the team.
- Notify the OR about patients with potential or known latex allergies (as soon as possible to prevent the inadvertant contamination of the OR due to opening packages of latex items).
- Schedule the procedures for patients with latex allergies as the as the first case of the day to ensure that aerosolized latex is at a minimum. (Note: This is particularly important if the facility uses powdered latex gloves as the risk for aerosolization is increased.)
- Educate the patient about the latex-safe plan.
- Plan for a latex-safe environment (i.e. remove all latex items from the OR).
- Substitute latex-free products for all latex-containing items on the surgeon’s preference card.
Intraoperative Care #
- Mark the OR doors with “Latex Precautions” signs.
- Mark the patient’s stretcher.
- Provide the patient with a “latex allergy” ID band.
- Restrict traffic flow in the room.
- Place the latex-free cart in the room.
- Use latex-free products (e.g. IV tubing, catheter, B.P. cuffs and tourniquets, etc).
- Monitor for anaphylactic reactions throughout the procedure (Note: Reactions can occur immediately or up to forty minutes after exposure).
- Inform Post Anesthetic Care Unit (PACU) staff about the patient’s latex allergy.
Post-operative Care #
- Continue latex-safe plan
- Ensure latex-free supplies are available to go with the patient, as needed.
- Ensure the latex-free resuscitation bag, oxygen mask, tubing and supplies go with the patient to PACU.
- Re-stock the supplies used from the latex-free cart.
Patient Safety – Communication #
Learning Objectives #
At the end of the unit the nurse will be able to:
- Describe the purpose of the Surgical Safety Checklist.
- Describe the role of the perioperative nurse in the Surgical Safety Checklist process.
- Identify other forms of communication and documentation that occur in the perioperative setting.
The WHO Surgical Safety Checklist #
The World Health Organization (WHO) has identified that:
- 11% of the global disease burden is attributed to surgically-treatable conditions.
- Of the 234 million operations performed annually throughout the world, there is a 0.4%-0.8% perioperative death rate and a 3%-17% complication rate in high income countries (and probably much higher in low income countries).
- At least half of all surgical complications are avoidable.
- Teamwork can reduce the number of adverse events.
To promote patient safety, the WHO conducted a study that would highlight the safety issues related to surgical morbidity and mortality and subsequently published a set of safety guidelines. A surgical Safety Checklist (SSCL) was developed that would target the six key safety issues that were identified in an attempt to reduce the number of surgical deaths. It was hoped that the study would demonstrate a shift to a “culture of safety” in the operating room. The development of the checklist was based on the idea that errors are reduced or eliminated when all safety checks are in place, similar to the safety checklists that occur in the airline industry. The WHO initiative was conducted in eight countries that represented the diverse socio-economic populations throughout the world. The six safety indicators identified were:
- Objective evaluation of airway status prior to administration of anesthesia
- Use of pulse oximetry during anesthesia
- Placement of two large bore IV’s if >500cc of blood loss was anticipated
- Administration of prophylactic antibiotics sixty minutes before skin incision (where previous infection did not exist)
- Prior to the skin incision, verbal confirmation of: the patient identity, surgical procedure to be performed, allergy status and surgical site
- Sponge, needle and instrument counts performed prior to the end of surgery
The SSCL was used in a study of over 7,000 patients. Complication and death rates were tracked for 3,733 surgical patients (in eight hospitals), prior to implementing the SSCL and 3,955 patients were tracked post-implementation. The results were reported as follows:
- The rates of complications went from 11% (pre-intervention) to 7% (post-intervention)
- High income countries: 10.3%- 7.1%
- Low income countries: 11.7-6.8%
- The rates of death went from 1.5% (pre-intervention) to 0.8% (post-intervention)
- High income countries: 0.9%-0.6%
- Low income countries: 2.1%-1.0% (50% decrease)
The study was shown to reduce the number of post-operative deaths and complication rates by more than one third! The simplicity of the SSCL and its irrefutable results has made the utilization of a SSCL mandatory in most centers across Canada.
Components of the Surgical Safety Checklist #
The Surgical Safety Checklist is divided into three parts, which represent three distinct time periods during the patient’s surgical procedure:
- Before the induction of anesthesia, also referred to as the “Sign In” or “Briefing”
- Before skin incision, also referred to as the “Time Out” or “Surgical Pause”
- Before transfer from the OR, also referred to as the “Sign Out” or “Debriefing”
It is important to address each of the components of the SSCL prior to beginnng any phase of the surgical procedure, to prevent errors. A checklist coordinator (ideally, the surgeon) will ask the questions at the appropriate time. However, it is everyone’s responsibility to ensure that the process is started and completed and to be attentive during this time. In each phase, the checklist coordinator confirms that each step has been completed with all members of the surgical team before proceeding further. When all the steps have been completed to ensure the patient’s safety, the team may continue with the procedure.
Click on the following link to the WHO website to view the WHO Surgical Safety Checklist.
The WHO recommends against removing any items from the checklist, but items may be added according to the individual requirements of the hospital. The following is an example of an SSCL for Vancouver Coastal Health (VCH) hospitals and St. Paul’s Hospital (PHC): VCH Surgical Safety Checklist and PHC Surgical Safety Checklist.
The following is a video link demonstrating how the Surgical Safety Checklist has been implemented at one facility: SSCL demonstration
The SSCL is a tool designed to assist the surgical team to reduce any surgical complications asssociated with the surgical procedure, and to ultimately provide safe and comprehensive care to the patient. The SSCL provides a consistent approach to patient safety in the operating room, and also maintains a practice culture that values the provision of safe patient care through communication and teamwork. All members of the surgical team play an important role in providing safe care during the process of surgery which has many potential safety hazards. All members of the surgical team need to be aware of the patient’s surgical care plan, the unique needs of the patient and any potential complications that may arise.
Communication #
It is essential that important patient information is communicated to all members of the perioperative team throughout every phase of the patient’s surgical experience (preoperative, intraoperative, and post-operative). Although this is not a comprehensive list, some methods of communication that are utilized in the perioperative setting include:
- DocumentationClear, concise, accurate, and legible charting is essential.
- If information/actions/assessments are not documented, it will be assumed that they were done.
- Use approved abbreviations only.
- Examples of documentation include: preoperative checklist, introperative record, surgical consents, blood and blood product consents, vital signs chart, flowsheets, implant record, specimen forms.
During the full-time clinical Program, students will be given instruction and opportunities for documentation. Professional responsibility and legal issues regarding documentation will be discussed.
- Equipment DocumentationThe use of all equipment must be documented including: equipment number, settings, etc.
Equipment used in the perioperative setting will be discussed in other units (ESU, laser, etc.) During the full-time clinical Program, students will learn how to operate equipment and how to document accordingly.
- Medication DocumentationAll medications given to the patient must be documented on the appropriate patient record (i.e. operative record or medication administration record). This includes medications used on the sterile field. The seven “R’s” (rights) must be utilized for all medication adminstration as follows:
- Right patient
- Right medication
- Right dose
- Right route
- Right time
- Right documentation
- Right reason
Handover reportingHandover reporting can occur:
- Between the preoperative nurse and the perioperative nurse
- At change of shift or (break) relief between the circulating and/ or scrub nurse
- Between the perioperative nurse and the post-operative recovery room nurse or ICU/CCU/CSICU/ER nurse
- To a surgeon, resident or anesthesiologist (see below in pagers/phones section)
Review an the example of what to include in a verbal or written Handover report (between two circulating nurses & between a circulating nurse and PACU nurse).
- Pagers/ PhonesTaking messages for (or from) a physician requires attentive listening, attention to detail and accurate recording.
- Ask for clarification or for the message to be repeated to ensure accuracy.
- It is helpful to use an ISBAR form of communication to describe the situation to ensure that patient information is relayed correctly, succinctly and thoroughly. ISBAR stands for:
- Identify yourself
- Situation
- Background information
- Assessment findings
- Recommendation and/or Requests